Making a trading Gameboy: A pocket exchange and algo trading platform
So in a nutshell I made this:
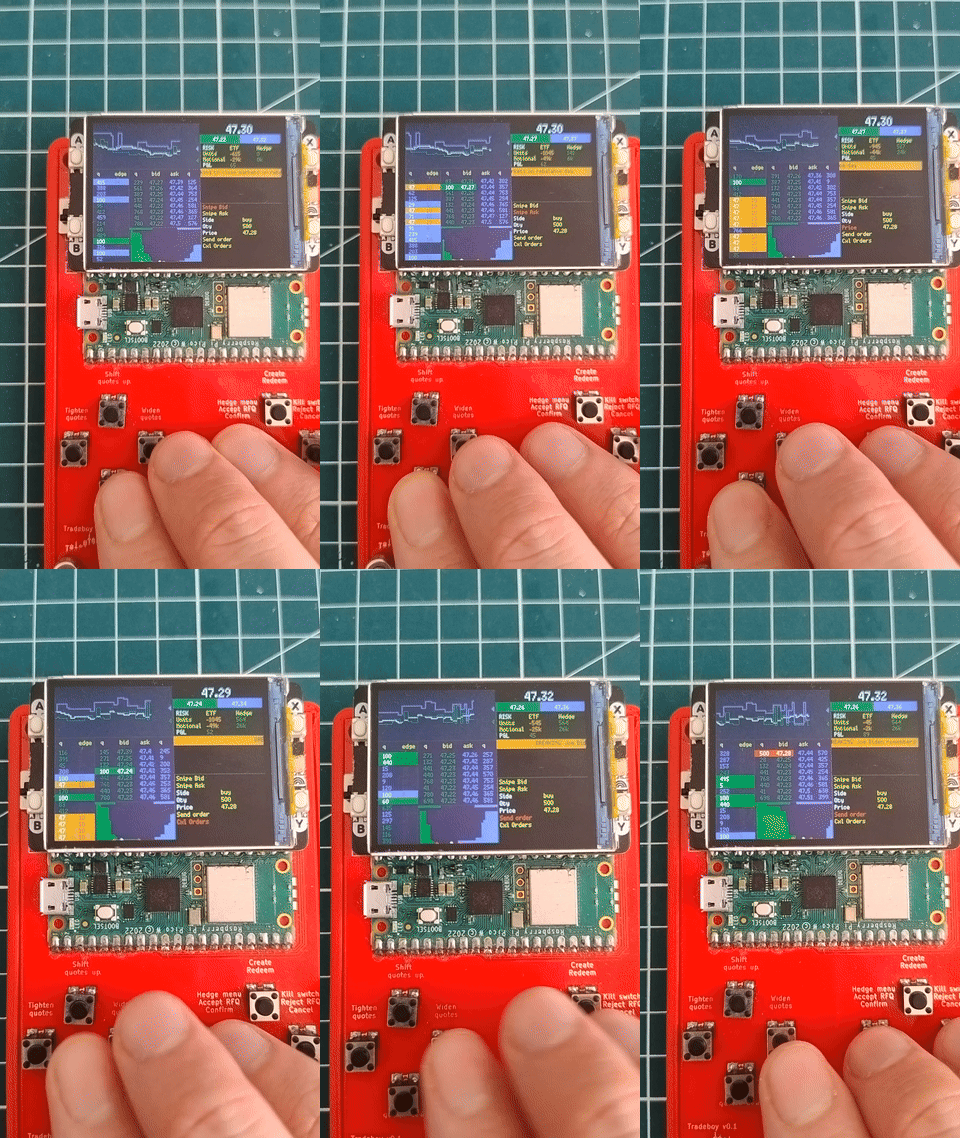
The story
I didn't wake up one day thinking I'd make a trading Gameboy.
It all came about gradually. Some might say I fell into a rabbit hole.
While it's satisfying to create something, I took the most pleasure in learning new things and gradually solving new problems.
This post is to share much of that I have learned.
From displaying a price...
My kid had a Raspberry Pi and he loved it.
Debian came pre-installed with a version of minecraft, and he really enjoyed having a tiny single-board computer with dangling wires. Unfortunately, the bare-bones setup was also a weakness and we ended up stepping on the HDMI connector and rendering the board unusable.
One day, he asked if I could get him a replacement. Upon checking the Raspberry Pi website, I came across the Raspberry Pi Pico microcontroller and a basic electronic kit with buttons, LEDs, and a two-line display which seemed more appropriate for his age.
Unlike the Raspberry Pi computer, the Pico is a microcontroller. Mostly this means it's not running an operating system and instead can run simple code. They are also typically less powerful with only 256kb of RAM instead of Gigabytes for the bigger brother, and have a lower clock speed.
However, this also means the controller starts immediately running your code upon power up, and it does not have to share resources to maintain an underlying system. This results in low power consumption, making them appropriate for battery-powered use cases.
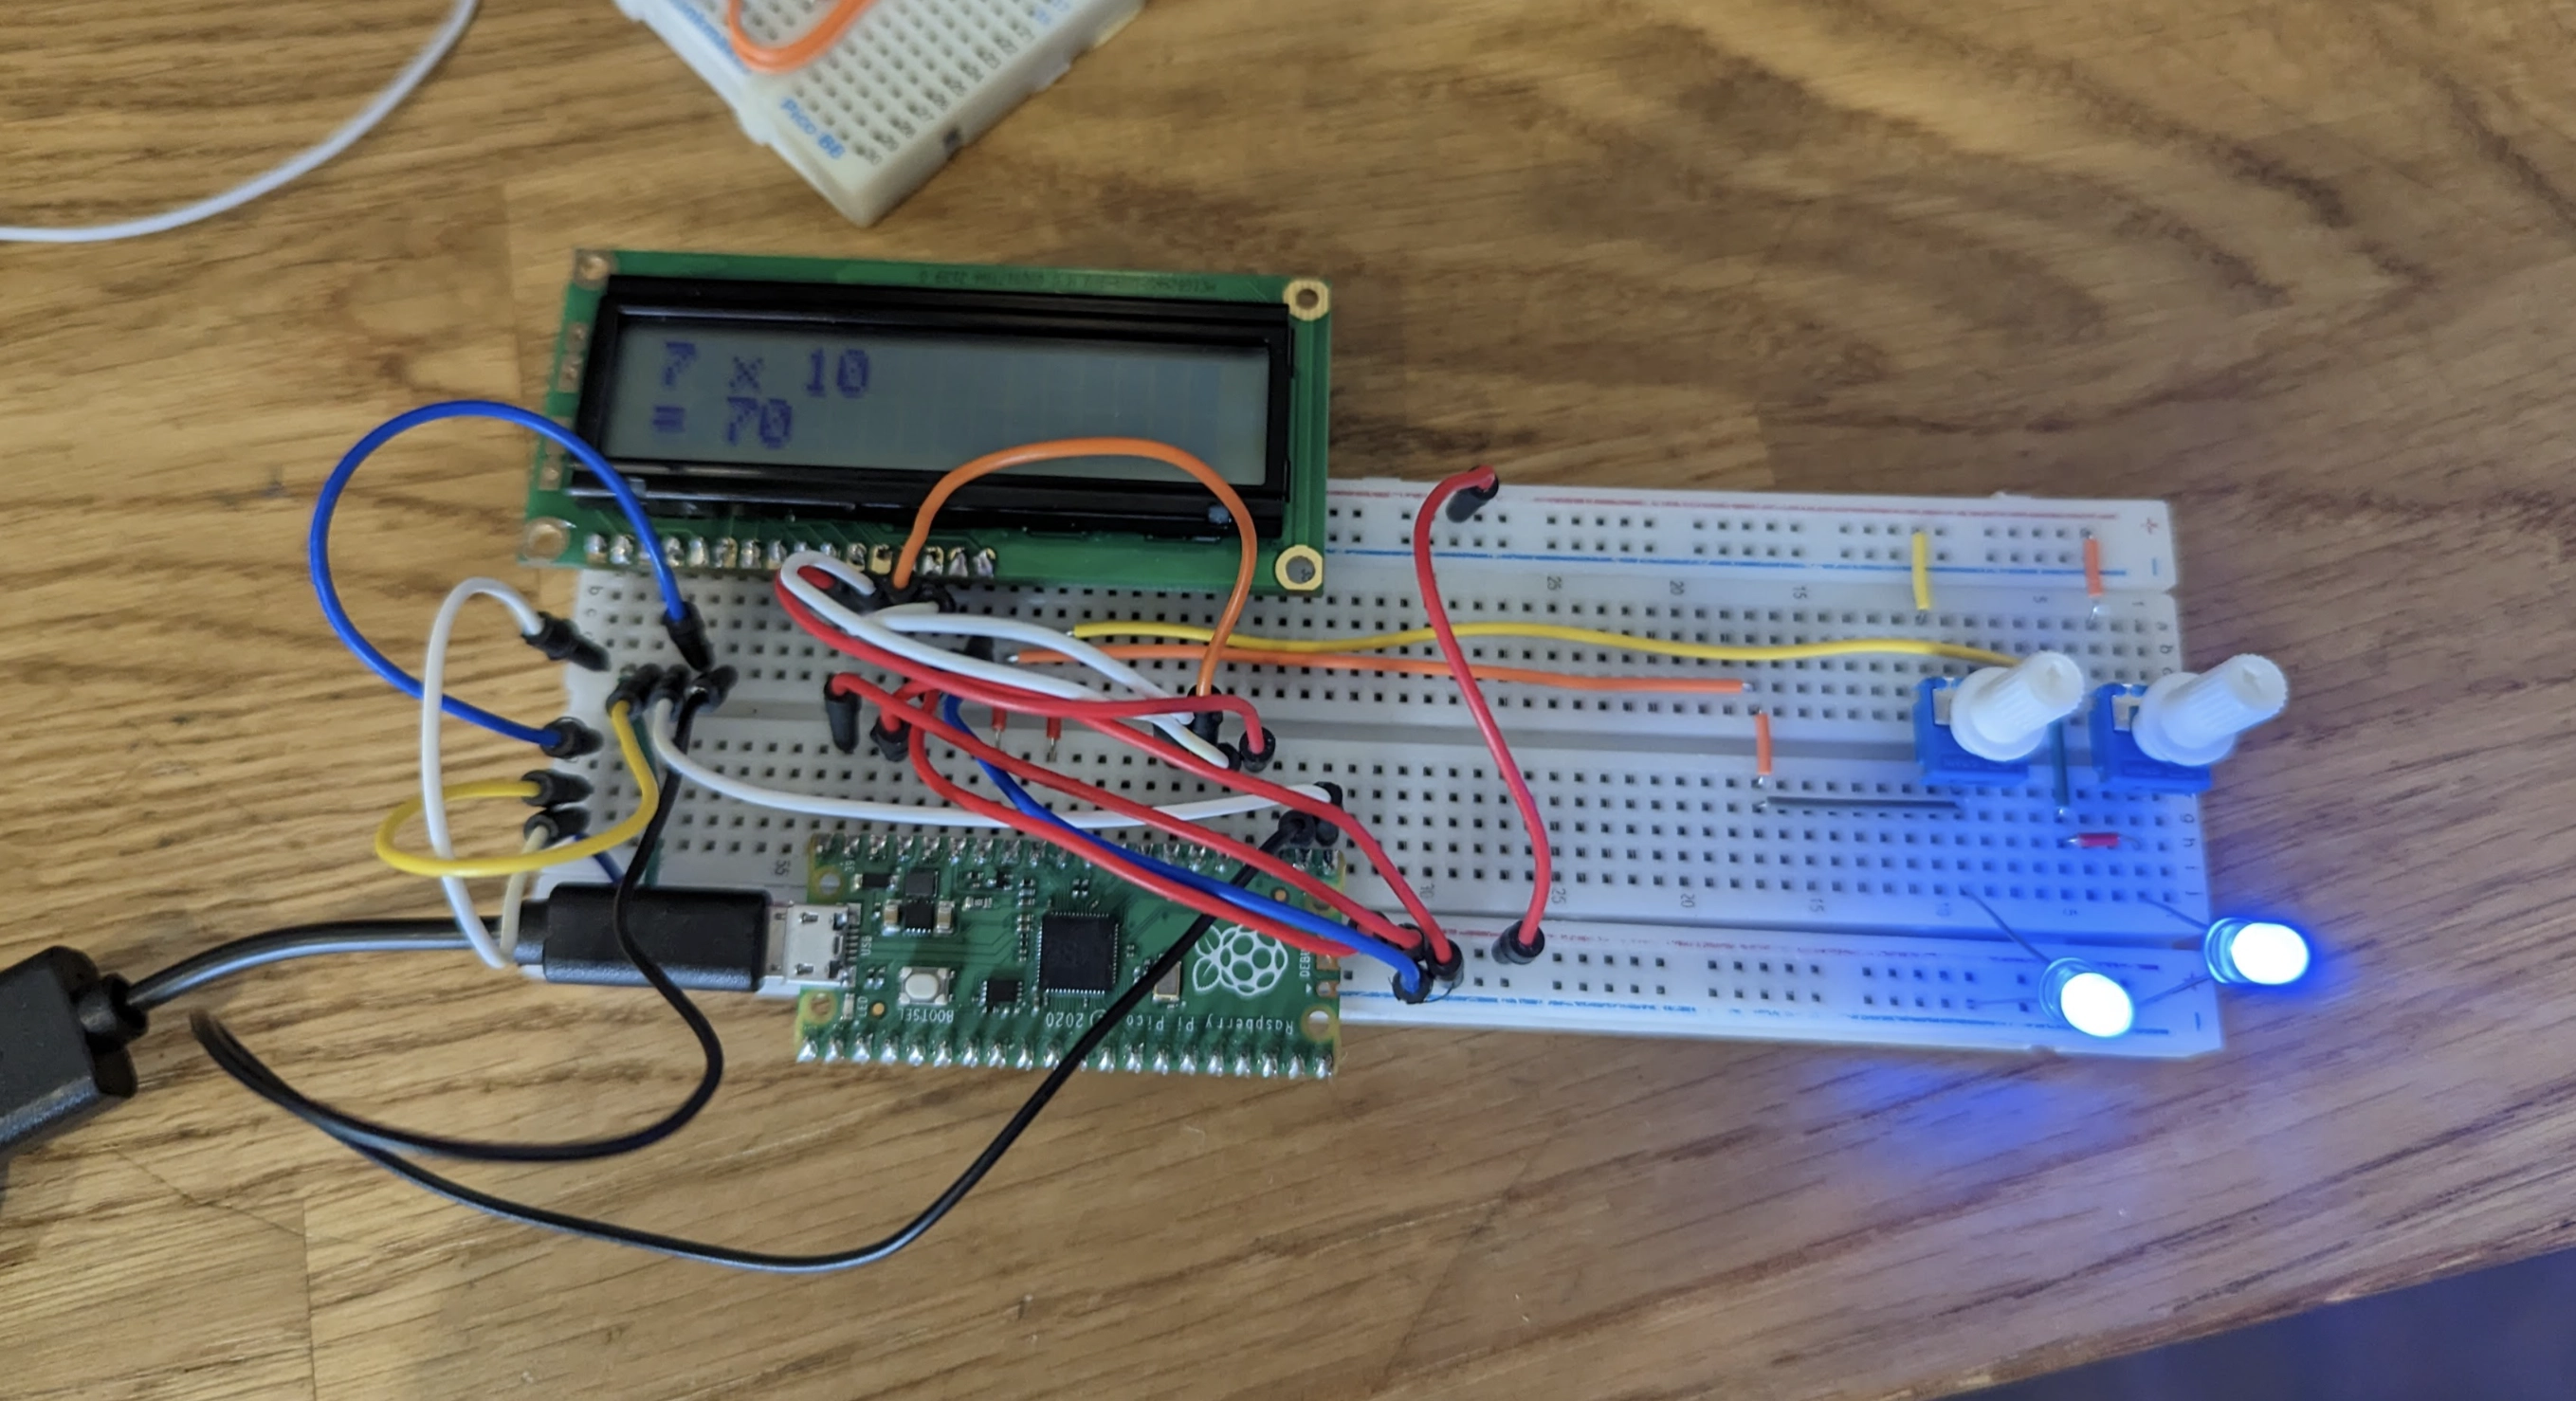
After blinking a few coloured LEDs, we found that we could use potentiometers to control how much electricity would go through the circuit. We could then read this value from a screen. With some tinkering, we made a calculator which would multiply two numbers which are set using the potentiometer:
This was a pretty cool object to bring to school for a demo, and both of us were pretty satisfied. But it then occurred to me that we could do so much more with these, particularly as I found that some versions of the Pico microcontroller contained a wireless chip.
So, as someone deeply interested in finance, I knew that technically nothing could stop me from connecting to, say, an API and then display stock prices on the screen. And that's what I ended up doing with the Raspberry Pi Pico, and a matrix of LEDs:
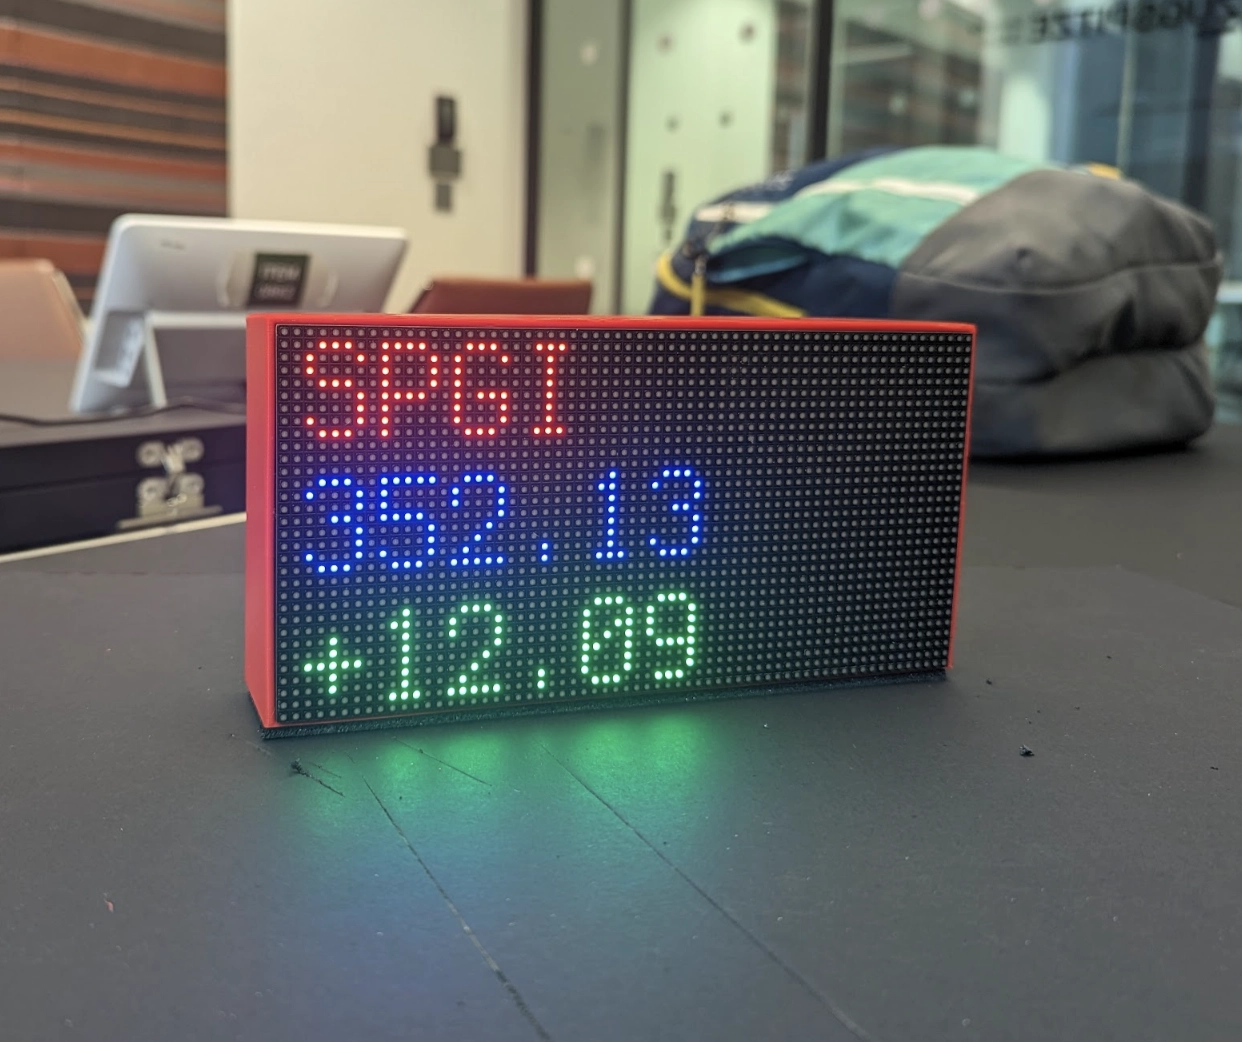
There were a few variations of this idea with train times and so on, but the main concept was there. It then occurred to me that simply looking at a price may not be as interesting, so I started experimenting with charts instead.
This meant using a different display, able to render more details. I found one called the Pimoroni Pico Display Pack 2.0, which came with a lot of benefits for my use case.
- First, it included a socket, which means one can simply fit the microcontroller to the back of the display and not worry with wires.
-
Second, it came with 4 built-in buttons which also simplifies wiring.
-
Lastly, it has a pretty robust library which allows you to display primitives on a screen such as text, lines, squares, circles, polygons, etc.
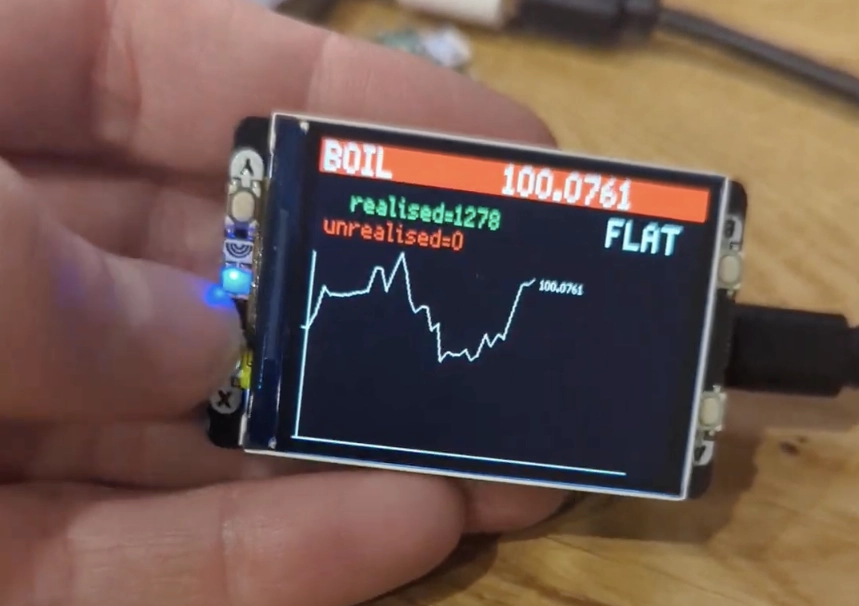
Above I used the buttons to allow the player to take a long or short position in the underlying. However, I quickly found the game uninteresting because it was purely based on luck: Watch a line on the screen and go long/short/flat.
I knew I wanted to gamify this, but had to find a different model to make it enjoyable.
...To making markets
It then occurred to me that a market-making game would be more interesting.
When market-making, you are quoting on both exchanges and over the counter, hedging in the underlying market and taking/managing risk. A large difference between market making and the previous game is that in market making, you are constantly quoting both sides, and other participants come and trade against you.
But you don't decide whether to buy or sell, your counterparties do. However, you can then decide what to do with this position, for example hedge it immediately, warehouse it, etc.
One particularly satisfying dynamic was to offset the flow: Get a position through someone hitting your quotes and shortly after receive an opposite trade which closes this position. While you could have closed the position yourself, waiting for passive flow instead means you don't cross the bid-ask spread and maximise your margin.
It quickly dawned on me that four buttons would not be sufficient. This led me to the rabbit hole of 3D printing. I won't go into too much detail here, but I bought a Prusa Mini +, some calipers, and after some measurements, a lot of trial and error, and a lousy soldering job, I ended up with this.
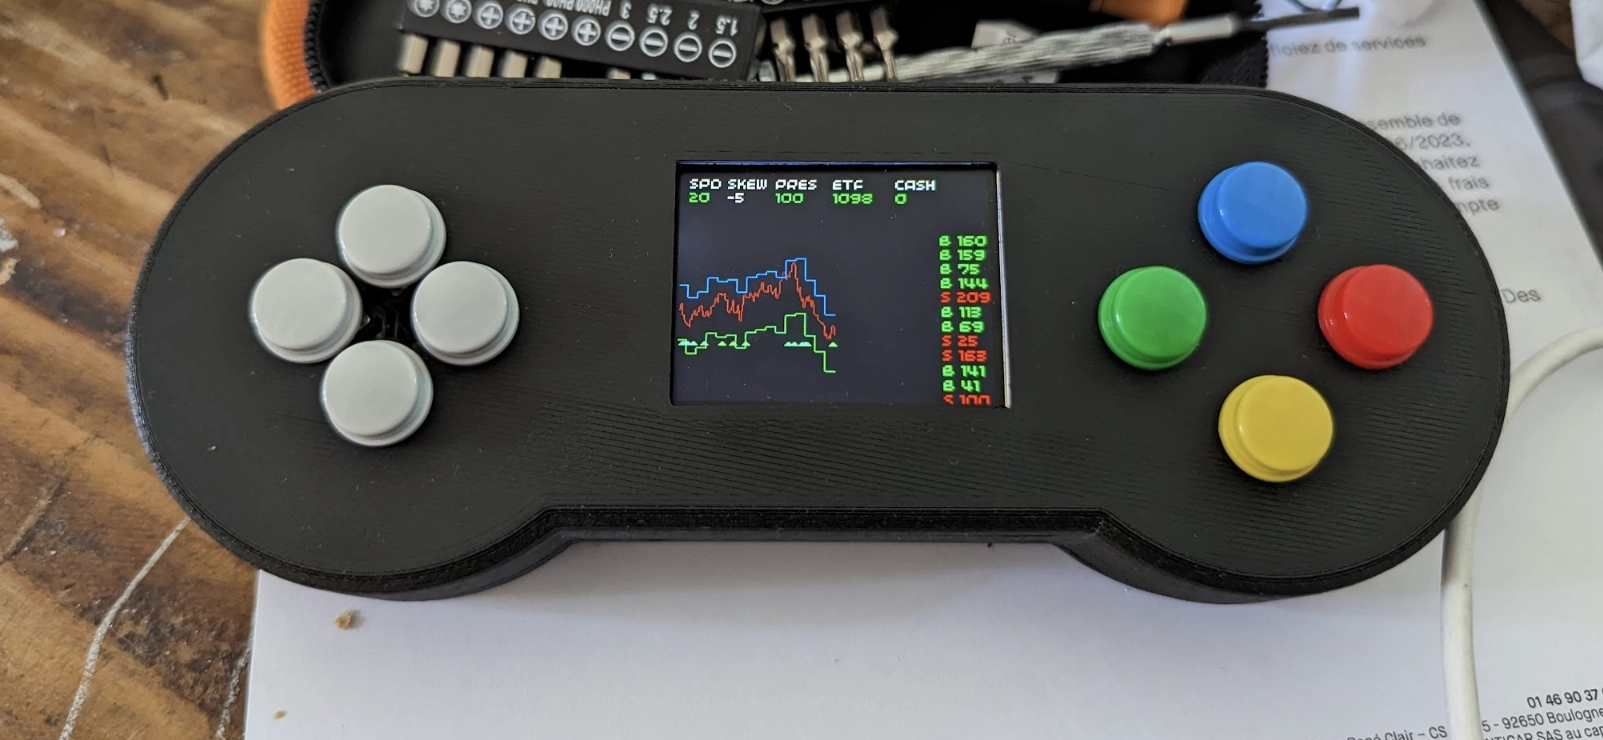
Game on!
In this game, there is a red line representing the fair value, and your bid and offer prices in green and blue. You can control your quotes by increasing or decreasing the spread, and skewing your quotes up and down to attract more flow on the side you're axed on (where you have a preference or bias towards buying or selling).
Say you just bought a lot of XYZ. You probably want to sell and don't want to buy more of it. You would then skew your quotes down by a few basis points which makes it more likely for you to sell (you are giving a more aggressive sell price), and conversely less likely to buy.
However, at this stage I started running into some issues. The first was that building this was very tedious. I had to solder a lot of cables within this box. In addition, I was unsatisfied with the software side and the game felt slow and clunky.
So with the same concept, I went for a complete overhaul.
The idea of the game
In this game, you act as a market-maker on the ETF markets. Your job is to quote a tradeable bid price and ask price on the exchange at all times, while answering OTC requests for larger trades and managing your risk. You control your prices through algo parameters and fight for being first in the orderbook on the side you prefer to trade on. You can also place orders manually.
To manage your risk, you can trade in the underlying markets. For example, if you sell S&P 500 ETFs, you are short. To mitigate this risk, you can buy a hedge instrument (for example S&P500 futures) which are perfectly correlated to the ETF and therefore render yourself immune to market movements.
As you trade the ETFs on exchange and OTC, you accumulate risk which you can choose to neutralise in the hedge markets. Doing so has a cost and reduces the margin you make on each trade. So does trading the ETF directly with the market as you'd pay the spread. You can execute hedges via algos such as TWAP which make your hedge adjust slower, but also at a lower cost since you spread execution over time.
If you're doing a good job, you capture a lot of flow, win a lot of trade requests, and don't lose money nor take disproportionate risk. Events such as a release new financial figures or major news happen from time to time, so you want to make sure you're not outright long or short when this happens. Additionally, you don't have the best latency, so you want to avoid keeping your quotes during figures as you'd be subject to latency arbitrage.
Overall this is a good representation of the dynamics of market-making in the ETF space, and a good entry point for beginners or junior traders to understand the basic principles behind it.
Improving the hardware
Let's dig more into the constructive details.
PCB
To avoid cutting and soldering wires, the solution was a printed circuit board (PCB). I downloaded Kicad, which is an open-source PCB design tool, and got started. To my surprise, the process was much easier than I thought and I could go from complete zero to ordering my PCBs online in a couple of days.
The first step is to design the diagram, which means listing all components and their connections in a schematic way. In my case, the diagram looks like the following:
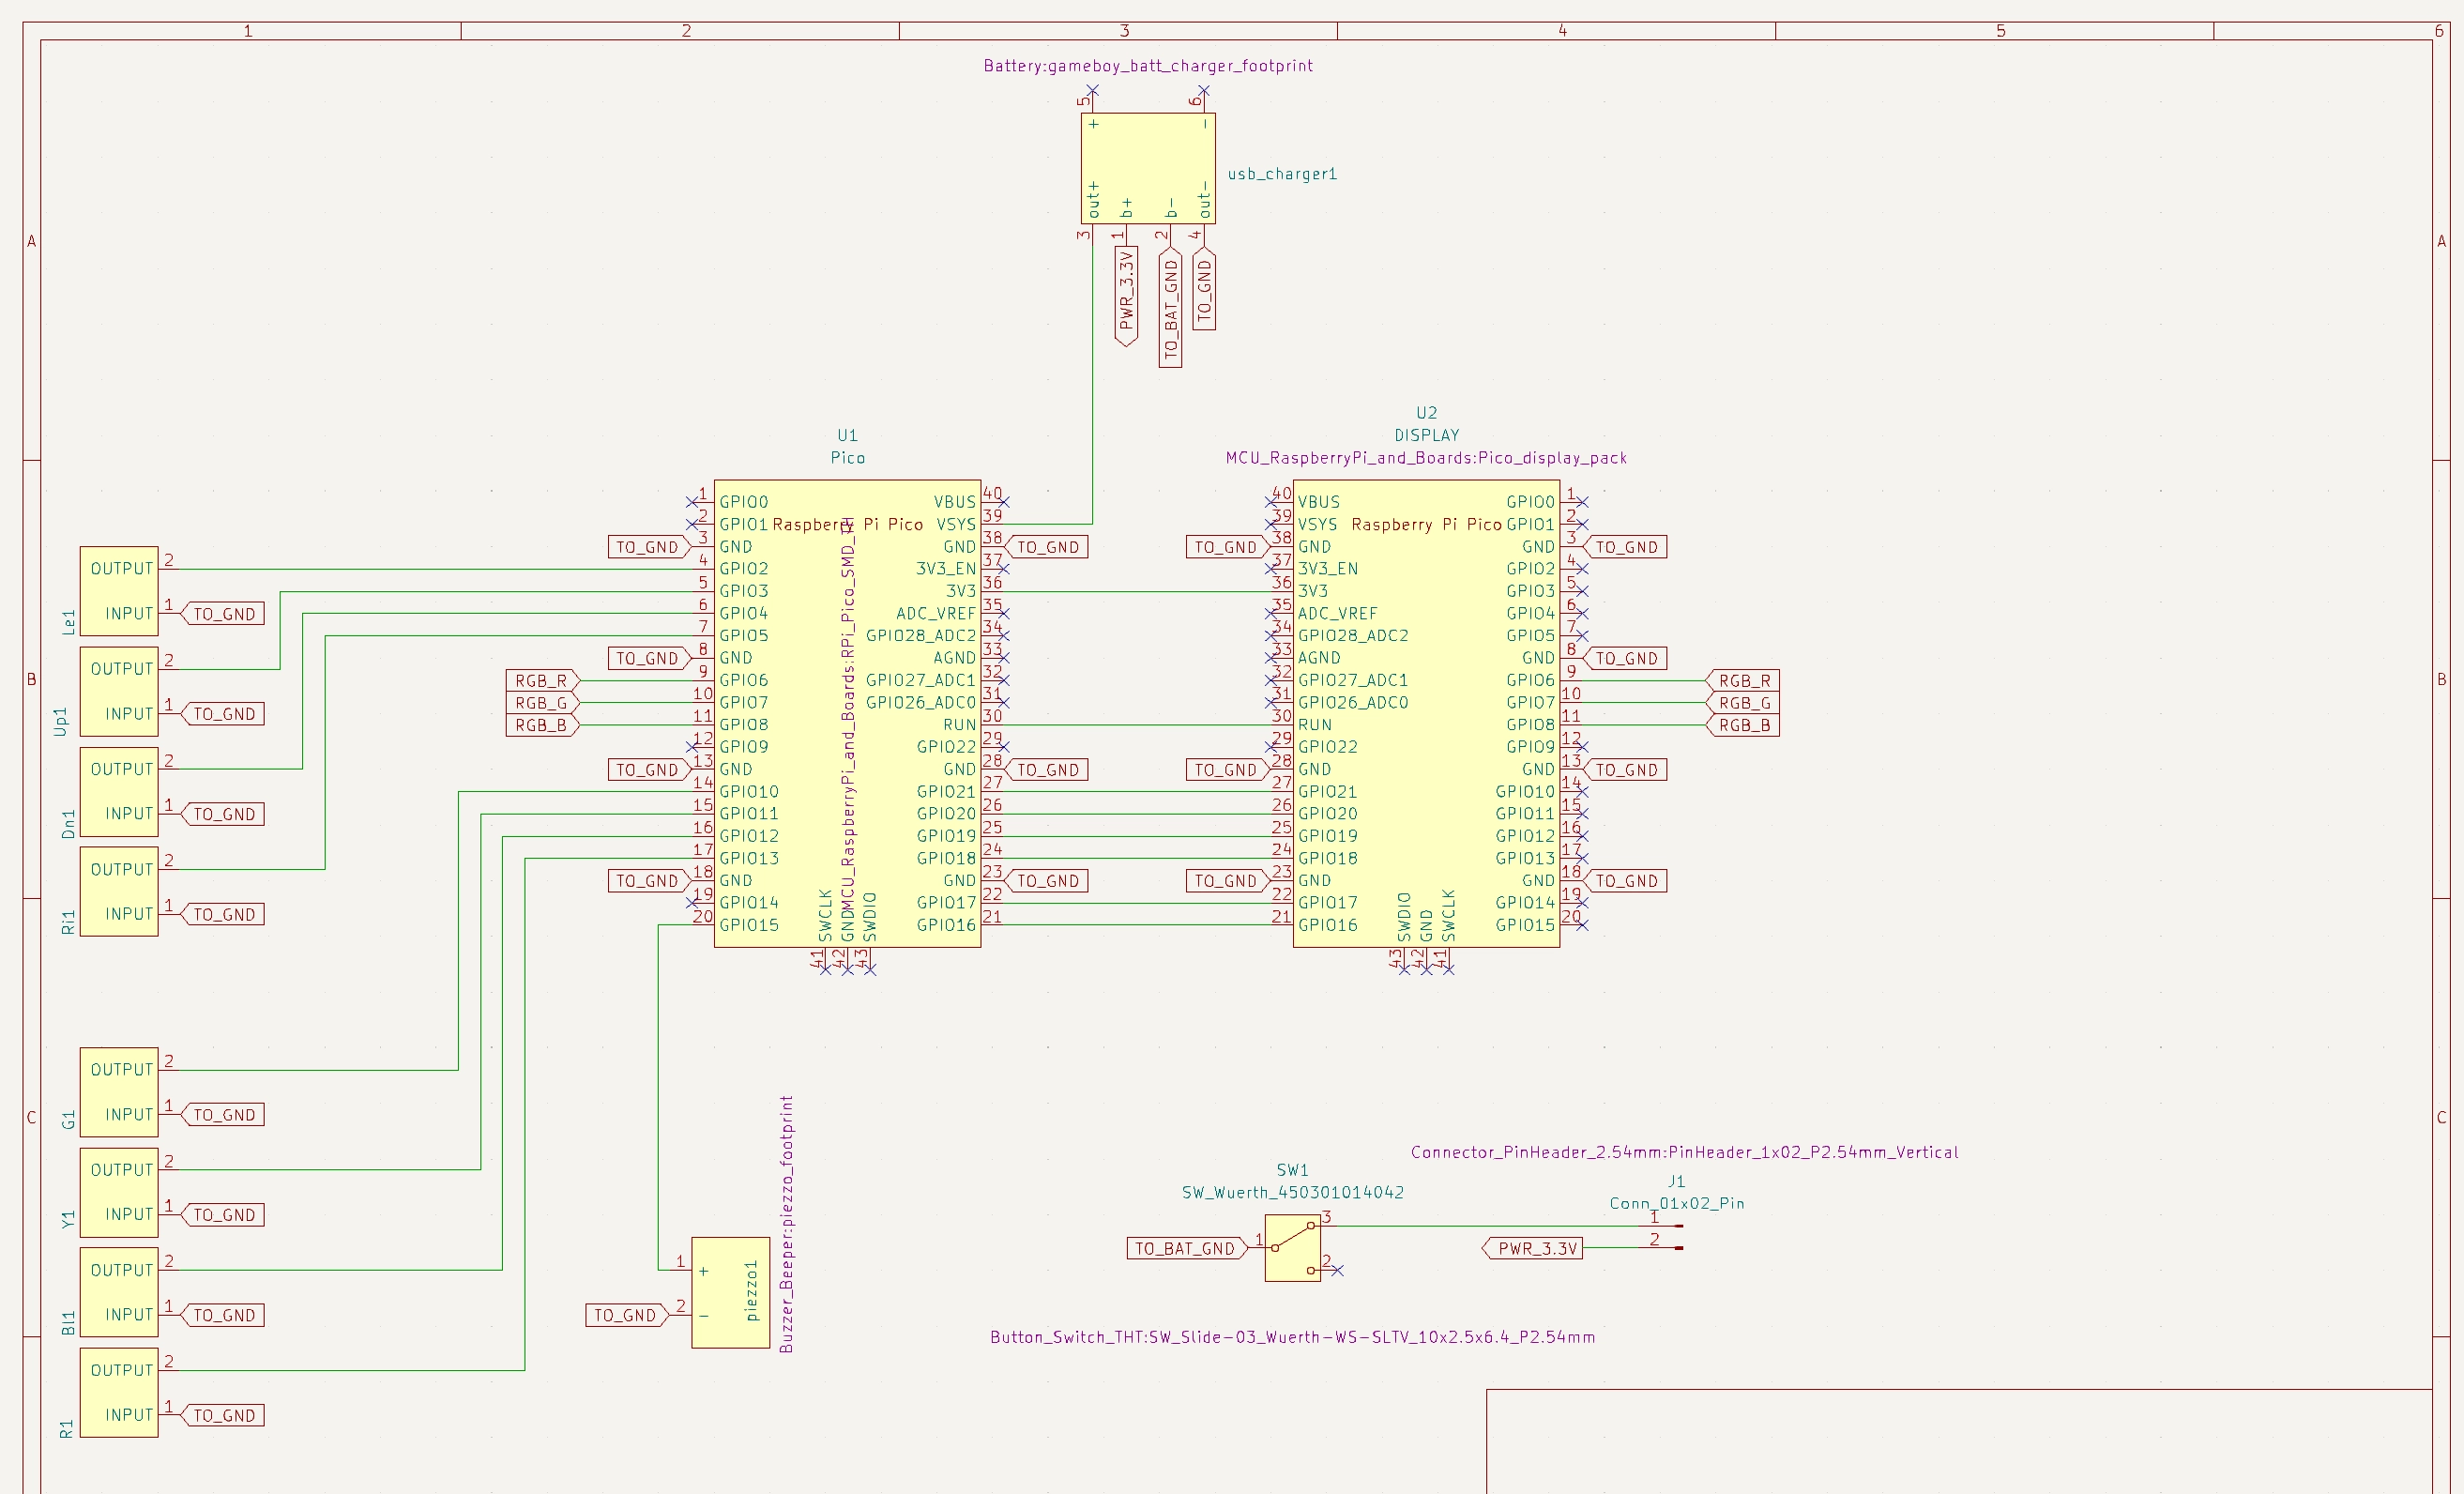
The buttons are on the left-hand side. The microcontroller in the middle, the display on the right. Other items include the speaker, the on-off button and the battery management system which handles the lithium battery's charge and discharge.
Once they are connected like this, the system knows I will need to route traces between all these connector points, and we can start making the PCB.
To my surprise, the drawing of traces (the electrical connection between two points) is done by hand. The schematic we just made only helps guiding connections from one point to another and making sure all connections are implemented.
So after designing the schematic, it was time to place the components on the board and to draw the traces to join the related connectors:
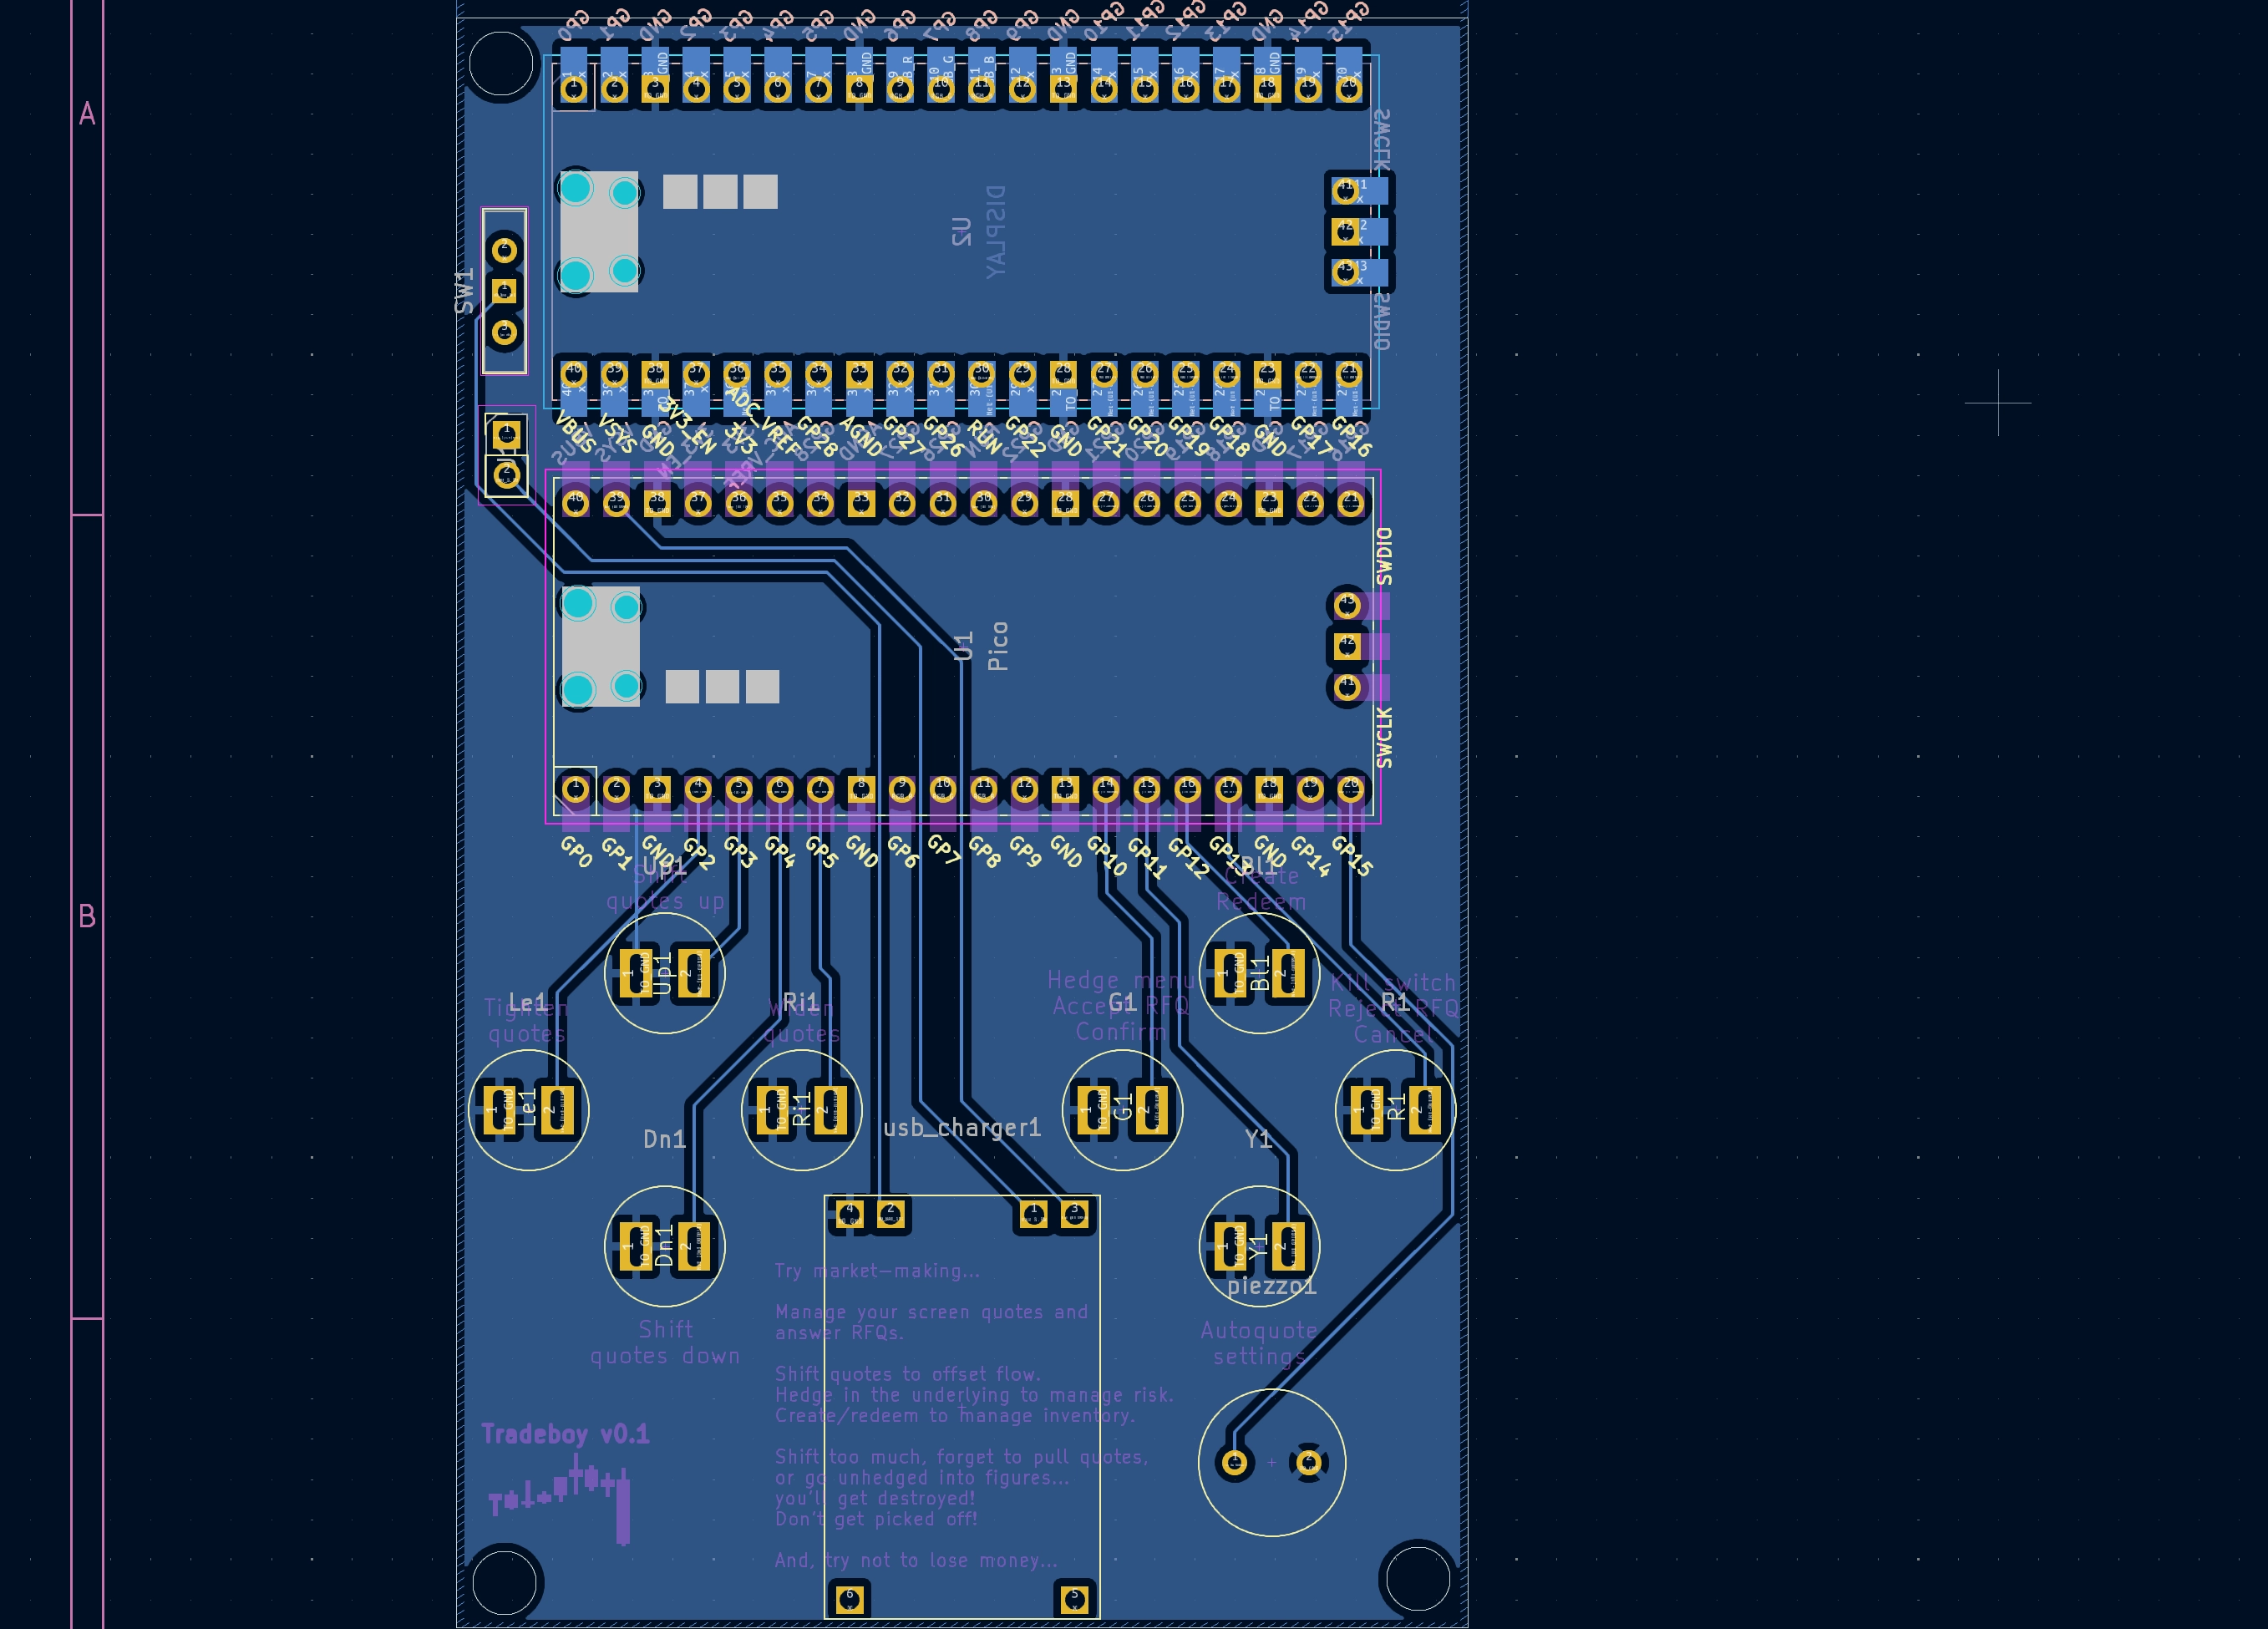
I was particularly pleased to find that I could leave some copper exposed to display text. It's something I found visually attractive.
Anyways, once the components are placed on the board and the connections are drawn, you can export gerber files which you can then upload on PCB Way to order the boards. They arrived within 4 days which is impressive considering that their manufacturing involves many steps, and that they shipped from China.
3D printed Case
Kicad allows us to export the PCB 3D model and footprint. This meant I could design a case around it to 3D print later:
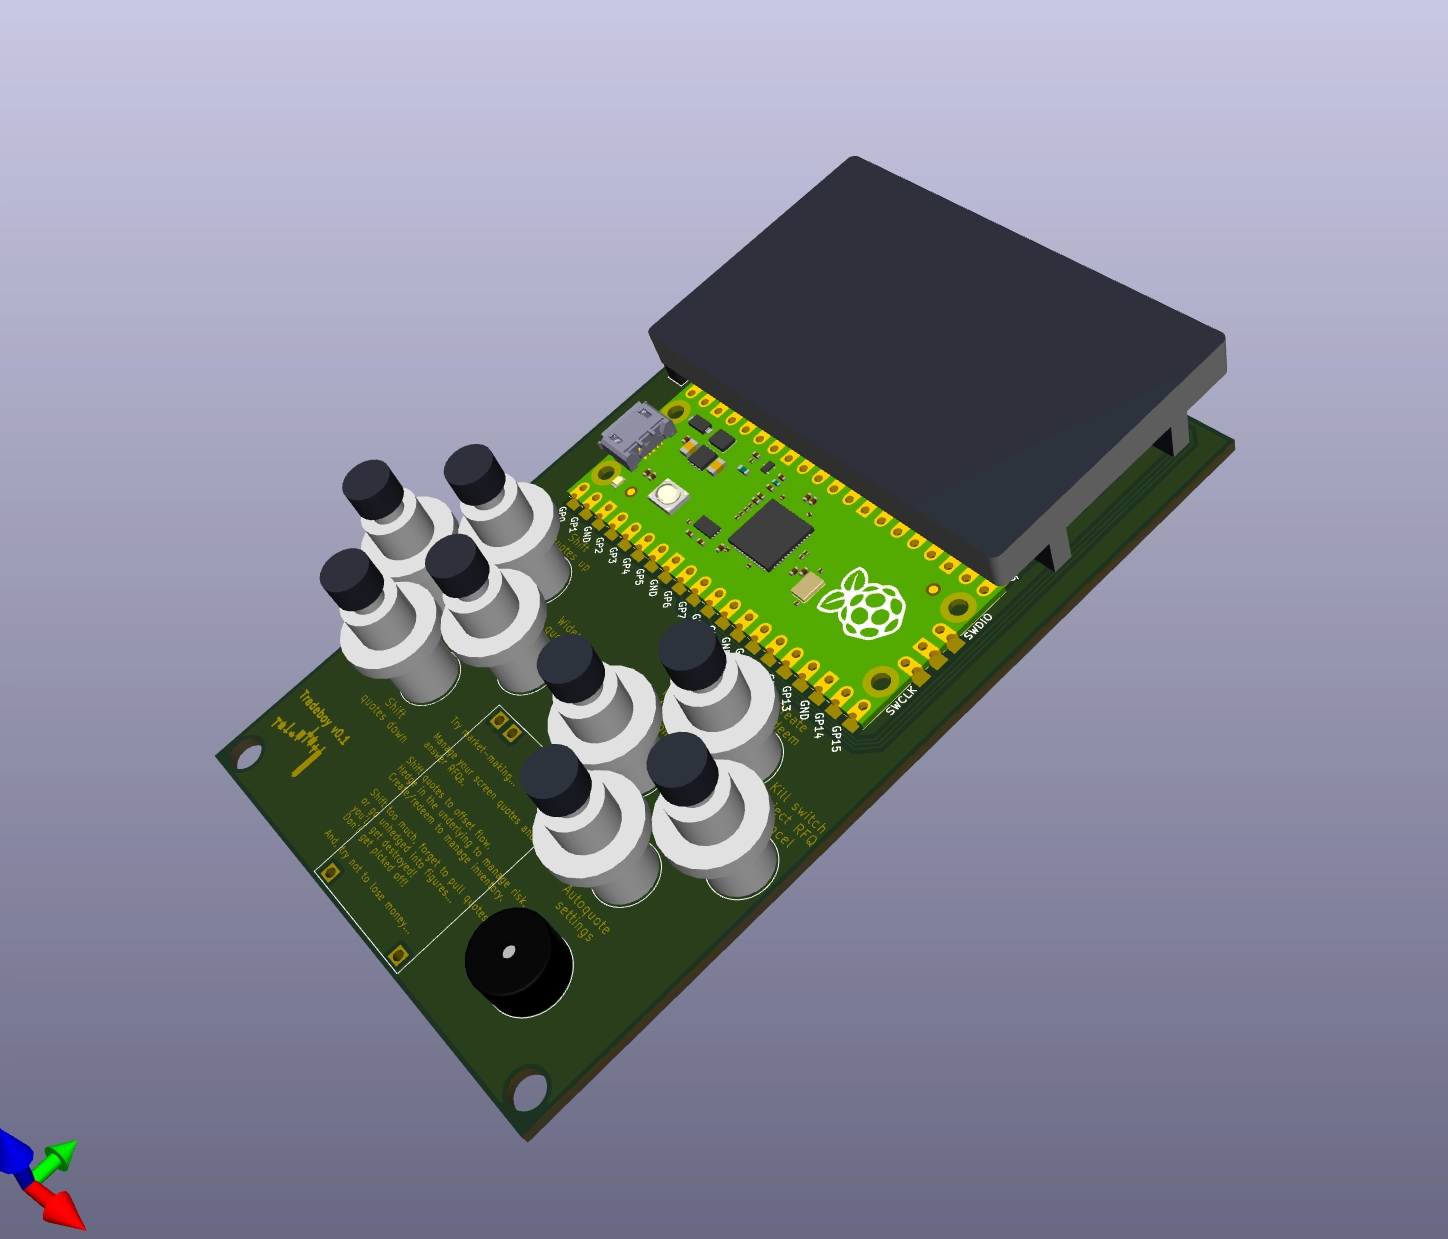
What's nice is that you can import the model into something like Autodesk Fusion 360, and then design the case around it. In this instance, I projected the PCB sketch imported from Kicad (the purple lines) and created a structure around it using offsets from the Kicad drawing. I left some holes for the screws and used the feature which automatically models the thread in 3D:
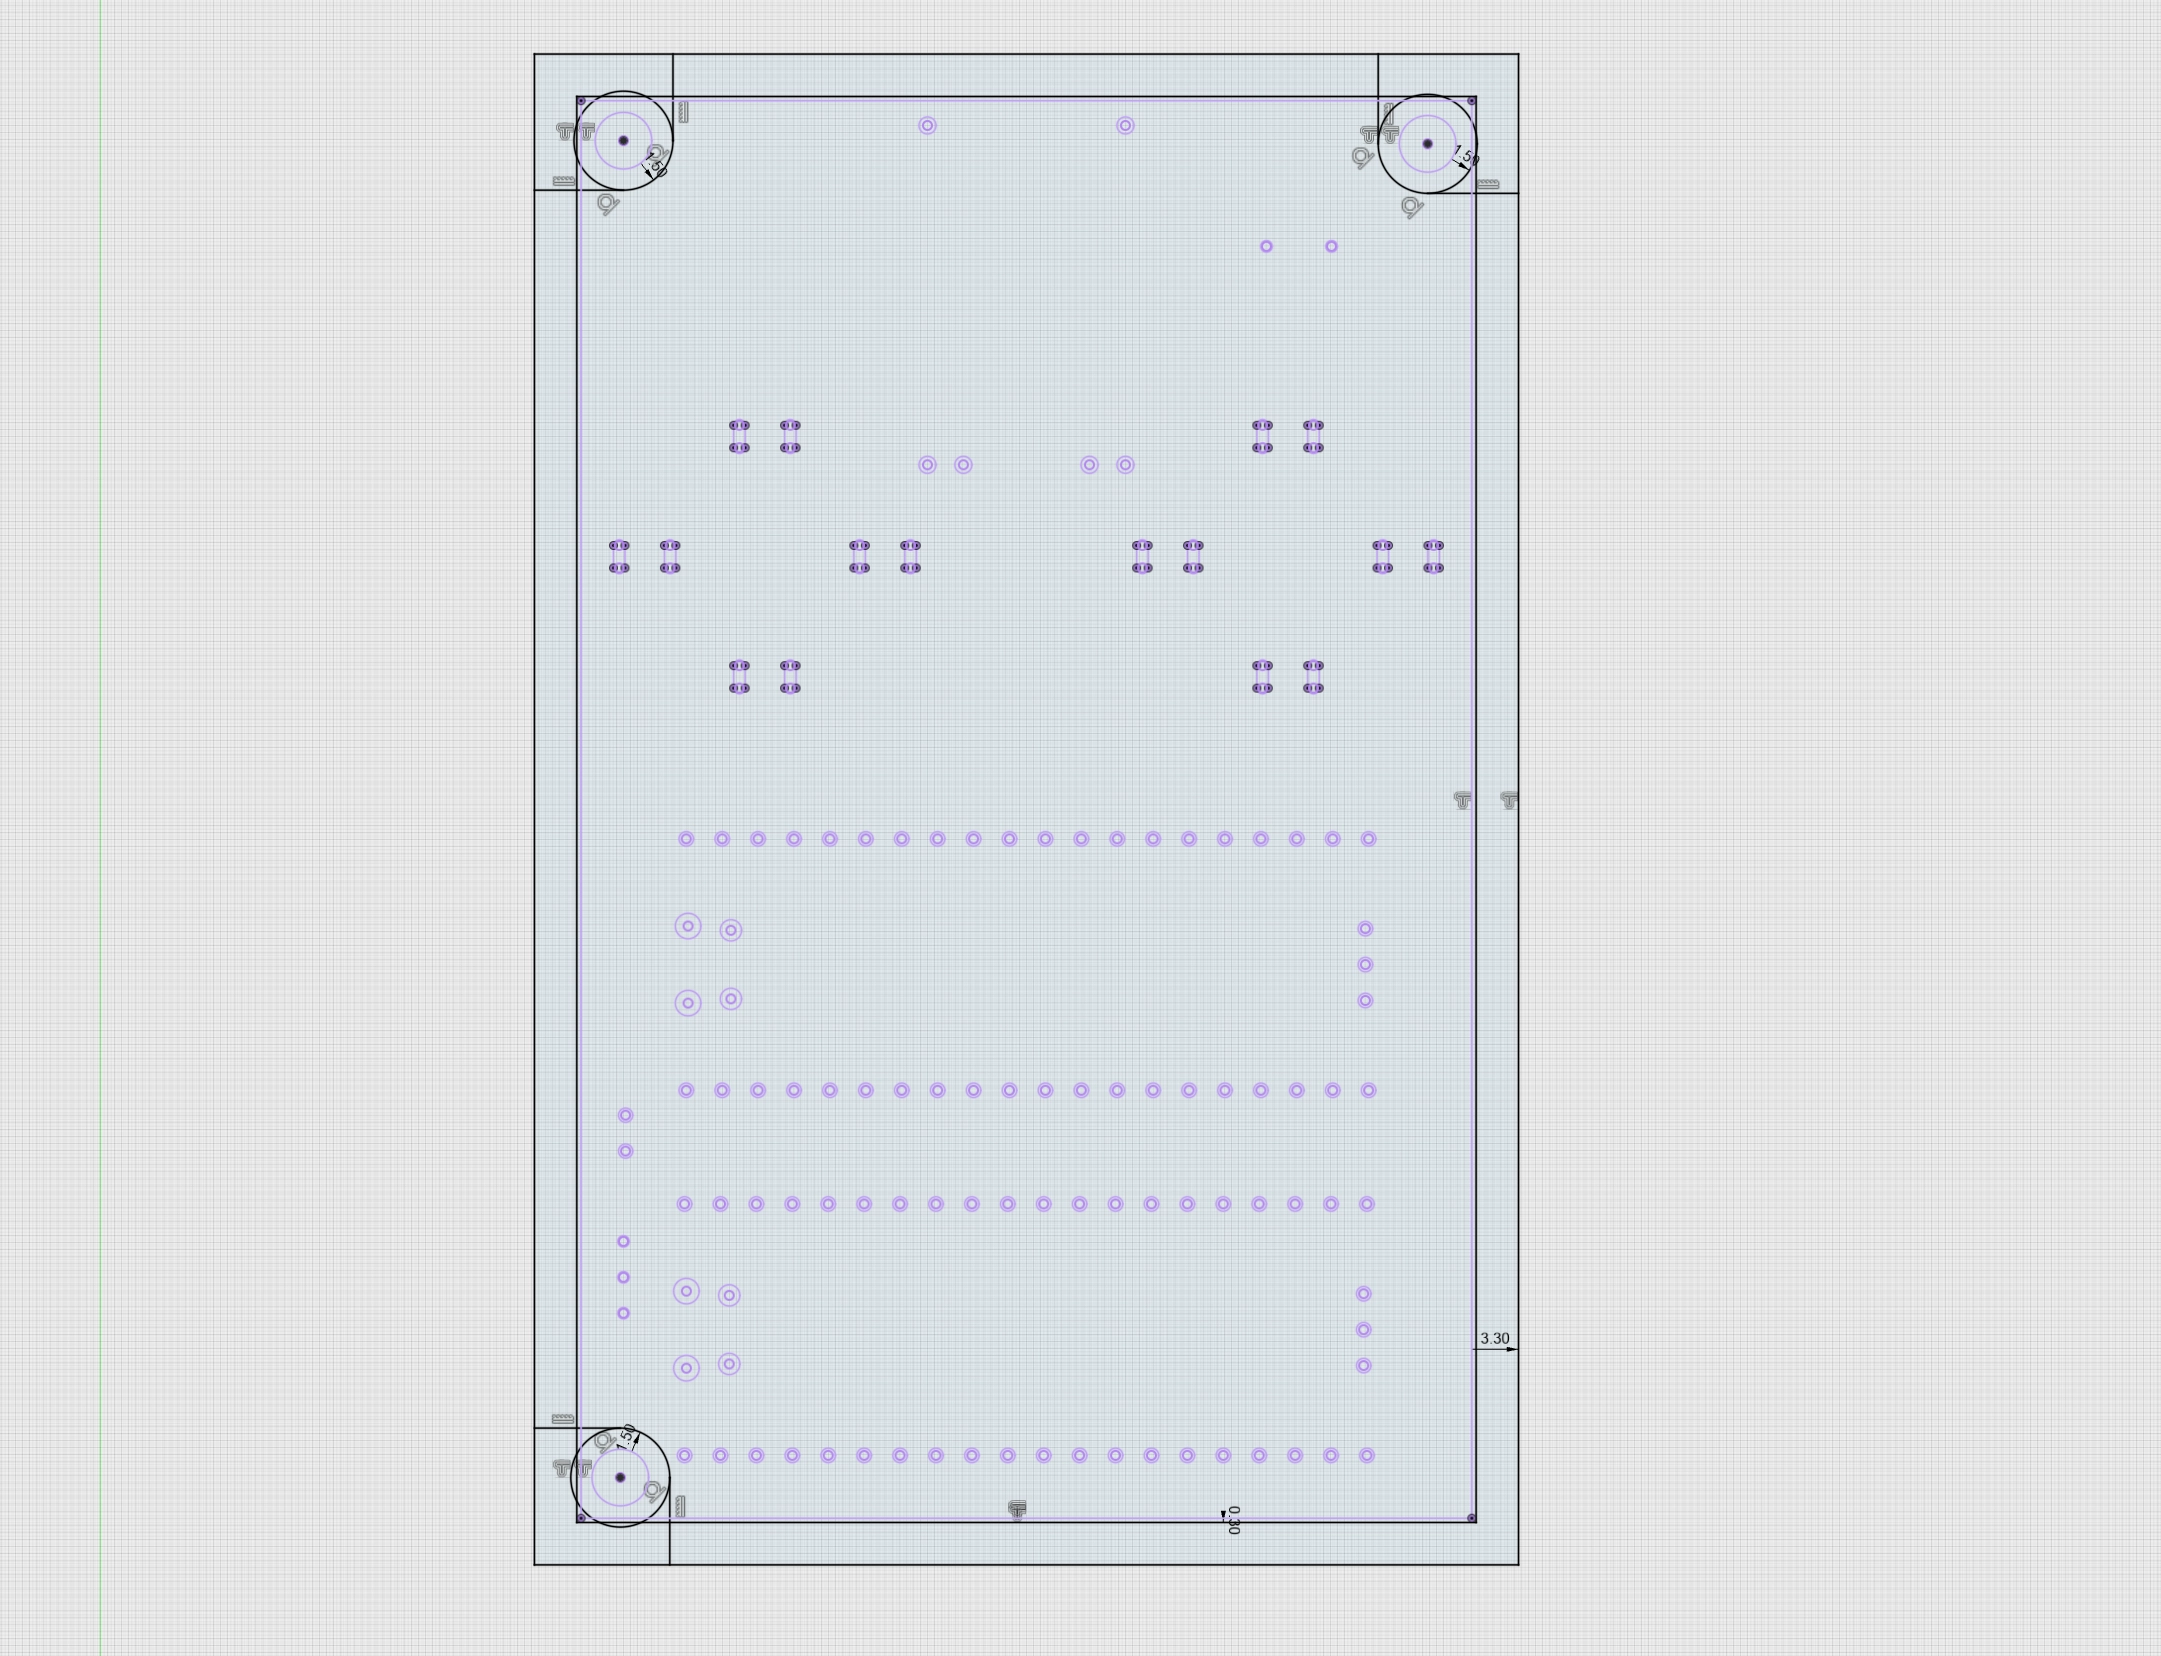
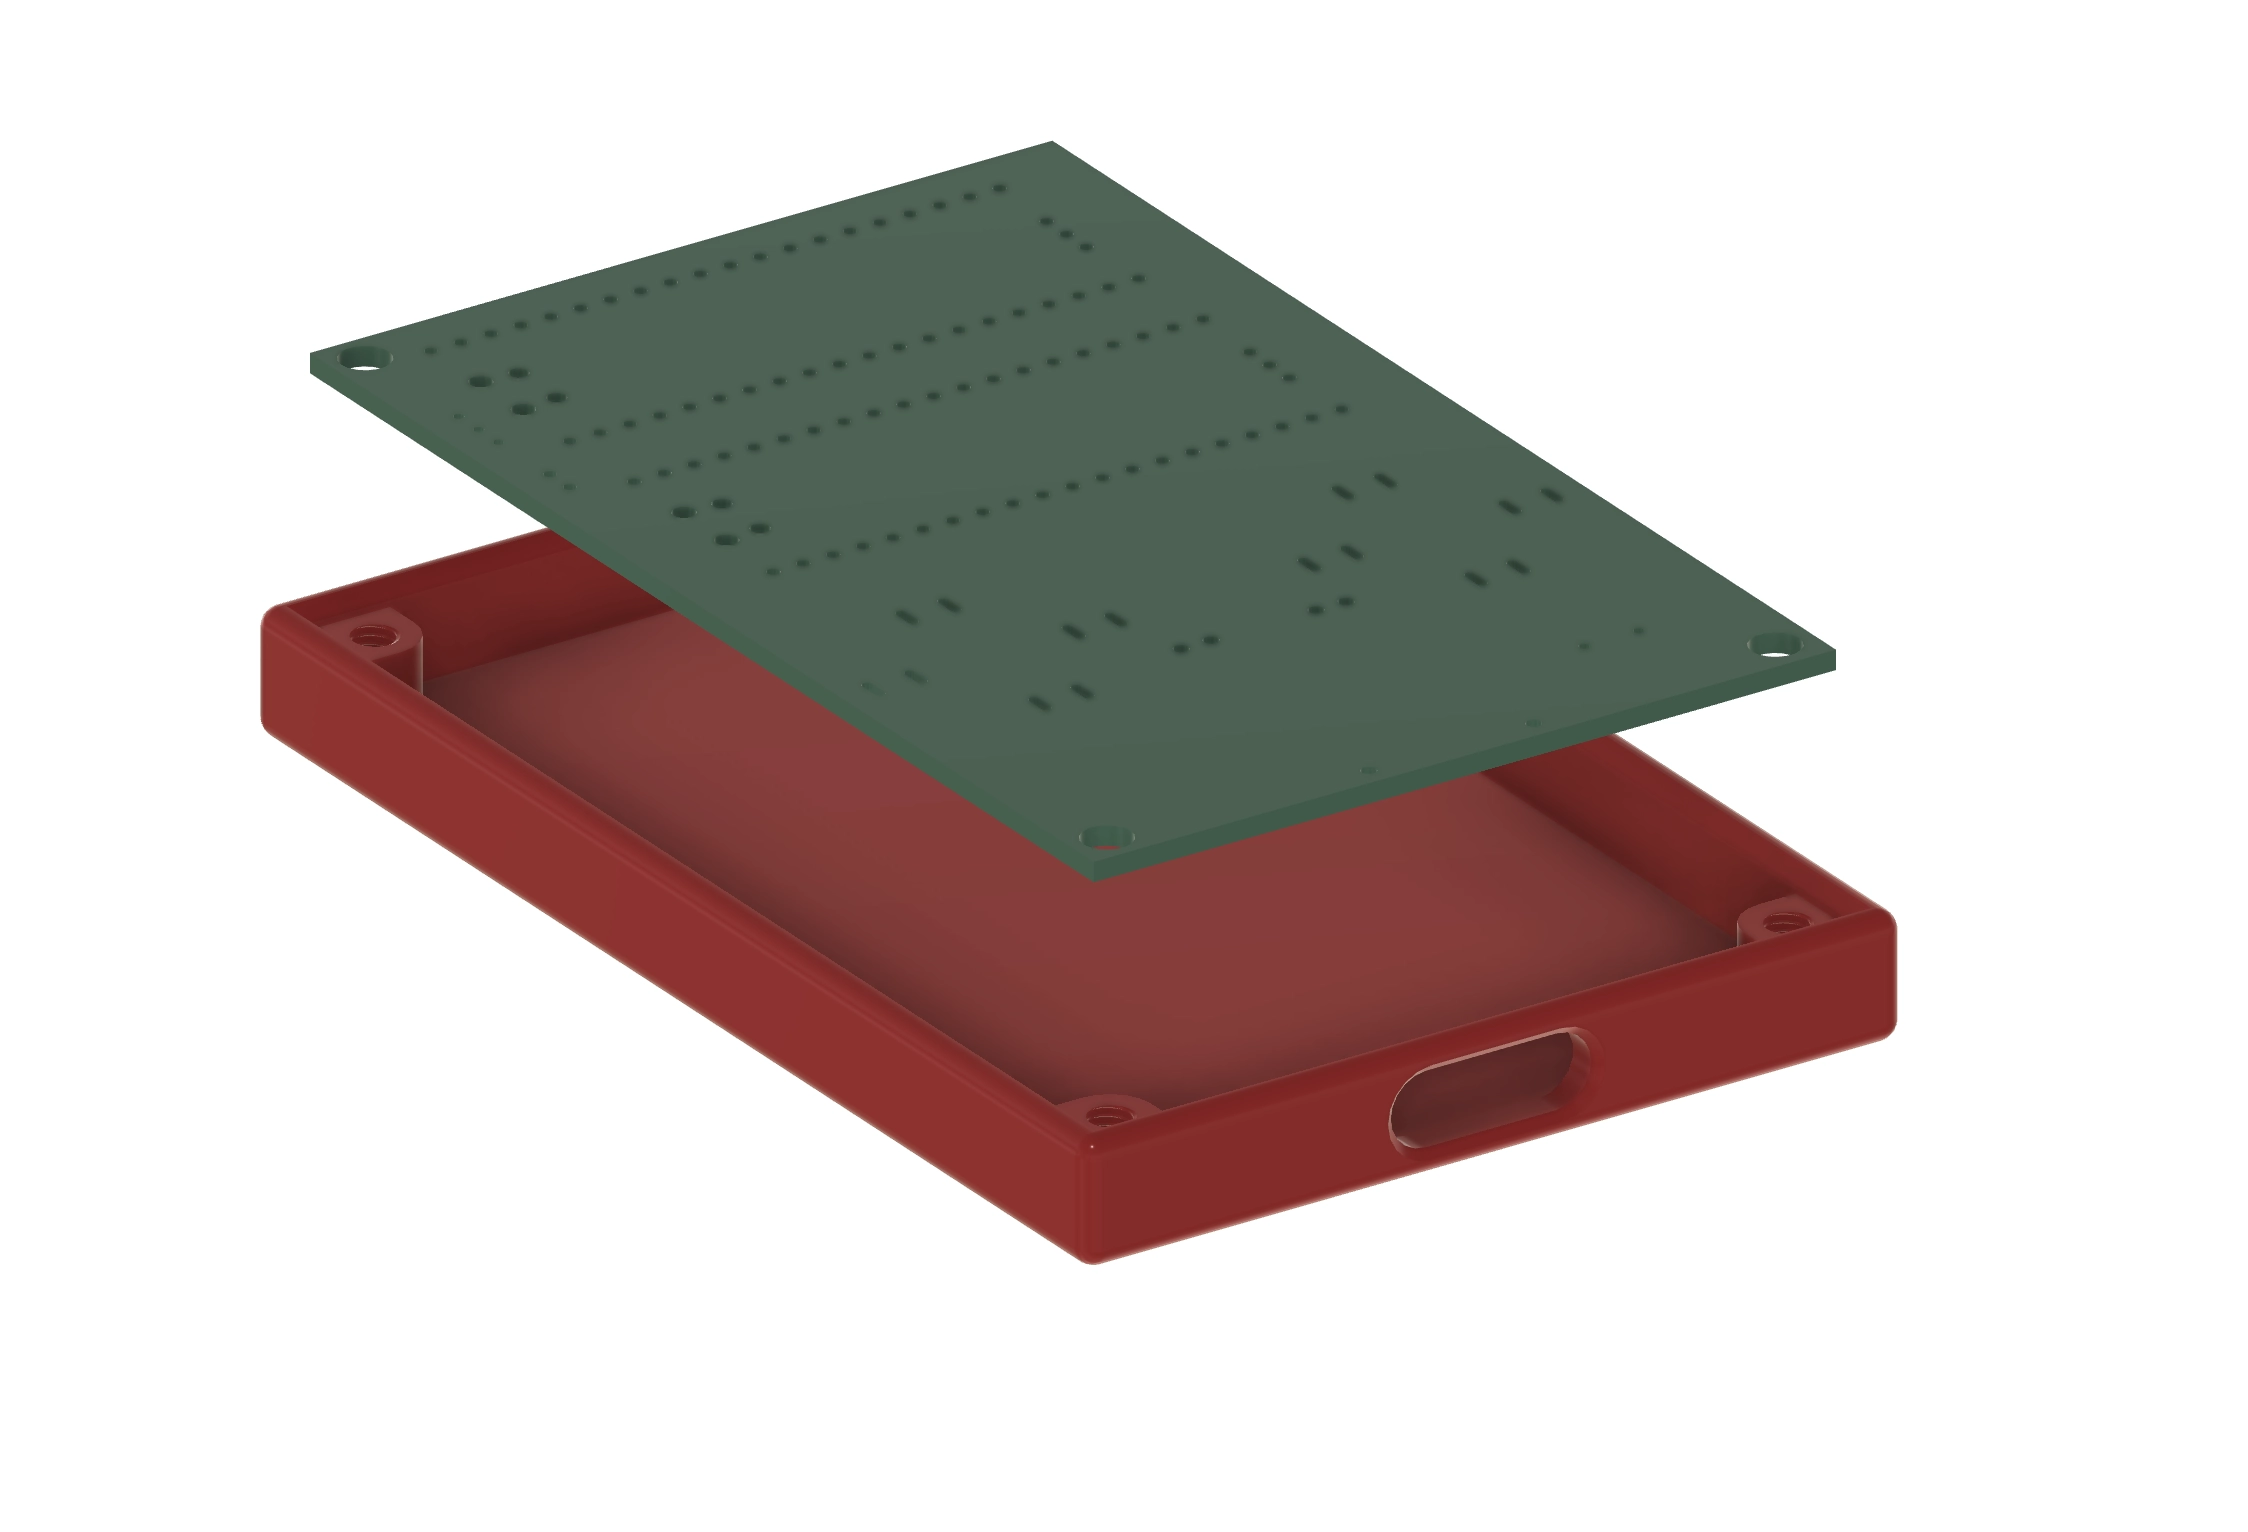
I designed this with the intent of leaving the PCB exposed, so the case was simply covering the back of the PCB and the battery. The result is the simple case displayed in red below which 3D-prints in half an hours or so:
Rewriting the software
As mentioned, there was a lot to improve in the first software iteration.
For this new one, I decided to start from scratch.
Reference price
The previous game model was based on a random walk of the price. I know, it's not ideal. But I started this fetching real prices and I soon found that this was not ideal for a game for a few reasons.
First, in the space of few minutes, the prices don't change that much. Creating the reference price myself meant I could inject events such as market crashes and whatnot to spice things up a bit.
Another consideration was that the API calls from the Pico took a long time, and this was a blocking operation.
The model looks like the following:
async def flow(self):print(f'{BLUE}EXCHANGE{ENDC}: {GREEN}Start Ref Price Service{ENDC}')while self.running:self.price = round(self.price* (1 + self.next_jump)+ random.uniform(-0.01, 0.01) * random.uniform(0.0, 5.0) * self.vol_multiplier, 2)self.next_jump = 0if self.figures_mode:self.figures_elapsed += 1if self.figures_elapsed > self.figures_duration:self.figures_mode = Falseself.figures_elapsed = 0self.reset_volatility()print(f'{RED}JUMP{ENDC}: Exit high vola mode')else:self.ticks_to_next_jump -= 1if self.ticks_to_next_jump < 0:from config import FIGURES_VOL_MULTself.figures_mode = Trueself.set_next_jump_time()self.introduce_jump()self.change_volatility(FIGURES_VOL_MULT * self.vol_multiplier)print(f'{RED}JUMP{ENDC}: Jump triggered')print(f'{RED}JUMP{ENDC}: Enter high vola mode')await aio.sleep_ms(self.tick_rate)
Essentially, the whole game is based around a reference price, and that reference price moves between two ticks following a random walk.
However, I introduced a figures concept whereby at certain moments, economic figures are released, and the price jumps at that time. Then, markets are more volatile (the price changes by a larger amount between two ticks), until such point that it reverts to normal trading mode with standard volatility.
You can think of this reference price as the 'fair' price for the consensus of market participants.
Exchange
With a reference price, I can start constructing other concepts. In the previous iteration, there was only one bid and offer, meaning the player always won the trades.
Because of this, I simulated the effects of player actions (skew and spread) by affecting the relative probabilities that a player would receive a trade on either bid or offer sides at each tick.
In this iteration, I wanted to simulate the dynamics of a real orderbook and queue position. In the real world, you only get the trade if you're first in the queue, and I wanted a similar dynamic:
def __init__(self, exchange):from config import MAX_OB_SIZEself.sell_orders = []self.buy_orders = []self.exchange = exchangeself.max_order_count = MAX_OB_SIZEself.last_order_type = Nonedef add_order(self, trader_id, order_type, price, quantity, is_quote):"""Adds an order to the correct heap.Sets self.last_order_type so that the matching engine knows whowas the aggressor. Otherwise, it may execute trades at the limit from theaggressor instead of the resting order."""if trader_id in self.exchange.traders:order = Order(trader_id, price, quantity, is_quote)if order_type == 'buy':heapq.heappush(self.buy_orders, (-price, order))elif order_type == 'sell':heapq.heappush(self.sell_orders, (price, order))print(f'{BLUE}EXCHANGE{ENDC}: {ORANGE}new {"quote" if is_quote else "order"}{ENDC}: trader:{GREEN}{trader_id}{ENDC} - {RED}{order_type}{ENDC} - {CYAN}{quantity}{ENDC} @ {RED}{price}{ENDC}')self.last_order_type = order_typeself._match_orders()else:print(f'{BLUE}EXCHANGE{ENDC}: {RED}REJECTED ORDER{ENDC} trader_id {trader_id} is not registered')def _match_orders(self):"""This is the main logic of the matching engineChecks buy and sell orders both existThen enters a loop while the best bid >= best askExits loop and matching when that stops being the caseWhen there is a match, issues a trade on both sides and reduces theremaining order by the matching size."""while self.buy_orders and self.sell_orders:best_buy = self.buy_orders[0][1]best_sell = self.sell_orders[0][1]if -self.buy_orders[0][0] >= self.sell_orders[0][0]:trade_quantity = min(best_buy.quantity, best_sell.quantity)if self.last_order_type == 'buy':trade_price = best_sell.priceelse:trade_price = -self.buy_orders[0][0]best_buy.quantity -= trade_quantitybest_sell.quantity -= trade_quantityedge = int((trade_price / self.exchange.rpm.get_ref_price() -1) * 10_000)print(f"{BLUE}EXCHANGE{ENDC}: {ORANGE}New trade{ENDC}: {GREEN}{trade_quantity}{ENDC} @ {RED}{trade_price}{ENDC} between {GREEN}trader {best_buy.trader_id}{ENDC} and {GREEN}trader {best_sell.trader_id}{ENDC} EDGE: {edge}")self.exchange.notify_trade_listeners(Trade(best_buy.trader_id, best_sell.trader_id, trade_quantity, trade_price, edge, self.last_order_type, False, False))self.exchange.risk_engine.register_etf_trade(best_buy.trader_id, 'buy', trade_quantity, trade_price)self.exchange.risk_engine.register_etf_trade(best_sell.trader_id, 'sell', trade_quantity, trade_price)if best_buy.quantity == 0:heapq.heappop(self.buy_orders)if best_sell.quantity == 0:heapq.heappop(self.sell_orders)else:break
The logic is that traders can add orders to the bid and ask sides of the orderbook. These are then stored in a heapq.
Since the micropython implementation only implements minheap, I had to store one
of the sides by taking the opposite of the price so that it would be stored in
the correct order. This is why some negative signs appear in the code suce as
this -self.buy_orders[0][0] >= self.sell_orders[0][0].
Creating agents
Having done this, I could start creating agents. These agents would, for example, place orders randomly in the book with a price relative to the current reference price:
async def start_bot(self):from random import choice, randintprint(f'{BLUE}EXCHANGE{ENDC}: {GREEN}bot online{ENDC}')while True:ref_price = self.rpm.get_ref_price()self.orderbook.add_order(randint(0, self.bot_count-1),choice(['buy', 'sell']),randint(int(0.995 * ref_price * 100), int(1.005 * ref_price * 100)) / 100,randint(20, 800),False)await aio.sleep_ms(self.bot_loop_ms)
The result of the above is a stream of orders coming on both sides of the orderbook.
Some of these orders are resting, and populate the orderbook.
Some are crossing the spread, taking liquidity from the book, and resulting in trade matches.
When a trade happens, both counterparties are notified, and the risk engine is updated with the new positions.
This is a simple placeholder for now, but it's relatively easy to implement a set of smarter agents, each with their own logic and incentives, including competing market-makers, and arbitrageurs.
The player logic is different and more akin to controlling an algo:
def player_turn(self):from master.cash_market_manager import HedgeOrderif self.turns_awaited >= self.turn_latency:self.turns_awaited = 0self.cancel_quotes()self.calculate_quotes()if self.quoting:self.exchange.orderbook.add_order(self.trader_id, 'buy', self.own_bid, self.clip_size, True)self.exchange.orderbook.add_order(self.trader_id, 'sell', self.own_ask, self.clip_size, True)if self.auto_hedge_active:self.exchange.cash_market.cancel_hedges(self.trader_id)risk = self.exchange.risk_engine.risk_metrics[self.trader_id]q = -risk.etf_position - risk.hedge_positionif abs(q) > self.auto_hedge_threshold:side_is_buy = True if q > 0 else Falseself.exchange.cash_market.add_cash_order(HedgeOrder(side_is_buy, abs(q), self.trader_id, max(20,int(abs(q)/20))))else:self.turns_awaited += 1def calculate_quotes(self):spot = self.rpm_pricespot_skewed = spot * (1 + self.skew_bps / 10000)half_spread = spot_skewed * self.spread_bps / 10000 / 2self.own_bid, self.own_ask = round(spot_skewed - half_spread, 2), round(spot_skewed + half_spread, 2)
The parameter turn_latency is so that a player's algo can only update quotes
periodically. This replicates the throttling implemented by exchanges whereby
traders cannot continuously update their quotes with every tick.
When the latency has elapsed, a few things happen:
- The current player quotes are cancelled with the exchange
- New quotes are calculated using the current quoting parameters
- The quotes are sent back to the exchange.
In addition, other orders may be sent automatically to another market for hedging if the player sets up their algo to automatically hedge the flow.
Display
I decided to split the display into a bunch of sections which can be rendered separately.
For example, here is the class displaying the current ref price on the screen.
from frames.bounded_area import BoundedAreafrom config import CHART_WIDTHclass PriceSection:def __init__(self, player, display):from config import PRICE_SECTION_HEIGHTself.player = playerself.area = BoundedArea(display, 1 + CHART_WIDTH, 1, 320 - 1 - CHART_WIDTH - 1,PRICE_SECTION_HEIGHT, 'GRAY', 'BLACK')def plot_all(self):self.area.draw_background()self.display_price()self.area.draw_perimeter()def display_price(self):price = self.player.ref_prices.array[-1]self.area.write_centred('{0:.2f}'.format(price), 'WHITE', 1 + CHART_WIDTH,320 - 1 - CHART_WIDTH - 1, 5, 2)
So in this case, this is what displays the price in the top-right corner with a value of 50.22:
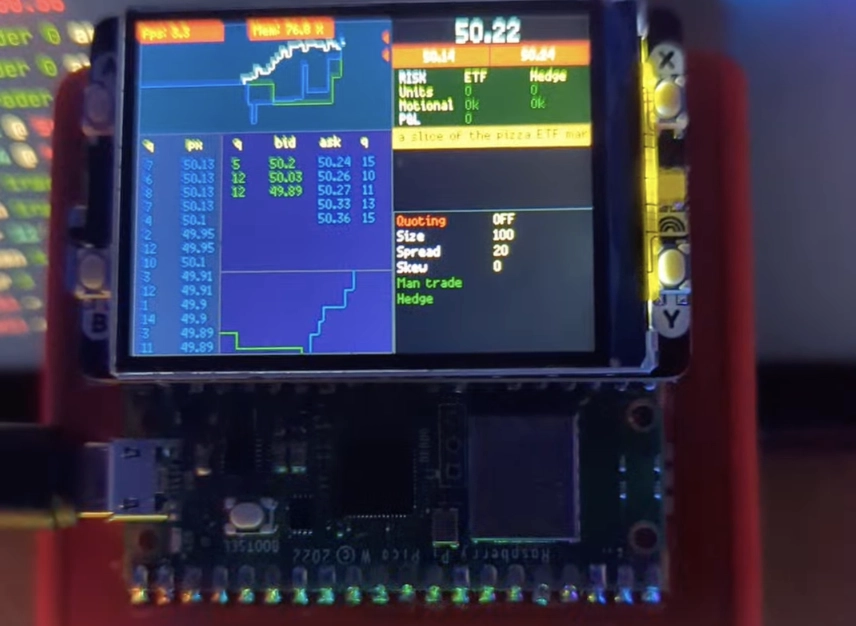
There are multiple other sections like this. The one displaying the chart area, the one with the controls, the news, the risk section, the market depth chart, the orderbook table, the trades feed, and so on.
By rendering them independently, I can then place them relatively to one another and potentially schedule their update cycles at different moments if needed.
Some things I learned
Buttons are not that simple
It is really easy to program a microcontroller to react to a button press. Connect the button, and write some micropython like the following:
import machinebutton = machine.Pin(12, machine.Pin.IN, machine.Pin.PULL_UP)while True:if not button.value():print('Button pressed!')
However when the program becomes larger, this approach stops working. One of the reasons is that you may be pressing the button at the moment where the loop is executing some other code.
By the time your code gets back to evaluating button.value(), you may have
released it. Ideally, you'd want your inputs to be immediately registered.
Another consideration is that button presses, from a signal perspective, are not how one intuitively may think. Instinct tells us that the button is an on/off switch, and therefore pressing it should look like the following:
____________|-----------------------|__________________^ vpress release
However, in practice, it looked more like the following.
____________|-|_|-|_|-|_|--------|__________________^ vpress release
It seems like the signal needs to stabilise after a button press and may oscillate initially, even if the button is pressed continuously. This has two consequences.
- First, it means you may register several presses instead of one.
- Second, depending on timing, your software may not register a button press if the signal jumped to the low state at that exact time.
To circumvent this, I used interrupt requests which will monitor a signal
change and interrupt execution to run the routine called by the button press. I
coupled this with a timeout to avoid processing the same button input multiple
times.
In this case, the trigger is the 'falling' edge of the signal:
def __init__(self):from machine import Pinself.last_change_ms = ticks_ms()self.callbacks = {}self.red_button = Pin(13, mode=Pin.IN, pull=Pin.PULL_UP)self.red_button.irq(trigger=Pin.IRQ_FALLING, handler=self.red_isr)def red_isr(self, pin):if 'RE' in self.callbacks and time.ticks_diff(ticks_ms(), self.last_change_ms) > BTN_FREQ_MS:print(f'{RED}BUTTONS{ENDC}: notifying button listener {RED}RED{ENDC}')self.callbacks['RE']()self.last_change_ms = ticks_ms()
Since the same button may have different functions depending on the context, for example depending on which menu you are currently in, each button press is triggering a callback.
Changes in menu context send a list of callbacks to override the previous one and setup the new actions. I found this made the buttons more generic.
RAM issues
I quickly ended up with memory issues whereby the program would crash with an
error message such as Memory allocation failed, failed to allocate 256 bytes
or something like this.
What happened here is two things.
- First, 256kb is not so much
- Second, it is relatively easy to end up with memory fragmentation. Fragmentation means that I have enough bytes in memory to allocate to my object, however these bytes are not contiguous and scattered across the memory range making the allocation impossible.
I watched a few videos from the creator of MicroPython, and read documentation online. This led to a few discoveries which helped.
Using const()
Say you have config values which won't change at runtime. When defining them as
LOOP_FREQUENCY_MS = 250, this may create a variable which requires more
memory. In this example, the system may allocate 32 bits for an int whereas I
only need 8 bits.
In some instances, for example when writing c = 22 ... a = b x c, I now
understand the compiler may detect that 22 is a constant and therefore apply
this for you, but being explicit does not hurt.
Proactive memory defragmentation
MicroPython has a garbage collection mechanism which triggers automatically.
However, it may only trigger once the memory is already fragmented, and not be able to help. When starting up the game, I create a lot of objects. As a result, this may not immediately trigger a connection.
I used gc.collect() profusely at startup and found that this helps make sure
that whatever memory is consumed by my objects is packed tighter together to
reduce fragmentation and its effects down the line.
Precompiling
MicroPython is an interpreted language whereby the code you write is transformed into bytecode at compilation time. However, this compilation happens at startup on the board itself, and can leave a significant memory footprint behind.
As I was struggling with memory issues, I considered compiling ahead of time, and copying the files to the board.
The compile script uses mpy-cross and looks like this:
#!/bin/shMPY_CROSS="mpy-cross/./mpy-cross"SOURCE_DIR="."BUILD_DIR="$HOME/build"echo "### Starting build"compile_to_mpy() {local src_file="$1"local dest_file="$2"mkdir -p "$(dirname "$dest_file")"$MPY_CROSS "$src_file" -o "$dest_file"}copy_file() {local src_file="$1"local dest_file="$2"mkdir -p "$(dirname "$dest_file")"cp "$src_file" "$dest_file"}# Clear the build directory at the startrm -rf "$BUILD_DIR"mkdir -p "$BUILD_DIR"echo "### Starting build"find "$SOURCE_DIR" -type d -name "mpy-cross" -prune -o -type f -print | while read -r src_file; dorelative_path="${src_file#$SOURCE_DIR/}"if [[ "$src_file" == *.py ]]; thendest_file="$BUILD_DIR/${relative_path%.py}.mpy"echo "### Compiling $dest_file"compile_to_mpy "$src_file" "$dest_file"elif [[ "$src_file" == *.txt ]]; thenecho "### Copying raw $dest_file"dest_file="$BUILD_DIR/$relative_path"copy_file "$src_file" "$dest_file"fiif [[ "$src_file" == *ain.py ]]; thenecho "### Copying raw $dest_file"dest_file="$BUILD_DIR/$relative_path"copy_file "$src_file" "$dest_file"fidone
This creates a set of .mpy files which are bytecode instead of the .py
files. Taking the compilation step from the board to the computer means less
memory usage and a faster startup time, although the onboard compilation is
quite quick and not noticeable.
Buffering
I have a few files such as a .txt containing information such as the list of
'fun' news to display during the game. I may be in situations where I cannot
load the file in memory in one go. So to avoid crashing when reading it, I count
the number of lines by reading it in a buffer:
def count_lines(file):count = 0while True:buffer = file.read(1024)if not buffer:breakcount += buffer.count('\n')return count
In a similar way, I tried to steer clear of string variables and holding text in
memory as this can quickly accumulate when collecting objects with text. So
things like side = 'buy' would be transformed into 'side_is_buy: True etc.
Speed issues
While I tried to be efficient, the game can be slow if not careful, even when the microcontroller clocks 133 million times per second. In this section, we'll look at some learnings which helped me make the game feel more fluid.
Multiprocessing
The first item is that the Pico has two cores, which means it can run two processes in parallel. This means I can split the work two-ways and theoretically do two things at the same time thereby (I simplify) run at twice the speed.
One difficulty with multiprocessing is potential contention over resources. For example, trying to modify a variable from one process while the other process is reading it.
In this case, I decided to organise my two processes such that they are independent. One runs the background game such as the exchange, bots, the matching engine, and similar. The other handles the player side such as rendering the game on screen, processing inputs, and so on.
The initialisation looks like this:
### Within the main thread...### Start second threadself.second_thread = _thread.start_new_thread(self.second_thread,())def second_thread(self):aio.create_task(self.exchange.flow())aio.create_task(self.exchange.simulate_order_book())aio.create_task(self.exchange.cash_market.flow())### Do something else with the first threadfrom game import Gamenext_step = Game(resources)while True:next_step = await next_step.flow()
Coroutines
The game consists of many small loops. The bots send orders in a loop at a given frequency. The player's algo reacts to market data at a given frequency. The display refreshes at a given frequency; there are many such intervals.
Having all these steps in a loop such as this is not optimal because it forces all steps to execute sequentially:
while True:loop1()loop2()...
Fortunately, micropython comes with a built-in implementation of asyncio.
This allows us to setup co-routines, then let them run at a given frequency by
using await aio.sleep_ms(interval). This pauses the current co-routine and
opens up resources to schedule another co-routine whose execution is due.
Here is an example for the player turn loop, and asynchronous wait:
async def play(self):while self.playing:self.rpm_price = self.exchange.rpm.get_ref_price()self.player_turn()await aio.sleep_ms(self.player_turn_ms)
What's nice about this is that we can then easily separate the loop frequencies
for all routines, and increase the frequency for critical ones, while decreasing
it for background tasks which don't need a high update rate. All frequencies can
then be setup as Const() in a config file.
Overclocking
It would not be a real trading machine if it was not overclocked! Overclocking means increasing the CPU clock frequency over its default value, in this case 133 Mhz. Doing so is easy in micropython and I found that I could double the clock frequency without any issues:
from machine import freqfrom config import OVERCLOCK_MHZ, MAX_OVERCLOCK_MHZ, OVERCLOCKasync def main():if OVERCLOCK and OVERCLOCK_MHZ < MAX_OVERCLOCK_MHZ:freq(OVERCLOCK_MHZ * 1_000_000)
Overclocking is not without risks however, and the CPU may become unstable or overheat as a result. So increasing it is possible but with some risks and downsides such as shortening the life of your device. But doubling the clock speed in a situation such as this is a quick and easy way to get the performance boost I need.
Practical issues
Generally, users are guided towards Thonny as an IDE. It is great in many ways. The REPL mode allows you to connect to your board, modify your code on the device, and run it.
While it's perfect for small scripts such as collecting readings or controlling a small item, it becomes much more complicated when using more advanced objects, classes, etc. There is no version control, and very few syntax checks or highlights.
The process mostly looked like this:
- Update a file on the Pico
- Update another file
- Save the first file
- Run
- Error message because the second file was not saved and therefore your code is broken
- Save the second file
- Run
- Get an error message because you made a small syntax error which was not highlighted in the IDE
A lot of issues I had at runtime were because of typos or small syntax issues which IDEs equipped with syntax checks would catch instantly and highlight.
On the other hand, using a fully fledged IDE also makes life harder because you lose the ability to browse and edit files on device. While this would have been a no-go due to the annoying overhead of copying the code across many times over, I found that using a small script helped a lot and rendered this step painless.
To that end, I used mpremote to copy all my files to the board and lastly start the program:
echo "### Copying to device"cd $BUILD_DIRmpremote cp main.py :mpremote fs cp -r animations/ :mpremote fs cp -r frames/ :mpremote fs cp -r helpers/ :mpremote fs cp -r master/ :mpremote fs cp -r menus/ :mpremote fs cp -r resources/ :mpremote fs cp -r slave/ :mpremote cp config.mpy :mpremote cp game.mpy :mpremote cp main.mpy :mpremote cp main.mpy :mpremote cp about.txt :mpremote cp news.txt :mpremote run main.py
Does it QuestDB?
QuestDB is a monster for market data. The Pico microcontroller includes a wireless chip. So it's possible to connect it to the network, and then to issue http requests to send data to a QuestDB instance.
Connecting to the wifi is pretty simple in micropython:
def connect_to_wifi(self):wlan = network.WLAN(network.STA_IF)wlan.active(True)wlan.connect(self.ssid, self.pwd)print(f'connecting {self.ssid}')
And then we can sending data using a raw HTTP request. For example something like this:
def send_results(self):query = f"INSERT INTO game(ref_price,timestamp, p_bid, p_ask, skew, pnl) " \f"VALUES(" \f"{str(self.current_ref_price)}," \f"systimestamp()," \f"{str(self.current_player_bid)}," \f"{str(self.current_player_ask)}," \f"{str(self.player_skew)}," \f"{str(self.player_pnl)})"full_url = self.url + "?query=" + self.url_encode(query)print(full_url)try:requests.get(url=full_url)
I can then setup a Grafana dashboard with queries such as the following:
SELECT timestamp, ref_price, p_bid player_bid, p_ask player_askFROM gameWHERE $__timeFilter(timestamp)
And tada!
Game stats are flowing in realtime into a QuestDB instance and displayed live in a Grafana dashboard. Of course, I set the refresh frequency to 250ms for more of a true HFT feel:
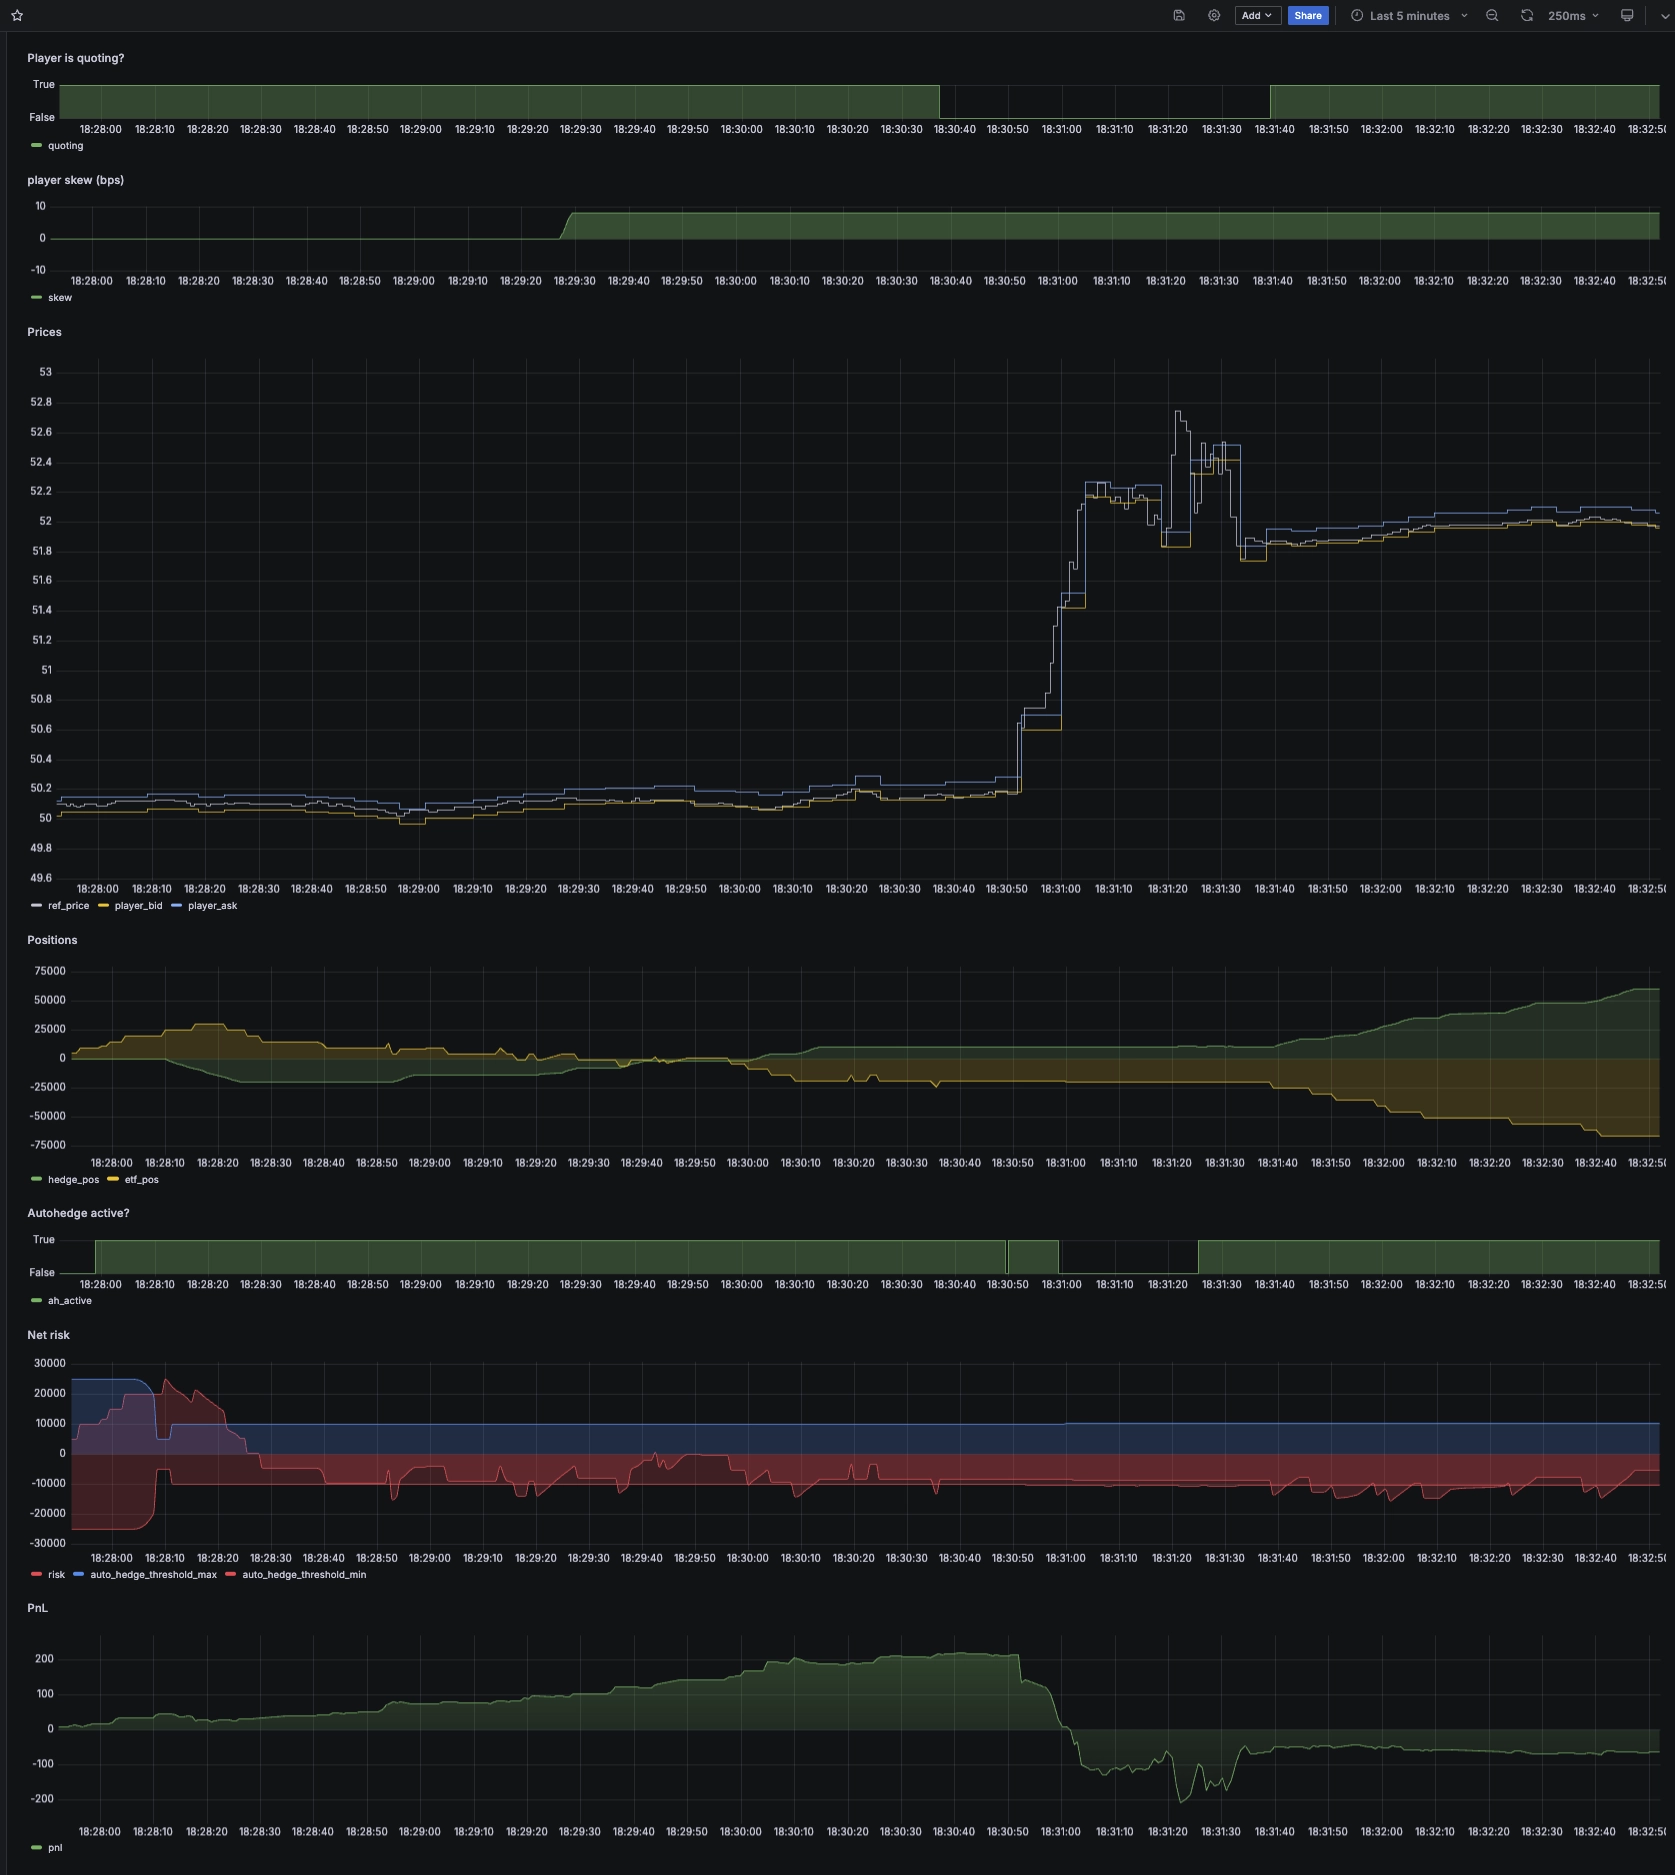
It's pretty satisfying to see the quotes adjusting automatically to market price. With more time, I could change the algo to adjust to the orderbook, fight for position, or come up with many other creative situations.
Another satisfying thing is to watch the autohedge get to work when I cross my threshold parameter. This threshold is dynamic, meaning that I can adjust it over the game depending on my current risk appetite. As soon as it's crossed, it sends orders in the other orderbook to hedge in the underlying.
What's less satisfying is my performance in this game. In this instance, it was all going well until figures occurred. I was making money from the spread collected on the flow. But when figures came out, I had a small short position... and the markets jumped up.
Consequently, my PnL went from positive to negative. While I remembered to pull quotes (I would have been demolished by arbitrage otherwise because I have higher latency than the market), I didn't completely flatten my position.
I'll do better next time!
In conclusion
While accidental, this experience was very enriching for a few reasons.
First, as someone who always worked in dematerialised things (data, trading, computers), it was great to work on something tangible and physical. There is a pleasure in creation and this opened new perspectives in terms of daring to do things with my hands such as fixing something at home or building.
I naturally feel more at home with a computer than with a hammer, and people in the opposite situation tell me they are scared of computers. It's great to realise that going from one to the other is possible, and feels great.
Second, I was amazed to discover 3D printers and CAD design. The state of tooling is such that one can very easily design a part (PCB or other physical object) to solve real world problems with infinitely more satisfaction than just buying something off-the-shelf.
For example, my bedside table lamp comes with shades, and there is a set of two disks which screw on the lamp shaft to hold the shade in place. These broke, and within a few minutes I could print replacements for a fraction of the cost with multiples of the satisfaction.
Most people I know have never seen such a machine before and I envy them for their ability to see it in action for the first time materialising an object before their eyes.
Third, I am truly impressed by the Raspberry Pi Pico, and the micropython language. When I think microcontroller, I think toothbrush control or small RC remote. But seeing it run an exchange, orderbook, matching engine, and refreshing a display for a cost of around $8 is truly impressive.
They just released a new version with more cores, more memory, and other features, and I can't wait to try it for other projects and to see what more skilled makers will make of it!
Want more Pi?
If this sort of thing is up your alley, we've got more fun Pi projects:
- Fluid real-time dashboards with QuestDB and Grafana
- Build your own resource monitor
- Tracking sea faring ships with AIS data and Grafana
- Visualizing real-time NYC cab data and geodata
- Analyzing the beautiful charts and history behind ECB FX rates
- Increase Grafana refresh rate frequency
- Or check out our Grafana blog tag
Want to chat with us? Holler on social media or join in our engaging Community Forum or our public Slack.