The Raspberry Pi 5 is mighty far beyond its form-factor. When paired with an emerging database like QuestDB, how does it hold up under intensive workloads?
This article will evaluate raw database performance. We'll see what we can get out of the Pi5's minimal, power-efficient package. The article will introduce the Pi, QuestDB, our mission and method, and walk through it in detail so that you can replicate it.
And of course, we'll show our Time Series Benchmark Suite benchmarks.
With compute costs, power costs and storage costs rising every day, maybe the data centre of the future is a Pi cluster in the corner of your office?
Impossible! Or is it? Let's find out.
The Why of Pi
For those unfamiliar, the Raspberry Pi is a small, integrated computing device. It comes equipped with concise and minimal hardware. Since its creation in 2012, the Pi has gotten better with each release. The 5 marks a standout year. Why? Performance and power efficiency.
It's equipped with a 2.4 GHz Quad-Core 64-bit ARM Cortex-A76. It's small enough to maintain its power-sipping nature, while offering enough juice for common server workloads or a proper "desktop grade" experience. Its onboard GPU even supports Vulkan 1.2 which can offer light gaming if that's your thing.
The Raspberry Pi comes in 4GB and 8GB models and is deeply extensible. It has ports that can attach to a variety of sensors and common peripherals. Out of the box, it uses a small SD card for storage.
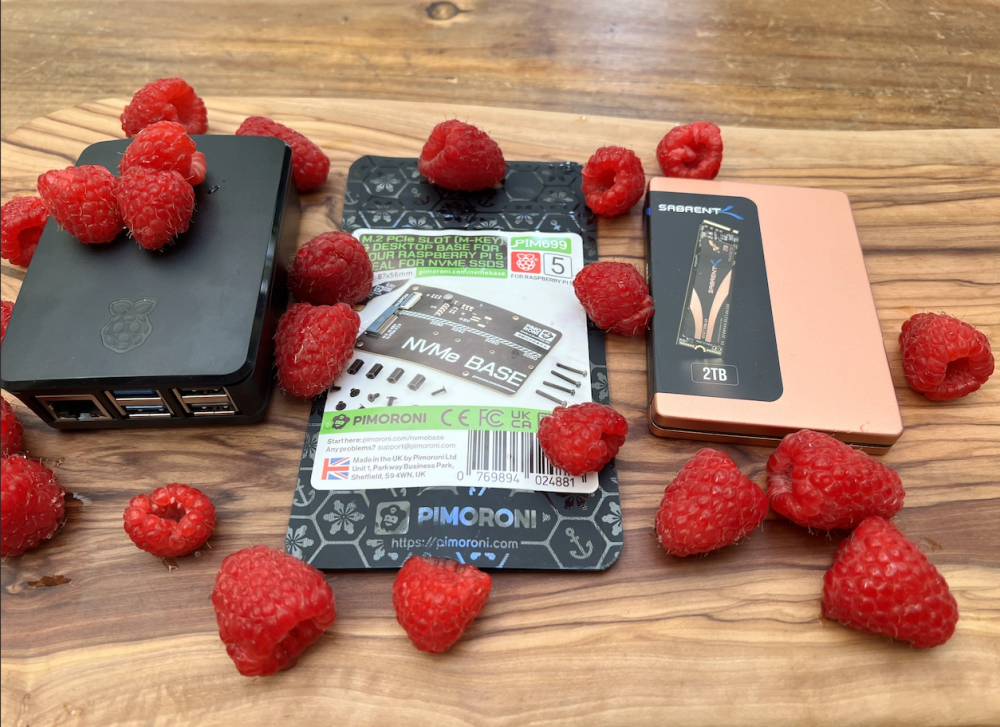
We're going to benchmark the 4GB version. But before we do, we're going to supe it up with an NVMe M.2 extension stack and a 2TB Rocket NVMe 4.0 drive.
Database: QuestDB
Once we've suped up our Raspberry Pi, we'll install QuestDB and run the Time-Series Benchmark Suite. This open source project is designed to mirror intense IoT and analytical-type data workloads. In short, it generates time-series data and blasts it into — or out of — an underlying database.
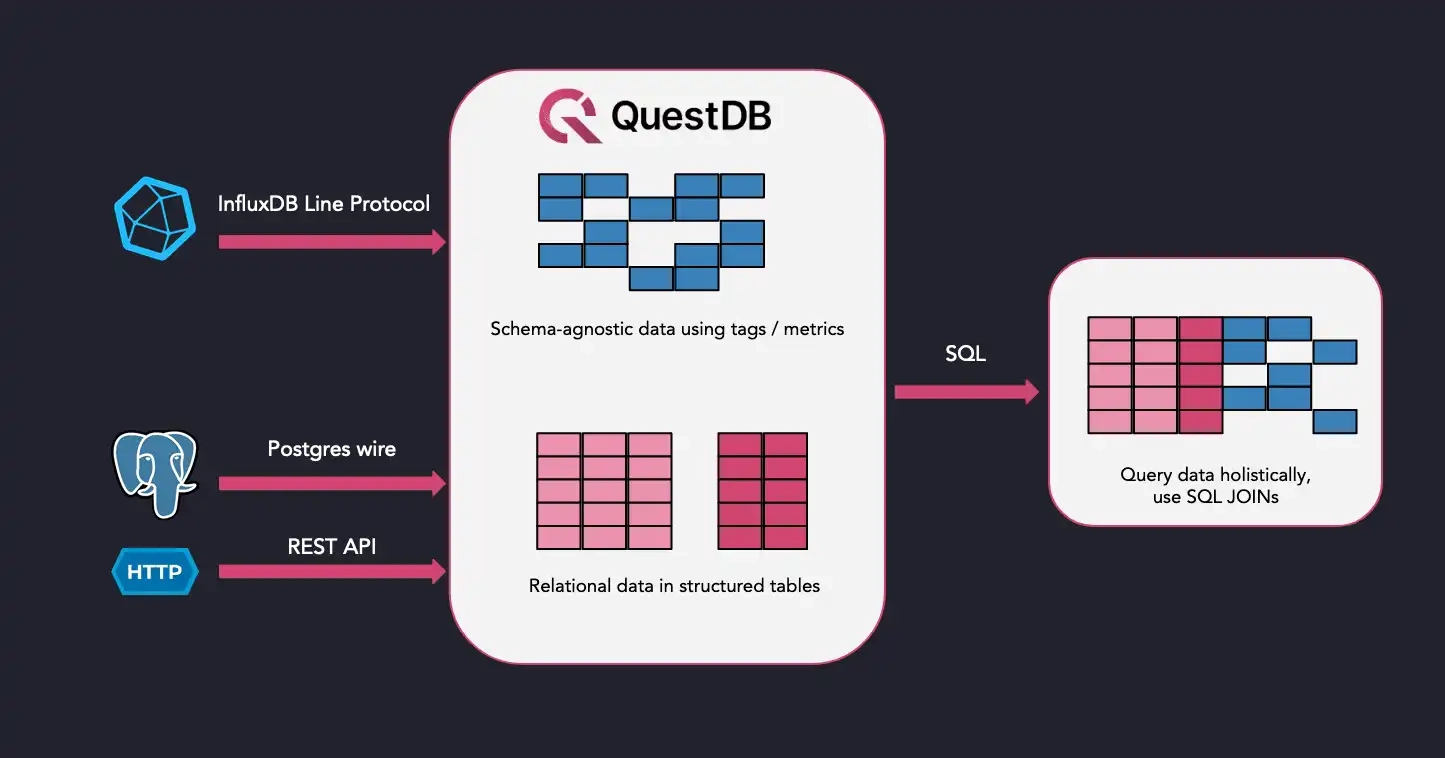
Our database is QuestDB. It's a high-performance database that specializes in any time-based workload. It offers category leading ingestion throughput and blazing fast SQL queries. It's open source, efficient and built from the ground-up to handle modern industry requirements. When packaged without Java it's less than 10MB.
See how QuestDB compares to databases like Timescale and InfluxDB
In our benchmark, we'll see just how many rows per second we can ingest based on different "scales" of data complexity. Then we'll see how quickly we can query this data.
Why? If building sophisticated sensor arrays, stitching together blockchains or financial data, or working with any stream of data related to time, the performance of an inexpensive, small-yet-punchy device and matching database is of great interest.
After all, data centres like AWS are hyper-sophisticated networks of computers. But if you can accomplish all of your intensive data analysis with a sub-$100 device, maybe you can save a ton of money. And avoid vendor lock-in to boot.
Make a Pi
OK. Now to supe up the Pi.
The NVMe drive will exceed 2000mb/s in both read and write. A top-of-the-line SD card will tickle 300mb/s at best. With a very fast NVMe drive, we'll move data as fast as the CPU can handle. Our bottleneck won't be storage. And an NVMe drive is also much more durable.
To prevent this article from stretching too long, we'll summarize the build steps and link to high quality resources.
Attach the M.2 drive
Our first step is to attach the NVMe drive to the Pi.
The manufacturer of the M.2 extension kit, Pimoroni, offers clear and easy-to-follow documentation.
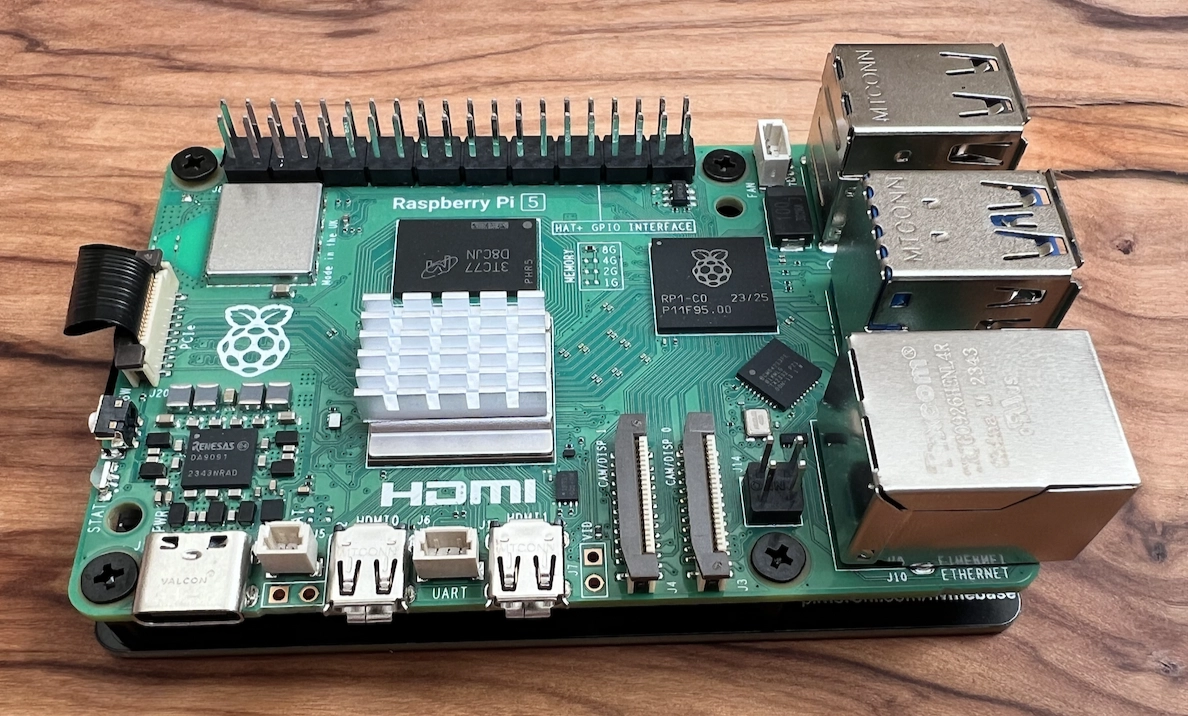
It involves fastening the Pi to the board:
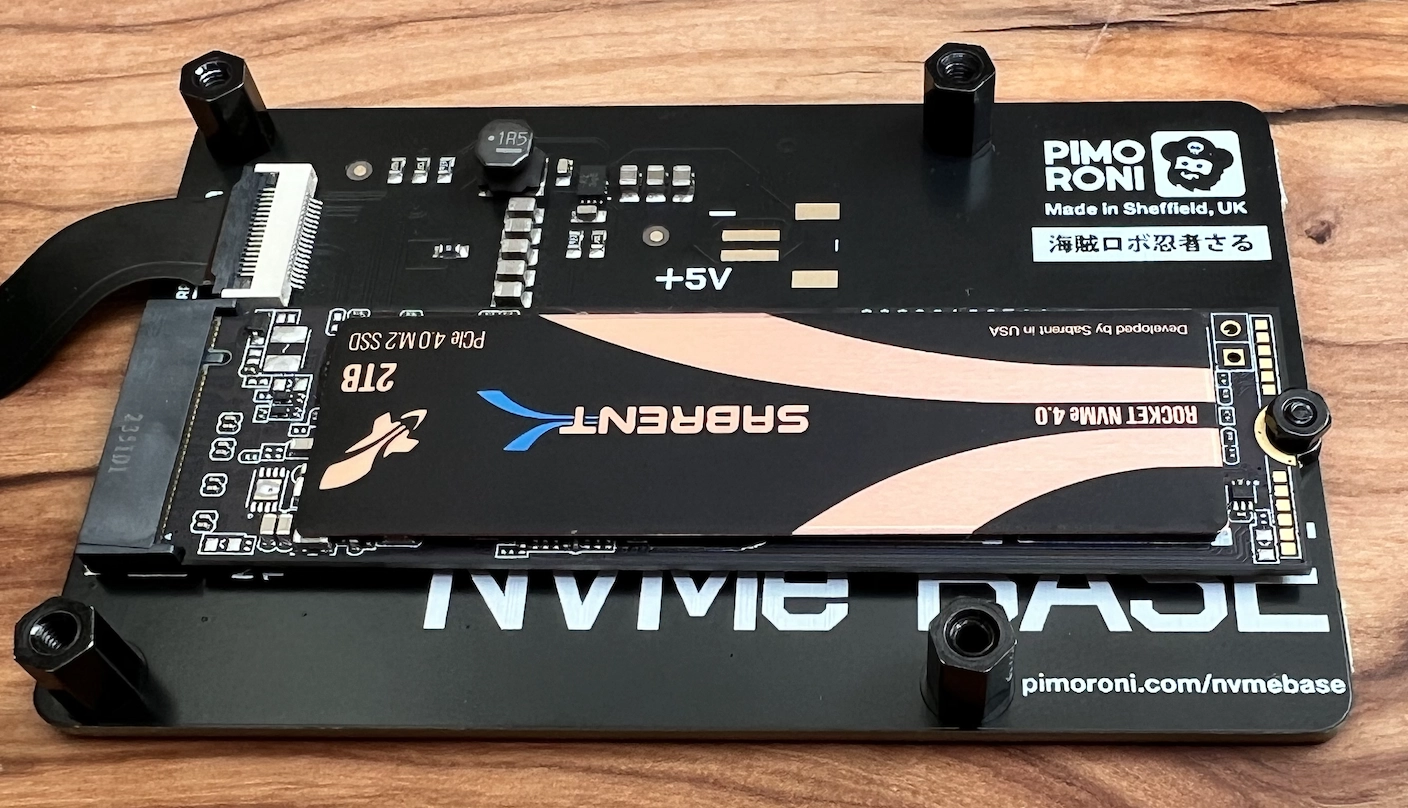
Then assembling it all together, with the delicate-yet-responsible bridge strip cable snapped-in:
After that, we secure it in the case. We recommend using a case with a fan. The extra air movement will ensure your Pi stays cool and comfortable, even during intense benchmarks.
All of the remaining steps occur on the software-side.
Set the Pi to M.2
For this step, we followed a solid guide from Tom's Hardware.
The M.2 is not automatically detected. To enable it, we edit the Raspberry Pi firmware settings. To do so, boot into the Pi and alter a couple configs, then reboot. If setup correctly, the system will reboot into the M.2 drive - which, at the moment, does not have an operating system.
So before we do that, we'll boot into Raspberry Pi OS one last time to pre-load our M.2 with an OS.
Install Ubuntu on the M.2
The Raspberry Pi often comes with an SD card, pre-loaded with Debian-based Raspberry Pi OS. However, to standardize our approach somewhat we’ll use the Raspberry Pi Imager — a fantastic utility — to put Ubuntu Server on our NVMe drive.

It’s helpful to pre-configure users, WiFi (if applicable) and SSH. You don’t have to, but it is time saving. That way, the Pi is setup somewhere comfortable and we can SSH into it from our usual workstation.
We’ll restart into our Ubuntu Server, ready to benchmark.
Benchmark QuestDB on the Pi
Our installation steps will run in a few parts.
To help you run this on your own, they’re written as bash scripts. Copy them, set them to executable, and run them in order. This will get you going. They’re commented so that you’re aware of what they’re doing, as there’s some nifty bits.
In total, we’ll:
- Setup our directory structure
- Download & install Go, the Time Series Benchmarking Suite (TSBS), the latest
cut of QuestDB, fresh from GitHub, and utilities and programs to facilitate
such as
make,mavenand Java - Generate a boat load of sample data
- Throw that data into QuestDB, with great haste
- Query that data out of QuestDB, with similar hastiness
Prepare dependencies
The following sets up the main directories and installs dependencies.
#!/bin/bash

# Ensure running as root to avoid permission issues, especially with apt and snap
if [ "$(id -u)" -ne 0 ]; then
    echo "This script must be run as root" >&2
    exit 1
fi

# Create the main data directory if it doesn't exist
if [ ! -d "/data/tsbs" ]; then
  echo "/data/tsbs does not exist, creating..."
  mkdir -p /data/tsbs/
fi

echo "Navigating to /data directory..."
cd /data

# Install Go using snap
echo "Installing Go..."
snap install go --classic

# Clone the TSBS repository if it doesn't exist
if [ ! -d "tsbs" ]; then
    echo "Cloning the TSBS repository..."
    git clone https://github.com/questdb/tsbs || { echo "Failed to clone TSBS repository"; exit 1; }
fi
cd tsbs

# Install make and other potentially missing build essentials
echo "Updating package lists..."
apt update
echo "Installing build-essential tools..."
apt install -y make build-essential || { echo "Failed to install build-essential tools"; exit 1; }

# Install Java, for ARM of course
echo "Installing Java for ARM..."
apt install -y openjdk-11-jdk || { echo "Failed to install Java"; exit 1; }
export JAVA_HOME="/usr/lib/jvm/java-11-openjdk-arm64"
echo "Java home is set to $JAVA_HOME"

# Install Maven
echo "Installing Maven..."
apt install -y maven || { echo "Failed to install Maven"; exit 1; }

# Compile the TSBS
echo "Compiling TSBS..."
make || { echo "TSBS compilation failed"; exit 1; }

# Create data and results directories within the TSBS directory
mkdir -p data/quest results

echo "System & TSBS setup complete. Run questdb.sh!"
With this, we've setup the system and TSBS.
Its directory is where we’ll perform the bulk of our operations.
Set up QuestDB
Note that we’re using the no-jre-bin version of QuestDB. It’s very
lightweight, and requires that we bring-our-own Java. It is less than 10MB!
The script will also initialize, configure, and start QuestDB:
#!/bin/bash

# Enter data dir
cd /data/ || { echo "Failed to change directory to /data/"; exit 1; }

# Clone the QuestDB repository if it doesn't exist
if [ ! -d "questdb" ]; then
    git clone https://github.com/questdb/questdb.git || { echo "Failed to clone repository"; exit 1; }
fi
cd questdb || { echo "Failed to change directory to questdb"; exit 1; }

# Build QuestDB without running tests
mvn clean package -DskipTests -P build-web-console,build-binaries || { echo "Build failed"; exit 1; }

# Go back to the parent directory
cd .. || { echo "Failed to navigate back to parent directory"; exit 1; }

# Copy the QuestDB binary package
cp questdb/core/target/questdb-*-no-jre-bin.tar.gz questdb-no-jre-bin.tar.gz || { echo "Failed to copy QuestDB package"; exit 1; }

# Extract the QuestDB package
tar -xvf questdb-no-jre-bin.tar.gz || { echo "Extraction failed"; exit 1; }

# Rename the QuestDB directory for easier access
mv questdb*-no-jre-bin questdb || { echo "Rename failed"; exit 1; }

# Start, then stop QuestDB to initialize configuration
./questdb/questdb.sh start || { echo "QuestDB start failed"; exit 1; }
./questdb/questdb.sh stop || { echo "QuestDB stop failed"; exit 1; }

# Create a directory for QuestDB root, adjust as necessary
mkdir -p /data/tsbs/QDB_ROOT || { echo "Failed to create QDB_ROOT directory"; exit 1; }

# Update the server configuration to set the database root directory
sed -i 's|#cairo.root=db|cairo.root=/data/tsbs/QDB_ROOT|g' /data/questdb-no-jre-bin/conf/server.conf || { echo "sed operation failed"; exit 1; }

# Start QuestDB with the new configuration
./questdb/questdb.sh start || { echo "QuestDB start with new config failed"; exit 1; }

echo "QuestDB is alive! Setup and initial configuration complete."
QuestDB is alive and well.
You can access it at http://localhost:3000.
The endpoint we'll target is at port 9000.
Time to generate data.
Generate data with TSBS
What kind? Server data. Hosts, in particular.
Servers are everywhere, and they generate waves of host-specific data. The region, its identifier, its operating system, processor type, a timestamp and more, are all included per row:
| hostname | region | datacentre | rack | os | arch | team | service | service_version | service_environment | usage_user | usage_system | usage_idle | usage_nice | usage_iowait | usage_irq | usage_softirq | usage_steal | usage_guest | usage_guest_nice | timestamp |
|---|---|---|---|---|---|---|---|---|---|---|---|---|---|---|---|---|---|---|---|---|
| host_0 | eu-central-1 | eu-central-1a | 6 | Ubuntu15.10 | x86 | SF | 19 | 1 | test | 58 | 2 | 24 | 61 | 22 | 63 | 6 | 44 | 80 | 38 | 2016-01-01T00:00:00.000000Z |
| host_1 | us-west-1 | us-west-1a | 41 | Ubuntu15.10 | x64 | NYC | 9 | 1 | staging | 84 | 11 | 53 | 87 | 29 | 20 | 54 | 77 | 53 | 74 | 2016-01-01T00:00:00.000000Z |
| host_2 | sa-east-1 | sa-east-1a | 89 | Ubuntu16.04LTS | x86 | LON | 13 | 0 | staging | 29 | 48 | 5 | 63 | 17 | 52 | 60 | 49 | 93 | 1 | 2016-01-01T00:00:00.000000Z |
Our specified time range means we’ll churn out around between 20-40 million rows of data just like this, depending on the scale. Keep in mind that as the number of hosts goes up, so does the cardinality.
We’ll sample 100, 1000, 4000, 100,000 or 1,000,000 servers, or hosts as our scale. This means that we'll generate information about 1,000,000 servers in bursts every 10 seconds. Each row will be unique. This is very high cardinality. Many databases struggle as cardinality goes up.
The generation is also based on a seed. Using a seed means that our dataset is
deterministic. If anyone wants to replicate just this, use the seed to
replicate our results. And finally, our base parameter for benchmarking is
cpu_only as opposed to a specific use-case like IoT.
Now, enough talkin'.
Let’s generate:
#!/bin/bash

# Define the base directory
DATA_DIR="/data/quest"
mkdir -p $DATA_DIR

scales=(100 1000 4000 100000 1000000)

for scale in "${scales[@]}"; do
    # Set the default timeout duration
    timeout_duration="2m"

    echo "Generating data for scale $scale with a timeout of $timeout_duration..."
    if ! timeout $timeout_duration bin/tsbs_generate_data --use-case="cpu-only" --seed=123 --scale=$scale --timestamp-start="2016-01-01T00:00:00Z" --timestamp-end="2016-01-15T00:00:00Z" --log-interval="10s" --format="questdb" > $DATA_DIR/cpu_only_$scale; then
        echo "Failed to generate data for scale $scale."
        continue  # Skip this scale and go to the next
    fi

    echo "Truncating the last line of scale $scale..."
    if ! truncate_size=$(tail -n 1 "$DATA_DIR/cpu_only_$scale" | wc -c | xargs); then
        echo "Failed to calculate the size of the last line for scale $scale."
        continue  # Skip truncation if last line size calculation fails
    fi

    if ! truncate "$DATA_DIR/cpu_only_$scale" -s -$truncate_size; then
        echo "Failed to truncate the last line for scale $scale."
        continue  # Skip this scale and go to the next
    fi

    echo "Completed scale $scale."
done

echo "All data generation and truncation processes are complete."
Now the data is there, in bulk.
At last: Let’s see how QuestDB can do.
Benchmark QuestDB ingest
QuestDB is no stranger to massive data volumes.
We'll ingest data using QuestDB's InfluxDB Line Protocol support which operates over HTTP.
Another script will do:
#!/bin/bash

# Declare arrays to hold scales and worker numbers
declare -a scales=()
declare -a workers=()

# Parse command line options
while getopts 's:w:' flag; do
    case "${flag}" in
        s) scales+=("${OPTARG}") ;;
        w) workers+=("${OPTARG}") ;;
    esac
done

# Loop through all scale and worker combinations
for scale in "${scales[@]}"; do
    for worker in "${workers[@]}"; do
        # Drop the CPU table if it exists, suppressing output
        if curl "localhost:9000/exec?query=drop%20table%20if%20exists%20cpu" > /dev/null 2>&1; then
            echo "Table dropped successfully or did not exist. Running for scale: $scale, workers: $worker"
        else
            echo "Failed to drop table, continuing anyway..."
        fi

        # Execute the data loading script with the specified number of workers and direct all output to stdout
        bin/tsbs_load_questdb --file="data/quest/cpu_only_$scale" --workers=$worker
    done
done
As discussed earlier, we'll provide different "scale" levels.
For each scale, we'll test using the full set of workers:
bash bench_run.sh -s 100 -s 1000 -s 4000 -s 100000 -s 1000000 -w 4 -w 8 -w 12 >> results/run_1.txt
We can pass as many workers as we'd like, but given the small hardware profile and 4GB of available RAM, we'll max out at 12. We suspect that managing workers at million-scale would ultimately lead to performance degradation.
After we've generated the results, we'll clip out the necessary information:
awk '/Running for scale.*/ || /loaded [0-9]+ rows .*/' results/run_1.txt
The result...
We can see the average, median and max by scale and worker count.
This is every second:
| Scale | Workers | Avg. | Median | Max |
|---|---|---|---|---|
| 100 | 4 | 348882 | 346908 | 360503 |
| 8 | 331748 | 332514 | 334071 | |
| 12 | 329552 | 330254 | 330512 | |
| 1000 | 4 | 301448 | 298256 | 311138 |
| 8 | 303412 | 299620 | 311846 | |
| 12 | 297293 | 295555 | 305407 | |
| 4000 | 4 | 293759 | 293013 | 298257 |
| 8 | 265472 | 265778 | 275438 | |
| 12 | 265083 | 265455 | 272074 | |
| 100,000 | 4 | 270486 | 269556 | 274466 |
| 8 | 263547 | 280731 | 285468 | |
| 12 | 233756 | 221700 | 265499 | |
| 1,000,000 | 4 | 311230 | 311292 | 312914 |
| 8 | 294654 | 302839 | 304174 | |
| 12 | 282393 | 282387 | 282521 |
With 4 workers, we can easily handle near or over 300,000 rows per second in most scenarios. As we expected, additional workers don't necessarily help with such a small pool of resources. More RAM may change the equation, but that's unlikely. The bottle neck will be the CPU.
This general shape of data volume contains many real-life use-cases.
Not bad for a computer that can fit into your pocket!
The implications of the results are fascinating.
And what about queries?
Benchmark QuestDB queries
We'll generate the queries, then run them many times for an average.
For this exercise we'll simulate queries over 100M rows, which is around 1 billion metrics:
#!/bin/bash

# Declare arrays to hold scales
declare -a scales=()
# Declare a scalar for number of queries
declare queries=''

declare -a query_names=('single-groupby-1-1-1' 'single-groupby-1-1-12' 'single-groupby-1-8-1' 'single-groupby-5-1-1' 'single-groupby-5-1-12' 'single-groupby-5-8-1' 'cpu-max-all-1' 'cpu-max-all-8' 'double-groupby-1' 'double-groupby-5' 'double-groupby-all' 'high-cpu-all' 'high-cpu-1' 'lastpoint' 'groupby-orderby-limit')

while getopts 's:q:' flag; do
    case "${flag}" in
        s) scales+=("${OPTARG}") ;;
        q) queries="${OPTARG}"  ;;  # Set queries as a scalar
    esac
done

for scale in "${scales[@]}"; do
    echo "Generating queries for scale: $scale, number of queries: $queries"
    for query_name in "${query_names[@]}"; do
        echo "Generating $query_name"
        output_file="data/quest/${query_name}_scale_${scale}.txt"  # Unique filename for each scale and query
        if ! bin/tsbs_generate_queries --use-case="cpu-only" --seed=123 --scale=$scale --timestamp-start="2016-01-01T00:00:00Z" --timestamp-end="2016-01-15T00:00:00Z" --queries="$queries" --query-type="$query_name" --format="questdb" > "$output_file"; then
            echo "Failed to generate queries for $query_name at scale $scale."
            continue  # Skip this query and go to the next
        fi
        echo "Running query bench for $query_name"
        if ! bin/tsbs_run_queries_questdb --file="$output_file" --workers=10 >&1; then
            echo "Failed to run queries for $query_name at scale $scale."
            continue  # Skip this query and go to the next
        fi
        echo "$query_name complete."
        echo ""
    done
done
Our script receives a scale value, the same as in the ingestion piece. We'll use 4000, which is in the middle and representative of many real use-cases. We'll also pass the number of times we'll query:
./generate_run_queries.sh -s 4000 -q 1000 >> results/query_1.txt
The benchmark indicates how long it takes these queries to execute within that many rows and thus metrics. These queries apply a variety of extensions, which are defined as such:
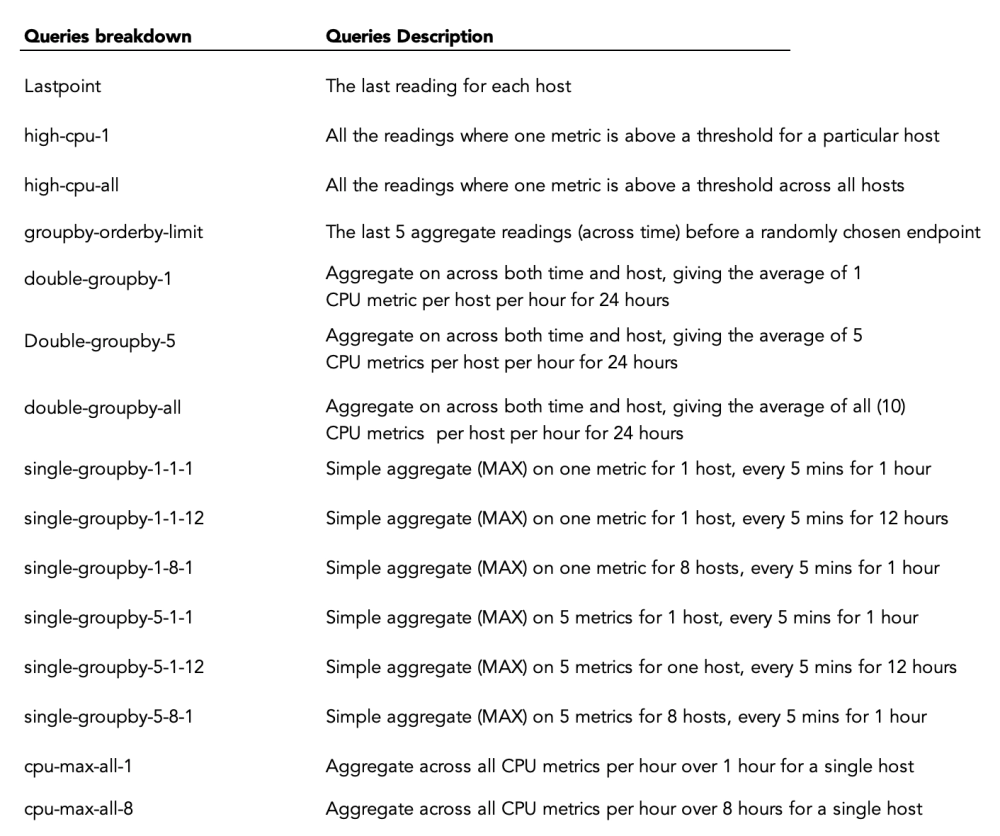
And the results are...
| Type | Mean Query Time (ms) |
|---|---|
| lastpoint | 7980.03 |
| high-cpu-1 | 8.41 |
| high-cpu-all | 75.06 |
| groupby-orderby-limit | 10060.98 |
| double-groupby-1 | 128.82 |
| double-groupby-5 | 113.99 |
| double-groupby-all | 134.53 |
| single-groupby-1-1-1 | 27.89 |
| single-groupby-1-1-12 | 18.97 |
| single-groupby-1-8-1 | 16.51 |
| single-groupby-5-1-1 | 13.57 |
| single-groupby-5-1-12 | 15.72 |
| single-groupby-5-8-1 | 14.14 |
| cpu-max-all-1 | 16.40 |
| cpu-max-all-8 | 10.88 |
There's some struggle in lastpoint and groupby-orderby-limit.
But in most context the results are impressive.
Given the small CPU in the Pi5 and the billion values, not bad!
Summary
As more and more workloads pour into the hyper-scaler Clouds, it's neat to see a pocket-sized revolution unfurl in the hardware world. Not long ago these results would have been inconceivable. But the Raspberry Pi 5 is an impressive device. Teamed up with QuestDB, it's an analytics powerhouse in a small package.
When we take a step back, in global networking and data analytics, the speed of light is ultimately the bottle neck. Transporting data from your sensors, apps, rockets, or whatever it may be, over networks can only be so fast. But as these small devices get more powerful, we're capable of putting the analysis right next to or as a part of the sensor, app or device itself.
Though it's a fun thought and not always sane in practice, we can safely wonder. Maybe the data centres of the future are indeed a local, wired-up shoe-box with a bunch of small machines in it and a fan on top.
Want more Pi?
If this sort of thing is up your alley, we've got more fun Pi projects:
- Create an IoT server with QuestDB and a Raspberry Pi
- Build a temperature IoT sensor with Raspberry Pi Pico & QuestDB
- Create an ADS-B flight radar with QuestDB and a Raspberry Pi
We'd also love to see your benchmarks.
Can you replicate this scenario? Improve upon it?
Is there a DB that can do this better, or faster?
Let us know on social media or in our engaging Community Forum.