Migrate from InfluxDB
QuestDB's first-party clients leverage the InfluxDB Line Protocol (ILP).
As a result, the InfluxDB clients work with QuestDB.
This guide demonstrates how to use InfluxDB's clients with QuestDB.
If you don't use the InfluxDB clients and want to use the QuestDB clients, see the ingestion overview.
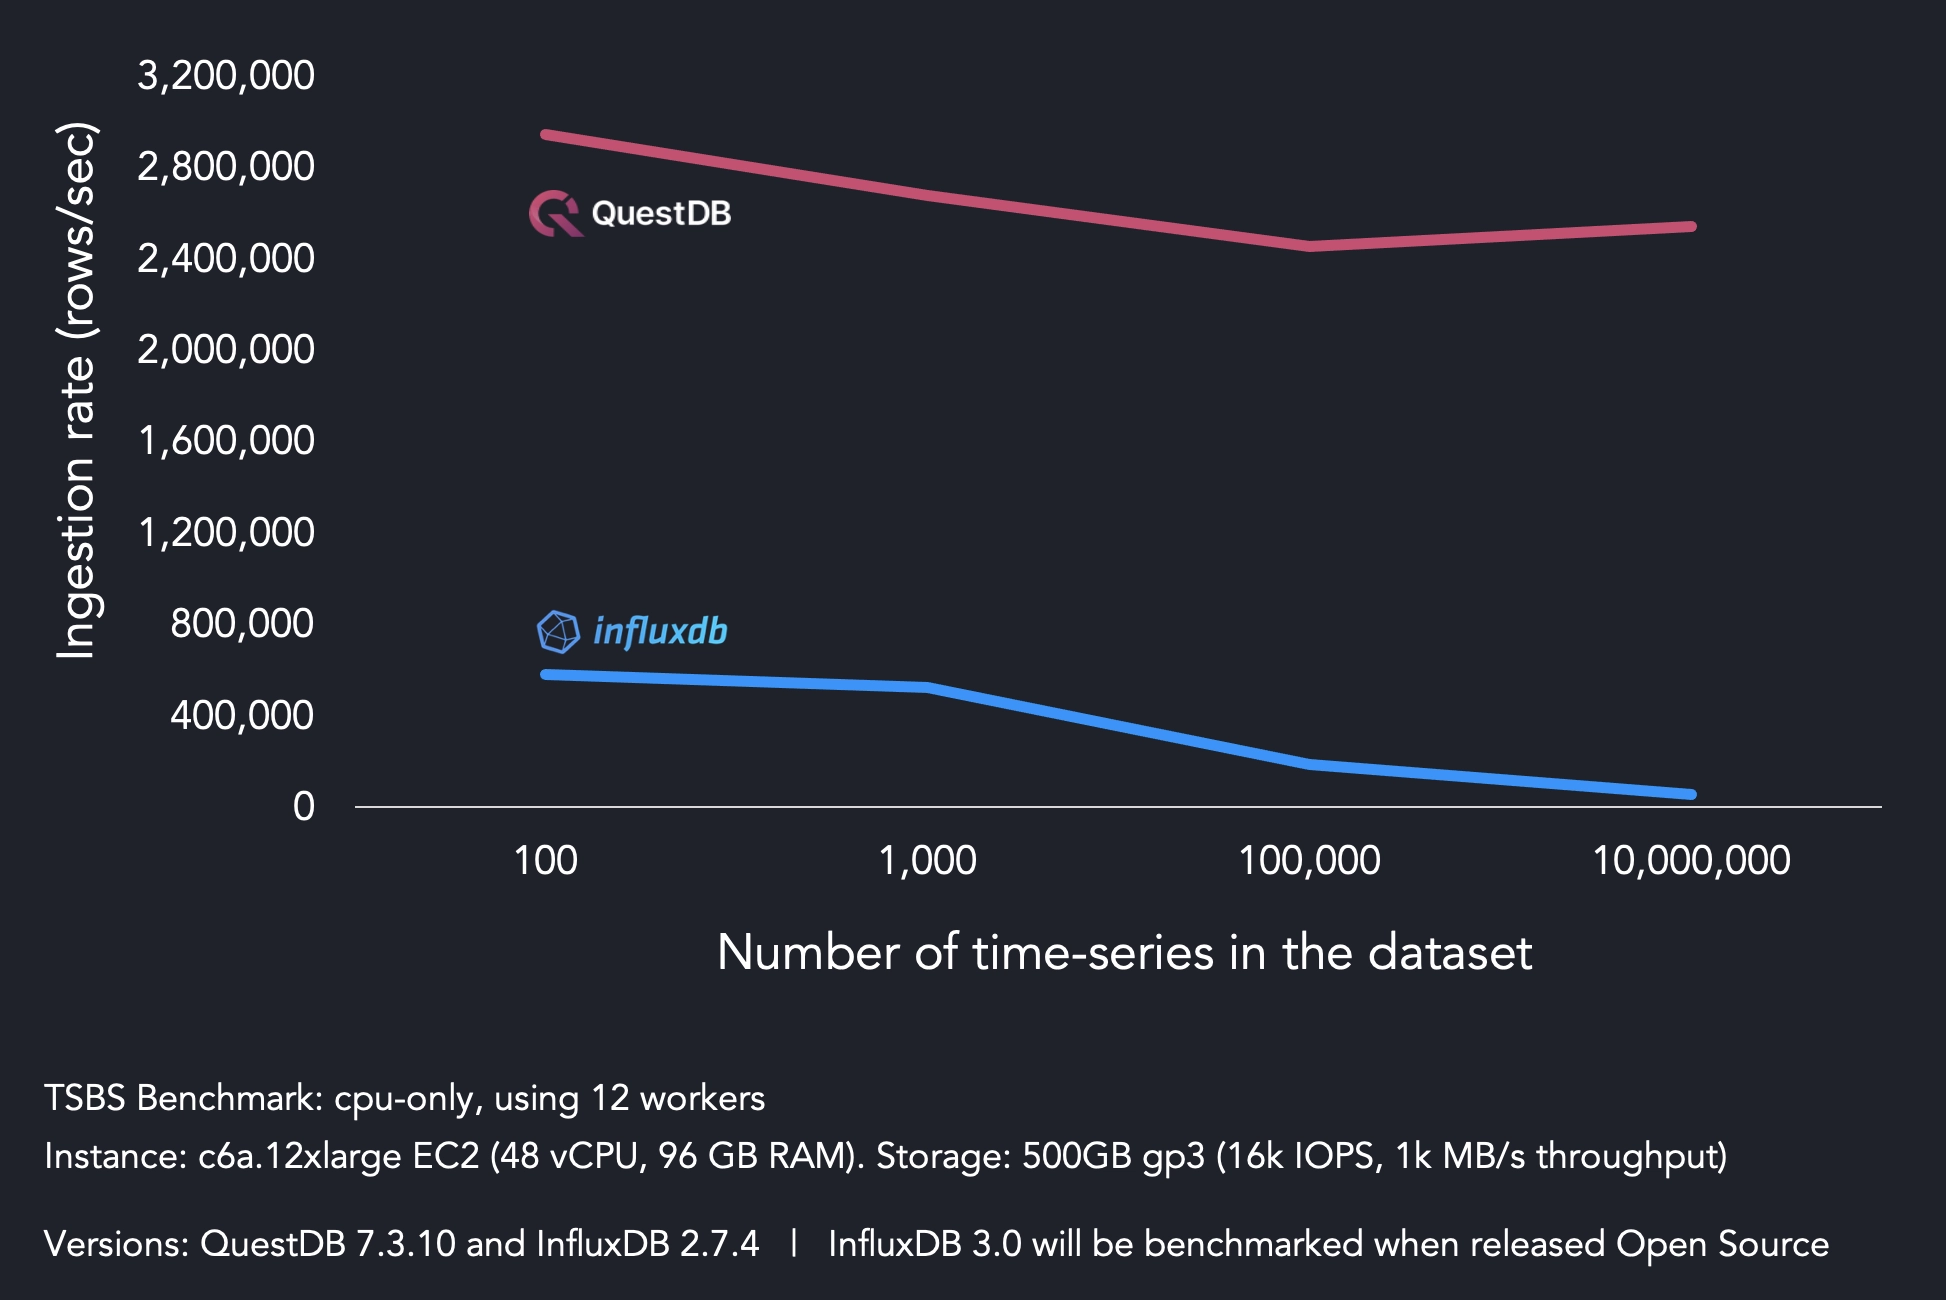
While InfluxDB clients are supported, we recommend using the QuestDB clients.
Overview
If QuestDB is not up and running, see the quick start.
Tables are automatically created during insert.
There is no need for an upfront schema!
Example with InfluxDB's Python client
Our example is adapted from the InfluxDB Python client repo.
There are many ways that the client can be utilized.
The InfluxDB clients have many examples, and you may already be deep into a usage pattern.
Therefore the example below provides trivialized write examples.
Switch client URLs
By default, the InfluxDB connection string of http://localhost:8086 is included in client examples.
With QuestDB, change url in the client method to an active QuestDB instance.
The default QuestDB endpoint is: http://localhost:9000.
If you would prefer to use 8086 or any port, alter the HTTP port via
http.bind.to in server.conf:
http.bind.to=0.0.0.0:8086
Now apply the client & write as per usual:
from datetime import datetime
from influxdb_client import InfluxDBClient, Point, WritePrecision
from influxdb_client.client.write_api import SYNCHRONOUS

# Create a new client - note the QuestDB HTTP port (9000)
# Pass the username and password for basic auth
# If Enterprise, swap clients to use below username & password string:
# client = InfluxDBClient(url="http://localhost:9000", username="admin", password="questdb")
client = InfluxDBClient(url="http://localhost:9000", token="")

# Use blocking write client for writes to desired bucket
write_api = client.write_api(write_options=SYNCHRONOUS)

# Create point using full params constructor
p = Point("stat").tag("unit", "temperature").field("avg", 24.5).field("max", 45.0).time(datetime.utcnow(), WritePrecision.NS)

# Write point immediately
write_api.write(bucket="qdb", record=p, write_precision=WritePrecision.NS)

# Create point using fluent style
p = Point("stat").tag("unit", "temperature").field("avg", 23.2).field("max", 45.0).time(datetime.utcnow(), WritePrecision.NS)

# Write point
write_api.write(bucket="qdb", record=p, write_precision=WritePrecision.NS)

# Or write directly via line protocol
line = "stat,unit=temperature avg=23.5,max=45.0"
write_api.write(bucket="qdb", record=line)
Features
Error handling
Our example table above created avg & max columns which were given inferred
types of double:
p = Point("stat").tag("unit", "temperature").field("avg", 24.5).field("max", 45.0).time(datetime.utcnow(), WritePrecision.NS)
If a request were then to be made that, say, passed strings instead:
p = Point("stat").tag("unit", "temperature").field("avg", "24.5").field("max", "45.0").time(datetime.utcnow(), WritePrecision.NS)
A helpful error will be presented:
panic: invalid: failed to parse line protocol:errors encountered on line(s):
error in line 1: table: stat, column: avg; cast error from protocol type: STRING to column type: DOUBLE
Precision
Pass precision parameters to ensure correct timestamp increment:
...
p = Point("stat").tag("unit", "temperature").field("avg", 24.5).field("max", 45.0).time(datetime.utcnow(), WritePrecision.NS)
...
Precision parameters include n or ns for nanoseconds, u or us for
microseconds, ms for milliseconds, s for seconds, m for minutes and h
for hours. Otherwise, it will default to nanoseconds.
Ping! Health check
Is your server running? Well then you'd better... catch it!
But in all seriousness, a health check endpoint is always of high usefulness.
curl -I http://localhost:9000/ping
Returns (pong!):
HTTP/1.1 204 OK
Server: questDB/1.0
Date: Fri, 2 Feb 2024 17:09:38 GMT
Transfer-Encoding: chunked
Content-Type: text/plain; charset=utf-8
X-Influxdb-Version: v2.7.4
Determine whether an instance is active and confirm the version of InfluxDB Line Protocol with which you are interacting.
Transform data in QuestDB
InfluxDB exports only one metric for each line. If you are storing more than one
metric for the same series, one row will create multiple ILP lines with one
valid metric value. The other metrics then show as NULL. Therefore, once your
data arrives we recommend transforming it in QuestDB.
For example, if you query a table with several metrics:
SELECT * FROM diagnostics WHERE timestamp = '2016-01-01T00:00:00.000000Z' AND driver='Andy' AND name='truck_150')
Your result may be something like this:
| device_version | driver | fleet | model | current_load | timestamp | fuel_capacity | fuel_state | load_capacity | nominal_fuel_consumption | status | name |
|---|---|---|---|---|---|---|---|---|---|---|---|
| v1.0 | Andy | West | H-2 | null | 2016-01-01T00:00:00.000000Z | null | null | 150 | null | null | truck_150 |
| v1.0 | Andy | West | H-2 | null | 2016-01-01T00:00:00.000000Z | null | null | 150 | 12 | null | truck_150 |
| v1.0 | Andy | West | H-2 | null | 2016-01-01T00:00:00.000000Z | null | null | 150 | null | null | truck_150 |
| v1.0 | Andy | West | H-2 | 0 | 2016-01-01T00:00:00.000000Z | null | null | 150 | null | null | truck_150 |
| v1.0 | Andy | West | H-2 | null | 2016-01-01T00:00:00.000000Z | 150 | null | 150 | null | null | truck_150 |
| v1.0 | Andy | West | H-2 | null | 2016-01-01T00:00:00.000000Z | null | 1 | 150 | null | null | truck_150 |
To solve this, execute a SQL query grouping data by all dimensions and then select the maximum values for all the metrics:
SELECT
  timestamp,
  device_version,
  driver,
  fleet,
  model,
  name,
  max(current_load) AS current_load,
  max(fuel_capacity) AS fuel_capacity,
  max(fuel_state) AS fuel_state,
  max(load_capacity) AS load_capacity,
  max(nominal_fuel_consumption) AS nominal_fuel_consumption,
  max(status) AS status
FROM
  diagnostics;
This produces aggregated rows containing all the metrics for each dimension group:
| timestamp | device_version | driver | fleet | model | name | current_load | fuel_capacity | fuel_state | load_capacity | nominal_fuel_consumption | status |
|---|---|---|---|---|---|---|---|---|---|---|---|
| 2016-01-01T00:00:00.000000Z | v1.0 | Derek | East | G-2000 | truck_3248 | 0 | 300 | 1 | null | null | null |
| 2016-01-01T00:00:00.000000Z | v1.0 | Derek | East | G-2000 | truck_2222 | 0 | 300 | 1 | 5000 | 19 | 0 |
| 2016-01-01T00:00:00.000000Z | v1.0 | Derek | East | G-2000 | truck_1886 | 0 | 300 | 1 | 5000 | 19 | 0 |
| 2016-01-01T00:00:00.000000Z | v1.0 | Derek | East | G-2000 | truck_1540 | 0 | 300 | 1 | 5000 | 19 | 0 |
| ... (rows continue) ... | ... | ... | ... | ... | ... | ... | ... | ... | ... | ... | ... |
| 2016-01-01T00:00:00.000000Z | v1.0 | Andy | West | H-2 | truck_583 | 0 | 150 | 1 | 1500 | 12 | 0 |
| 2016-01-01T00:00:00.000000Z | v1.0 | Andy | West | H-2 | truck_3546 | 0 | 150 | 1 | 1500 | 12 | 0 |
| 2016-01-01T00:00:00.000000Z | v1.0 | Andy | West | H-2 | truck_3247 | 0 | 150 | 1 | 1500 | 12 | 0 |
You can use the INSERT keyword to output the processed result into a new table.
Also, if you leverage Telegraf, you can do this with a small configuration change:
# -- AGGREGATOR PLUGINS ------------------------------------------------- #
# Merge metrics into multifield metrics by series key
[[aggregators.merge]]
  ## If true, the original metric will be dropped by the
  ## aggregator and will not get sent to the output plugins.
  drop_original = true
Dig deeper
Now that you know the basics of InfluxDB Line Protocol, you may want to dig deeper into customization options for ILP or HTTP, learn more about the protocol, or compare QuestDB with Influx: