OpenID Connect (OIDC) Integration
OpenID Connect (OIDC) integrates with Identity Providers (IdP) external to QuestDB.
It is a convenient way to integrate QuestDB into your enterprise environment, and it provides SSO (Single Sign-On) for the Web Console.
Microsoft Active Directory and Azure AD, for example, can be turned into an Identity Provider.
Specific installation steps depend on the type of the provider.
OpenID Connect (OIDC) is only available in QuestDB Enterprise.
Active Directory
See our example using PingFederate with Active Directory.
Architecture
Altogether, the architecture appears as such:
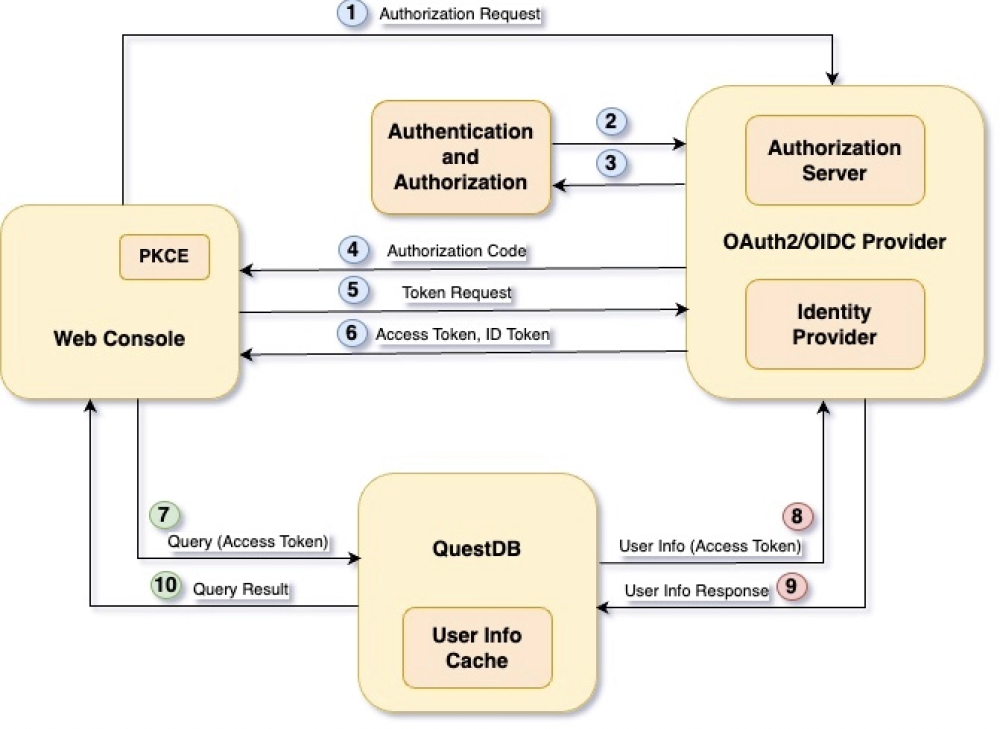
We can break it down into core components.
Web Console
QuestDB's interactive UI. Users must authenticate before accessing the database via the interface.
The Web Console uses PKCE (Proof Key for Code Exchange) to secure the authentication and authorization flow.
In OAuth2/OIDC terms, the Web Console is referred to as the client, and it is assigned an identifier, the Client Id.
Each application integrates via OIDC should be given a different Client Id.
OIDC Provider
Typically consists of a number of modules.
We are interested in two of them only.
-
The Identity Provider holds user identities and user information, capable of authenticating users, and to issue an ID Token which uniquely identify them.
-
The Authorization Server grants access to resources, such as a database, in the form of access tokens.
The OIDC Provider usually integrates with a number of applications which require different access to a number of resources.
These clients communicate with the OIDC Provider via its endpoints.
It exposes a number of APIs, including the Authorization, Token and User Info endpoints.
QuestDB
The database, in OAuth2/OIDC terms the protected resource or resource server.
Only processes requests which contain a valid access token.
Authentication and Authorization Flow
The OAuth2/OIDC standard defines different ways of obtaining access and ID tokens from the OIDC Provider, referred to as the "flow".
The goal of this flow is to get the user, who is sitting in front of the Web Console, authenticated.
Then, it allows QuestDB to determine the user's permissions based on user information provided by the Identity Providers.
Specifically, the QuestDB Web Console uses the
Authorization Code Flow with PKCE option.
It consists of ten steps...
1. Secret generation
First the Web Console generates a cryptographically strong random secret, called the code verifier.
The secret is hashed using the SHA256 algorithm, the result is the code challenge.
After PKCE initialization the Web Console requests an authorization code from the OIDC Provider.
It calls the Authorization endpoint with a few parameters, including the:
- Client Id
openidandprofilescopes- code challenge
- method which was used to generate it from the code verifier (SHA256)
When the Authorization Server receives the request, it checks if the user has been authenticated already:
-
If the user has a valid session, it can be provided with an authorization code straight away, so we jump to step 4.
-
If the user does not have a valid session yet, it will be redirected to the Identity Provider for authentication.
https://oidc.provider:443/as/authorization.oauth2?client_id=questdb&response_type=code&scope=openid+profile&redirect_uri=https%3A%2F%2Fquestdb.host%3A9000&code_challenge=IwZ-WuypAY3fMtvismbj1MQUe5CzMgrBa87nYcgFoLQ&code_challenge_method=S256
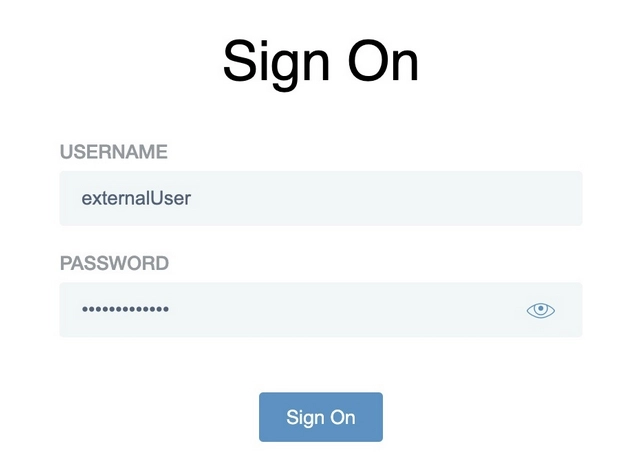
2. Prove identity
Next, the user must prove its identity.
This could be a username with:
- a password,
- an OTP
- facial recognition via a mobile app
- anything supported by the Identity Provider.
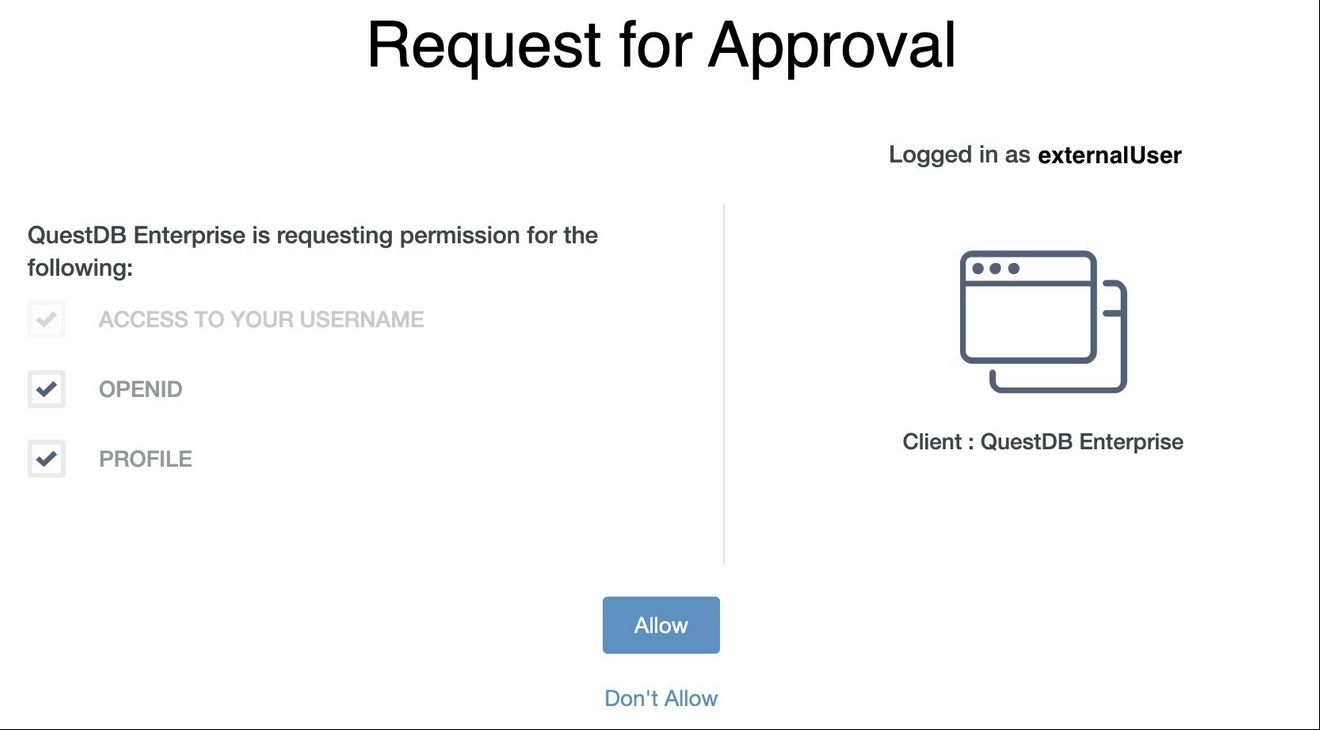
3. Scope consent
After successful authentication, the user provide consent for the requested scopes:
-
The scope
openidis authorization for using OIDC. No ID Token is issued without it. -
The scope
profileauthorizes the client to access user information.
The OIDC provider can be configured to provide the consent automatically, without presenting the user with an additional screen in the browser.
4. Redirection
Consent is granted!
The Authorization Server redirects the user back to the Web Console with the authorization code:
https://questdb.host:9000/?code=1L344XEY5XRka1j4ySNa8bVQSLf71as9uGLEuv_A
5. Credential request
Now, the QuestDB Web Console requests the ID and access tokens from the Token endpoint of the OIDC Provider with the authorization code.
It includes the Client ID and the PKCE code verifier together with the authorization code in the request.
The endpoint then hashes the code verifier using the method specified previously in step 1.
The result must match the code challenge, also provided in step 1.
The matching code challenge proves that the token is requested by the client which requested the authorization code, and it was not stolen:
POST https://oidc.provider:443/as/token.oauth2 HTTP/1.1
Content-Type: application/x-www-form-urlencoded
grant_type=authorization_code&code=1L344XEY5XRka1j4ySNa8bVQSLf71as9uGLEuv_A&client_id=questdb&&redirect_uri=https%3A%2F%2Fquestdb.host%3A9000&code_verifier=uGZh4sQffXLgRna7D-jtEAkuXzp7Lm_okZXBljzP38coAD44kEheIaz7Pdh98KxYtYLZHNiQPCczQYeF
6. Credentials received
If the PKCE check is passed, the Web Console receives the ID and access tokens.
There is also a third token in the response too, the refresh token.
The refresh token is used by the Web Console to refresh the access token before it expires.
Without the refresh token mechanism, the user would be forced to re-authenticate when the access token expires.
The validity of the tokens are configurable inside the OIDC Provider.
{
  "access_token": "gslpJtzmmi6RwaPSx0dYGD4tEkom",
  "refresh_token": "FUuAAqMp6LSTKmkUd5uZuodhiE4Kr6M7Eyv.eg83ge",
  "id_token": "eyJhbGciOiJSUzI1NiIsImtpZCI6I...",
  "token_type": "Bearer",
  "expires_in": 300 // In seconds, thus 5 minutes
}
7. Database access
With the tokens, the Web Console can interact with the database.
The access token is in the header of every request sent to QuestDB.
Worried about the token? It is rather opaque and does not contain user details.
To carry out permission checks, the database has to know more about the user. For this, QuestDB has a User Info Cache.
If it finds a valid entry with the access token in the cache, steps 8 and 9 are skipped.
https://questdb.host:9999/exec?query=select%20current_user()
Authorization: Bearer gslpJtzmmi6RwaPSx0dYGD4tEkom
8. Find user information
No user information in the cache, or stale information?
QuestDB uses the access token to request user information from the OIDC Provider's User Info endpoint.
This call also serves as token validation, because if the token is not real or has been expired, the User Info endpoint replies with an error.
https://oidc.provider:443/idp/userinfo.openid
Authorization: Bearer gslpJtzmmi6RwaPSx0dYGD4tEkom
9. Receive user information
If the access token is valid, QuestDB receives the required user information from the endpoint, and it will update its cache.
The cache improves performance, as the database does not have to turn to the OIDC Provider on every single request.
Cache expiry is configurable in QuestDB.
{
  "sub": "externalUser",
  "name": "External User",
  "groups": ["externalGroup1", "externalGroup2"]
}
10. Permission check
With the help of the user information QuestDB can carry out permission checks
If the permission check is successful, the database will processes the request, and then sends the results back.
{
  "query": "select current_user()",
  "columns": [
    {
      "name": "current_user",
      "type": "STRING"
    }
  ],
  "dataset": [["External User"]],
  "count": 1,
  "timestamp": -1
}
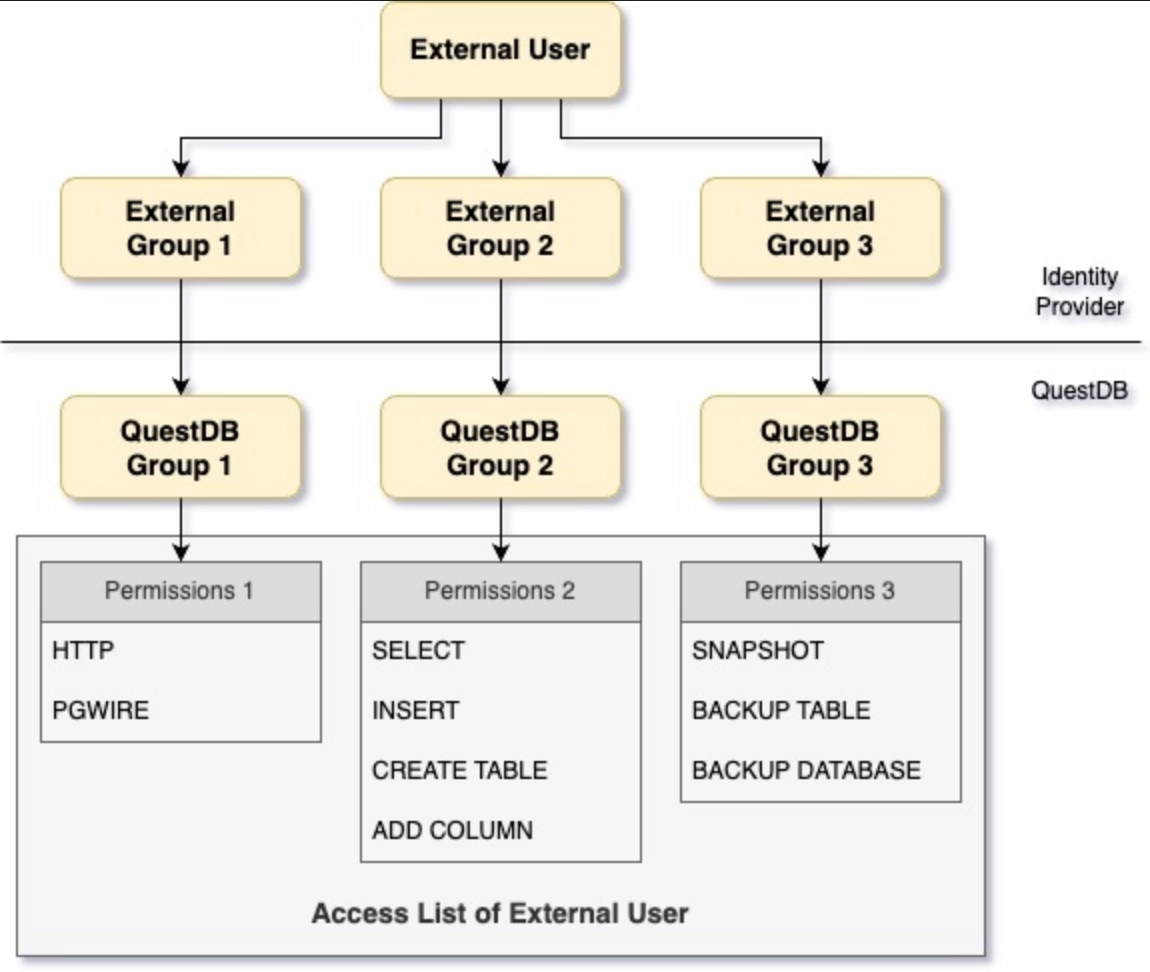
User permissions
As mentioned earlier, QuestDB requires user information to be able to construct the user's access list.
As a reminder, the access list is the list of permissions that determines what the user can and cannot do.
QuestDB itself does not store external users, nor their passwords or any other authentication related detail.
External users and their authentication methods are managed by the Identity Provider.
Since external users are not managed by QuestDB, permissions cannot be granted to them directly.
Instead the database expects a list of groups, called the groups claim to be present in the user information.
These external group names are then mapped to QuestDB's own groups.
The access list of the external user consists of the permissions granted to those groups:
Mapping user permissions
The mappings between external and QuestDB groups are managed with the following SQL commands:
CREATE GROUP groupName WITH EXTERNAL ALIAS externalGroupName;
ALTER GROUP groupName WITH EXTERNAL ALIAS externalGroupName;
ALTER GROUP groupName DROP EXTERNAL ALIAS externalGroupName;
QuestDB works the list of external groups out from the User Info response message.
If we take the example used earlier, we will see that the message contains a
claim called groups. This name is configurable in QuestDB.
If the groups claim is missing or it is an empty list, the user cannot access the database.
Although the user is authenticated, they have no permissions at all.
The user has to have at least the HTTP permission to be able to successfully
login via the Web Console.
{
  "sub": "externalUser",
  "name": "External User",
  "groups": ["externalGroup1", "externalGroup2"]
}
Any change made to the user's group membership in the Identity Provider, QuestDB will adjust the user's access list.
This might not be immediate because of the User Info Cache.
QuestDB will use the cached information until it becomes stale, and gets updated.
The same stands for changes made to the user's status within the Identity Provider.
For example, a disabled user will not be kicked out of QuestDB immediately.
The acl.oidc.cache.ttl config option drives how often user information should
be synchronized with the Identity Providers.
It should be set accordingly to your organization's policies.
Other parts of the user information, such as the sub and the name also used
by QuestDB.
They could be displayed in the Web Console, or appear in the logs, for example.
Configuration options
For all OIDC-related configuration options of QuestDB, see Configuration.