Role-based Access Control (RBAC)
Describes role-based access control (RBAC), authentication and authorization in QuestDB.
This document provides the context to setup a robust Access Control List in QuestDB.
It covers:
- A conceptual overview
- Permission reference with examples
- Full list of related SQL statements
- Special cases such as within the built-in admin
Role-based Access Control (RBAC) is available in QuestDB Enterprise & QuestDB Cloud.
RBAC conceptual review
User and service accounts
QuestDB's access control system applies both user and service accounts. Users and service accounts are the entities that can be authenticated, then authorized to perform operations in the database.
Although users and service accounts look similar, they are fundamentally different:
-
A user generally belongs to an individual. Individuals are often part of a team or a department of an organization.
-
A service account generally belongs to an org. A service account is suited for an application accessing the database.
Organizational units, such as teams or departments are represented by groups. Users can be associated with multiple groups at the same time. Members of a team often require the same permissions - a group of analysts, for example. As a consequence, both users and groups can be granted permissions. Users inherit permissions from the groups with which they are associated.
Service accounts, on the other hand, do not inherit permissions from anywhere. All permissions required by the application accessing the database must be granted directly to the service account. This is because applications work with the data programmatically, so their access is usually more restrictive than the permissions of a user or a group. For example, a service account would not usually need to create and drop database tables, while users are often granted this ability.
The below diagram is an example of a QuestDB access control system. Inherited permissions are shown in grey colour:
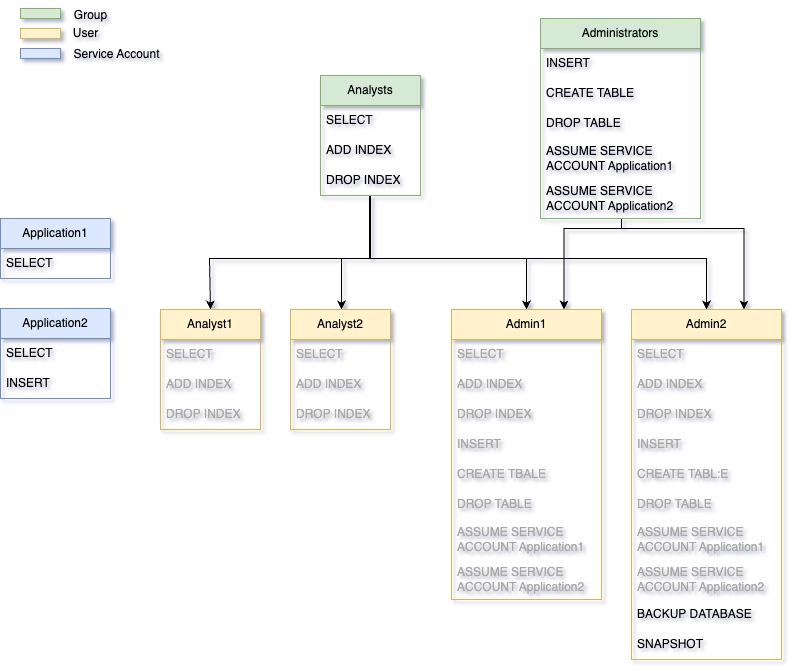
Based on the above, service accounts seem to be very isolated entities. But you
might have already noticed the appearance of the above ASSUME SERVICE ACCOUNT
permission.
Applications are usually owned by teams or a group of individuals. Hence, service accounts can be linked to a number of users and/or groups by granting them this permission. Being able to assume a service account means that a user can switch to the access list of the service account from their own account. This concept provides a great way of debugging access control related bugs in an application, and also controls who can see the permissions of a service account.
Ultimately, users are granted a set of permissions, either directly or indirectly via groups. The overall set of permissions granted to them forms their access control list. This list governs their authorization, what they can and cannot do.
The diagram below shows the authentication and authorization flow in QuestDB:
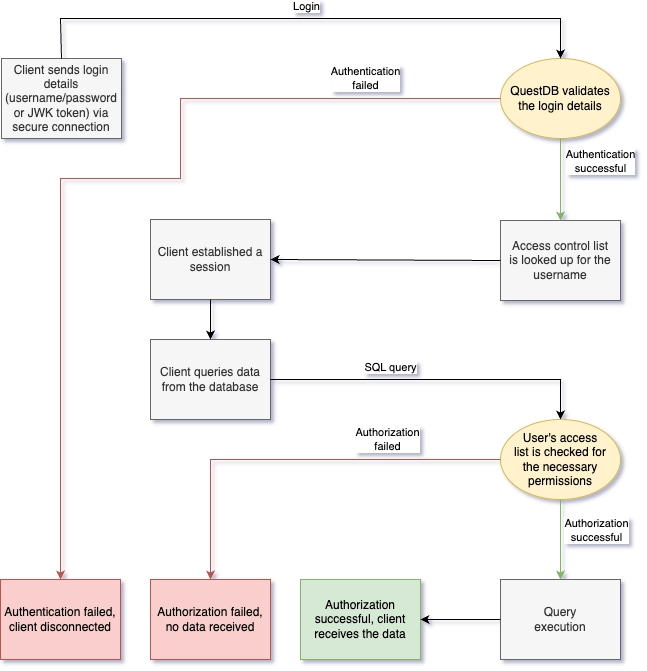
Authentication
Users must authenticate themselves before they perform any database operations. Authentication is required to determine an identity, and then subsequently to find their access control list.
Authentication must happen via a secure TLS connection, otherwise the user's secrets used for authentication will travel unencrypted.
QuestDB supports three different ways of authentication:
- Password: The user is required to provide their credentials for successful authentication. An initial password can be set when the user is created. This password should be modified by the user after their first successful login. Only a single password can be set for a user; there is no option to have multiple passwords at the same time. Password authentication is supported by the REST and the PostgreSQL Wire endpoints.
- JWK Token: The user is required to provide a JWK token. The private key of the token is tested against their public key which has been recorded previously in the database. Only a single token can be set for a user; there is no option to have multiple tokens at the same time. JWK token authentication is supported by the InfluxDB Line Protocol (ILP) endpoint.
- REST API Token: The user is required to provide a REST API token. The token is tested against other tokens that were previously generated in the database. A user may have multiple REST API tokens. REST API token authentication is supported by the REST endpoint.
Users and service accounts can have both password and token authentication enabled at the same time.
The only exception is QuestDB's built-in admin, which supports only password authentication. The built-in admin should be used to create the users and groups initially. More on the built-in admin later.
User Management
User management happens via SQL commands.
The CREATE USER / CREATE SERVICE ACCOUNT commands are used to create new
users and service accounts. These commands also provide the option to specify an
initial password, which should be changed after the first login. The name of the
principal must be unique across all users, service accounts and groups. This
is enforced by QuestDB.
CREATE USER user0;
CREATE USER user1 WITH PASSWORD pwd1;

CREATE SERVICE ACCOUNT application0;
CREATE SERVICE ACCOUNT application1 WITH PASSWORD pwd1;
The list of users can be displayed with the help of the SHOW USERS command.
SHOW USERS;

name
-----
admin
user0
user1
A similar command exists for service accounts too.
SHOW SERVICE ACCOUNTS;

name
-----
application0
application1
Principals can change their password with the help of the ALTER USER /
ALTER SERVICE ACCOUNT commands.
ALTER USER user1 WITH PASSWORD pwd2;

ALTER SERVICE ACCOUNT application1 WITH PASSWORD pwd2;
JWK tokens can be used for authentication too. The ALTER command can be used
to create a new JWK token.
ALTER USER user1 CREATE TOKEN TYPE JWK;

ALTER SERVICE ACCOUNT application1 CREATE TOKEN TYPE JWK;
The output of the command is the public and private keys of the principal. The keys should be copied and stored safely by the user. QuestDB does not store the private key. If the private key is lost, it cannot be recovered. A new token must be generated. If the above command is repeated, the token gets replaced with a new one.
As mentioned earlier, REST API tokens can be used for authentication as well.
The ALTER command can be used to create a new REST API token:
ALTER USER user1 CREATE TOKEN TYPE REST WITH TTL '30d';

ALTER SERVICE ACCOUNT application1 CREATE TOKEN TYPE REST WITH TTL '1d' REFRESH;
The output of the command is the generated token. The token should be copied and stored safely by the user. QuestDB does not store the token. If the token is lost, it cannot be recovered. A new token must be generated. If the above command is repeated, a new token gets generated, but all generated tokens will remain valid.
Check which authentication mode is enabled for a user with the SHOW USER
command:
SHOW USER user1;

auth_type   enabled
---------   -------
Password    true
JWK Token   false
REST Token  false
A similar command exists for service accounts too:
SHOW SERVICE ACCOUNT application1;

auth_type   enabled
---------   -------
Password    false
JWK Token   true
REST Token  false
Passwords and tokens also can be removed with the help of ALTER:
ALTER USER user1 WITH NO PASSWORD;
ALTER USER user1 DROP TOKEN TYPE JWK;
-- drop single REST API token
ALTER USER user1 DROP TOKEN TYPE REST 'qt1cNK6s2t79f76GmTBN9k7XTWm5wwOtF7C0UBxiHGPn44';
-- drop all REST API tokens for the given user
ALTER USER user1 DROP TOKEN TYPE REST;

ALTER SERVICE ACCOUNT application1 WITH NO PASSWORD;
ALTER SERVICE ACCOUNT application1 DROP TOKEN TYPE JWK;
ALTER SERVICE ACCOUNT application1 DROP TOKEN TYPE REST;
By removing all secrets, the user is essentially disabled. They cannot access the database anymore.
If we wanted to remove the user entirely, we can use the DROP USER /
DROP SERVICE ACCOUNT statements:
DROP USER user1;

DROP SERVICE ACCOUNT application1;
Related SQL commands:
- CREATE USER
- CREATE SERVICE ACCOUNT
- ALTER USER
- ALTER SERVICE ACCOUNT
- DROP USER
- DROP SERVICE ACCOUNT
- SHOW USERS
- SHOW SERVICE ACCOUNTS
- SHOW USER
- SHOW SERVICE ACCOUNT
Managing Groups
Groups are a great tool to reduce the burden of user management. They help group people together when many users require the same or similar permissions.
The CREATE GROUP command is used to create new groups.
CREATE GROUP group1;
CREATE GROUP group2;
To avoid confusion, the name of the group must be unique across all users, service accounts and groups.
The list of groups can be displayed with the help of the SHOW GROUPS command:
SHOW GROUPS;

name
------
group1
group2
Users can be added to or removed from groups:
ADD USER user1 TO group1;
REMOVE USER user1 FROM group2;
Users of a group inherit the permissions granted to the group.
Permissions inherited from groups cannot be revoked directly from the user.
We can check the groups of a user with the SHOW GROUPS command:
SHOW GROUPS user1;

name
------
group1
Groups can be deleted with DROP GROUP:
DROP GROUP group2;
If a group is deleted, all users of the group lose the permissions they previously inherited from the group.
Related SQL commands:
Built-in admin
A new QuestDB instance starts with a single user, which is the built-in admin. The default built-in admin settings are:
- Username:
admin - Password:
quest
It is strongly recommended that the built-in admin's password and all other default password are changed via QuestDB's server configuration before the instance is started.
Please remember to change both the admin's username and password!
The following property keys are used to configure the built-in admin in
server.conf:
# only needed if the built-in admin has been disabled previously
# the admin is enabled by default
acl.admin.user.enabled=true

# the built-in admin's user name and password
acl.admin.user=myadmin
acl.admin.password=mypwd
The built-in admin has all permissions granted by default. Its access cannot be modified. It is root.
After startup we can use the built-in admin to create new users, service accounts and groups. We can also grant permissions to them. It is recommended that the built-in admin is disabled in the configuration files after users and groups are setup.
The following property key is used to enable/disable the built-in admin in server.conf:
# disable built-in admin
acl.admin.user.enabled=false
Permissions
Permissions are the building blocks of access lists, and determine what a user can or cannot do. They can be granted to users, service accounts and groups, allowing them to access specific functionality.
First, learn to list all permissions.
Next, we'll unpack the depths of database, table & column permission levels.
List all permissions
Before, during and as a regular health-check, review all permissions.
List of all permissions, with levels they apply to, is returned by
all_permissions() function, e.g.
select * from all_permissions();
| permission | level |
|---|---|
| SELECT | Database | Table | Column |
| INSERT | Database | Table | Column |
| UPDATE | Database | Table | Column |
| ... | ... |
Not the return of the level column.
Permission levels
There are three levels of permissions:
- database - relate to global actions, e.g.
BACKUP, but also table-specific action that apply to all tables, e.g.SELECT - table - relate to table actions, e.g.
SET TABLE PARAM, and also column actions that apply to all table's columns, e.g.DROP COLUMNorSELECT - column - relate to actions on specific table's column, e.g.
DROP INDEX
Database permissions
| permission | level | description |
|---|---|---|
| ADD COLUMN | Database | Table | Allows adding new column to existing table in rest api and pg wire protocol. |
| ADD INDEX | Database | Table | Column | Allows adding an index on symbol column. |
| ALTER COLUMN CACHE | Database | Table | Column | Allows disabling or enabling caching of symbol column values via ALTER TABLE command. |
| ATTACH PARTITION | Database | Table | Allows attaching partition to existing table. |
| BACKUP DATABASE | Database | Allows creating database backup via BACKUP DATABASE command. |
| BACKUP TABLE | Database | Table | Allows creating table BACKUP TABLE command. |
| CANCEL ANY COPY | Database | Allows cancelling running COPY command via COPY importId CANCEL command. |
| CREATE TABLE | Database | Allows creating tables. |
| DEDUP ENABLE | Database | Table | Allows enabling deduplication and setting of upsert keys. |
| DEDUP DISABLE | Database | Table | Allows disabling deduplication. |
| DETACH PARTITION | Database | Table | Allows detaching partitions from tables. |
| DROP COLUMN | Database | Table | Column | Allows dropping table columns. |
| DROP INDEX | Database | Table | Column | Allows dropping symbol columns indexes via ALTER TABLE command. |
| DROP PARTITION | Database | Table | Allows dropping or squashing existing table partitions. |
| DROP TABLE | Database | Table | Allows dropping tables. |
| INSERT | Database | Table | Allows inserting data into table columns. |
| REINDEX | Database | Table | Column | Allows reindexing table's columns. |
| RENAME COLUMN | Database | Table | Column | Allows renaming columns. |
| RENAME TABLE | Database | Table | Allows renaming tables. |
| RESUME WAL | Database | Table | Allows resuming WAL processing via ALTER TABLE RESUME WAL command. |
| SELECT | Database | Table | Column | Allows selecting/reading table or column data. |
| SET TABLE PARAM | Database | Table | Allows setting table parameters via ALTER TABLE SET PARAM command. |
| SET TABLE TYPE | Database | Table | Allows changing table type via ALTER TABLE SET TYPE command. |
| SNAPSHOT | Database | Allows preparing database snapshot. |
| TRUNCATE TABLE | Database | Table | Allows truncating tables. |
| UPDATE | Database | Table | Column | Allows updating table columns. |
| VACUUM TABLE | Database | Table | Allows reclaiming storage via VACUUM TABLE command. |
User management permissions
| permission | level | description |
|---|---|---|
| ADD PASSWORD | Database | Allows setting user password in CREATE USER and ALTER USER commands. |
| ADD USER | Database | Allows adding user to group(s). |
| CREATE GROUP | Database | Allows creating groups. |
| CREATE JWK | Database | Allows creating JWK tokens via ALTER USER command. |
| CREATE REST TOKEN | Database | Allows creating REST API tokens via ALTER USER command. |
| CREATE SERVICE ACCOUNT | Database | Allows creating service accounts. |
| CREATE USER | Database | Allows creating users. |
| DISABLE USER | Database | Allows disabling users. |
| DROP GROUP | Database | Allows dropping groups. |
| DROP JWK | Database | Allows dropping JWK tokens via ALTER USER command. |
| DROP REST TOKEN | Database | Allows dropping REST API tokens via ALTER USER command. |
| DROP SERVICE ACCOUNT | Database | Allows dropping service accounts. |
| DROP USER | Database | Allows dropping users. |
| ENABLE USER | Database | Allows enabling users. |
| LIST USERS | Database | Allows listing user details in SHOWS GROUPS, SHOW SERVICE ACCOUNTS and SHOW USERS. |
| REMOVE PASSWORD | Database | Allows setting no password via WITH NO PASSWORD clause in CREATE USER and ALTER USER commands. |
| REMOVE USER | Database | Allows removing user from group(s). |
| USER DETAILS | Database | Applies to SHOW USER, SHOW SERVICE ACCOUNTS, SHOW PERMISSIONS, SHOW GROUPS commands. |
Database endpoint permissions
| permission | level | description |
|---|---|---|
| HTTP | Database | Allows access to the REST API endpoint, this includes connection from the Web Console. |
| ILP | Database | Allows access to the InfluxDB Line Protocol (ILP) endpoint. |
| PGWIRE | Database | Allows access to the Postgres Wire endpoint. |
Special permissions
| permission | level | description |
|---|---|---|
| ALL | Database | Table | Column | All permissions on all levels, it does not include permissions to assume service accounts |
Database vs. table vs. column permissions
The following will demosntrate the difference in permission levels.
GRANT SELECT, INSERT ON table1 TO group1;
GRANT CREATE USER TO user1;

SHOW PERMISSIONS user1; --user1 has been added to group1 earlier

permission	table_name	column_name	grant_option	origin
----------	----------	-----------	------------	------
CREATE USER	null		null		false			G
SELECT		table1		null		false			G
INSERT		table1		null		false			G
Users belong to group1 can insert data into table1, and can also query the
data from the table. user1 can create users in the database.
Permissions can be revoked from users and groups, which means losing their access to the given functionality:
REVOKE INSERT ON table1 FROM group1;
REVOKE CREATE USER FROM user1;

SHOW PERMISSIONS user1; --user1 has been added to group1 earlier

permission	table_name	column_name	grant_option	origin
----------	----------	-----------	------------	------
SELECT		table1		null		false			G
In this example, users who belong to group1 can no longer insert data into
table1. But they can still run queries on the data stored in the table. And
user1 can no longer create new users.
As an admin we can grant or revoke access to operations performed on database objects. By database objects we mean tables, columns, users, service accounts, groups or the database itself as a whole. Hence, permissions can be granted to users or groups on different levels.
Let's take SELECT as an example, this permission can be granted on three
different levels:
GRANT SELECT ON ALL TABLES TO user1;
GRANT SELECT ON table1 TO user1;
GRANT SELECT ON table1(col1) TO user1;
-
When granted on the database level (on all tables), the user can run queries involving any data from any table of the database
-
When granted on table level, the user can query only specific tables on which the permission has been granted to them
-
When granted on column level, the user can query only specific columns of tables. It could happen that the user can access all data in some tables, but only some columns from other tables.
Depending on related functionality, some permissions do not make sense when granted on table or column level. The granularity in which permissions can be granted is defined in QuestDB for each permission. See above for the full list.
Table level permissions can be granted only on the database or table
level. However, do note that the functionality linked to a table level
permission does not work on columns. Take DETACH PARTITION and
ATTACH PARTITION as an example. Partitions of a table can be detached and
re-attached only as a whole. It would not make sense to grant these permissions
only on specific columns of a table.
GRANT ATTACH PARTITION ON ALL TABLES TO user1;
GRANT ATTACH PARTITION ON table1 TO user1;
Other functionality is performed on the entire database, and is therefore not
applicable to specific tables or columns of a table. A good example is taking a
backup of the database, the permission BACKUP DATABASE can be granted only on
database level:
GRANT BACKUP DATABASE TO user1;
Notice the slight difference in syntax. When table or column level permissions,
such as ATTACH PARTITION or SELECT, were granted on the database level,
we used the ON ALL TABLES expression to make it obvious that the permission is
granted for the entire database. In the case of BACKUP DATABASE this is not
needed.
Functionality related to user management is always granted on the database level. However, users are always able to manage their own passwords and tokens, and view the list of permissions granted to them. Users can also view the permissions of the groups and service accounts they are associated with.
Related SQL commands:
Endpoint permissions
Endpoint permissions are granted on the database level. They are used to manage how users and service accounts connect to the database. If endpoint permissions are not granted, the user or service account cannot access the database.
The table below shows the permission required for each endpoint and protocol combination.
| Endpoint | Protocol | Transport Layer | Port (default) | Permission | |
|---|---|---|---|---|---|
| Web Console | JSON | HTTP | 9000 | HTTP | |
| REST API | JSON, TEXT | HTTP | 9000 | HTTP | |
| InfluxDB Line Protocol | ILP | TCP | 9009 | ILP | |
| Postgres Wire Protocol | PG Wire | TCP | 8812 | PGWIRE |
An example where we create a new user to access the database only via the Postgres endpoint:
CREATE USER user1 WITH PASSWORD pwd1;
GRANT PGWIRE TO user1;
Permission level re-adjustment
An interesting - and perhaps risky - property of granted high level permissions
is that they implicitly provide access to database objects created in the
future. For example, if a user has been granted SELECT permission on the
database level, the user can query all tables in the database, and also will
access any tables created in the future. Those tables will be part of the
database too!
Let's look at an example:
CREATE TABLE table1...;
CREATE TABLE table2...;
CREATE TABLE table3...;
CREATE USER user1...;
GRANT SELECT ON ALL TABLES TO user1;
CREATE TABLE table4...;

SHOW PERMISSIONS user1;

permission	table_name	column_name	grant_option	origin
----------	----------	-----------	------------	------
SELECT		null		null		false			G
user1 has access to all four tables in the database.
When you grant access at the database level, it applies to all database tables. QuestDB does not support an exclusion list, meaning you cannot grant database-level access and then exclude specific tables.
If you revoke access to any table, QuestDB automatically adjusts the permission level from the database level to the individual table level. As a result, revoking access to even a single table will not only remove access to that specific table, but also to any tables created in the future, unless access is explicitly granted for each new table.
For example:
CREATE TABLE table1...;
CREATE TABLE table2...;
CREATE TABLE table3...;
CREATE USER user1...;
GRANT SELECT ON ALL TABLES TO user1;
REVOKE SELECT ON table1 FROM user1;
CREATE TABLE table4...;

SHOW PERMISSIONS user1;

permission	table_name	column_name	grant_option	origin
----------	----------	-----------	------------	------
SELECT		table2		null		false			G
SELECT		table3		null		false			G
Now user1 has access to table2 and table3 only. The revoke statement
re-adjusted the database level permission to table level, meaning it
revoked SELECT on database level and granted it to table2 and table3
only.
If we want the user to access the newly created table4, we must grant access
explicitly:
GRANT SELECT ON table4 TO user1;
Permission re-adjustment can also happen when a permission is granted on table level, but then gets revoked on one or more columns.
An example of permission re-adjustment from table to column level:
CREATE TABLE table1 (col1 SYMBOL, col2 INT, col3 STRING);
CREATE USER user1...;
GRANT SELECT ON table1 TO user1;
REVOKE SELECT ON table1(col1) FROM user1;
ALTER TABLE table1 ADD COLUMN col4 DOUBLE;

SHOW PERMISSIONS user1;

permission	table_name	column_name	grant_option	origin
----------	----------	-----------	------------	------
SELECT		table1		col2		false			G
SELECT		table1		col3		false			G
In the above example, revoking access on col1 triggers permission
re-adjustment. Access is revoked on table level and granted to col2 and
col3 only. When col4 is added to the table, the user cannot access it.
Access has to be granted explicitly, if needed.
GRANT SELECT ON table1(col4) TO user1;
Implicit permissions
Since QuestDB is a time-series database, the designated timestamp column is treated on a special way. Some functionality, such as SAMPLE BY, LATEST ON or ASOF JOIN, require a designated timestamp. If a user can access only some columns of a table, but not the designated timestamp, then these operations would become unavailable to the user. It is something of a dependency.
As a solution, QuestDB derives permissions for the designated timestamp column
based on the access granted to other columns of the table. If a user is granted
SELECT or UPDATE permission to any of the columns of a table, the same
permission is then granted to the designated timestamp column implicitly.
Let's look at an example:
CREATE TABLE table1 (col1 SYMBOL, col2 INT, col3 TIMESTAMP) timestamp(col3);
CREATE USER user1...;
GRANT SELECT ON table1(col1) TO user1;

SHOW PERMISSIONS user1;

permission	table_name	column_name	grant_option	origin
----------	----------	-----------	------------	------
SELECT		table1		col1		false			G
SELECT		table1		ts			false			I
The overall permissions on the designated timestamp column will be the union of the permissions granted to the column explicitly and implicitly:
GRANT UPDATE ON table1(ts) TO user1;

SHOW PERMISSIONS user1;

permission	table_name	column_name	grant_option	origin
----------	----------	-----------	------------	------
SELECT		table1		col1		false			G
UPDATE		table1		ts			false			G
SELECT		table1		ts			false			I
Implicit permissions cannot be revoked directly from the designated timestamp column:
REVOKE SELECT, UPDATE ON table1(ts) FROM user1;

SHOW PERMISSIONS user1;

permission	table_name	column_name	grant_option	origin
----------	----------	-----------	------------	------
SELECT		table1		col1		false			G
SELECT		table1		ts			false			I
Grant verification
It is possible to grant permission to non-existent users, service accounts or groups. These permissions will get picked up when the entity eventually gets created.
For example:
CREATE TABLE table1 (col1 SYMBOL, col2 INT);
GRANT SELECT ON table1 TO user1;
CREATE USER user1...;

SHOW PERMISSIONS user1;

permission	table_name	column_name	grant_option	origin
----------	----------	-----------	------------	------
SELECT		table1		null		false			G
Flexibility is great, but can lead to issues when a typo in the name of the entity occurs.
If we want to avoid problems caused by typos, we can use the WITH VERIFICATION
option:
CREATE TABLE table1 (col1 SYMBOL, col2 INT);
GRANT SELECT ON table1 TO user1 WITH VERIFICATION;
The above will fail, because QuestDB will not find the user. This is especially useful for scripts.
If a user, service account or group is deleted and later re-created, permissions do not get reinstated.
Non-existent database objects
Permissions can be granted not only to non-existent users and groups, but also on non-existent tables and columns.
This is useful in some situations. For example, when it is expected that the table or the column will be created automatically via InfluxDB Line Protocol (ILP):
GRANT SELECT ON table1 TO user1;
CREATE USER user1...;

SHOW PERMISSIONS user1;

permission	table_name	column_name	grant_option	origin
----------	----------	-----------	------------	------
Permission is picked up after the table is created.
CREATE TABLE table1 (col1 SYMBOL, col2 INT);

SHOW PERMISSIONS user1;

permission	table_name	column_name	grant_option	origin
----------	----------	-----------	------------	------
SELECT		table1		null		false			G
When the table is deleted permissions disappear.
DROP TABLE table1;

SHOW PERMISSIONS user1;

permission	table_name	column_name	grant_option	origin
----------	----------	-----------	------------	------
However, if a table with the same name is re-created, the permissions are re-instated:
CREATE TABLE table1 (col1 SYMBOL, col2 INT);

SHOW PERMISSIONS user1;

permission	table_name	column_name	grant_option	origin
----------	----------	-----------	------------	------
SELECT		table1		null		false			G
This can be useful in situations when a table is deleted only temporarily.
For example, when you need to remove some data from a table, and the data to be
deleted is not aligned to partitions, so DROP PARTITION is not an option:
CREATE USER user1...;
CREATE TABLE table1 (col1 SYMBOL, col2 INT);
GRANT SELECT ON table1 TO user1;

CREATE TABLE tmp AS (SELECT * FROM table1 WHERE col2 != 42);
DROP TABLE table1;
RENAME TABLE tmp TO table1;

SHOW PERMISSIONS user1;

permission	table_name	column_name	grant_option	origin
----------	----------	-----------	------------	------
SELECT		table1		null		false			G
Reinstating permissions on the re-created table is not always desirable. If we want a clean start, we can delete the old table along with the permissions assigned to it.
This can be done by using the CASCADE PERMISSIONS option:
CREATE USER user1...;
CREATE TABLE table1(col1 SYMBOL, col2 INT);
GRANT SELECT ON table1 TO user1;

CREATE TABLE tmp AS (SELECT * FROM table1 WHERE col2 != 42);
DROP TABLE table1 CASCADE PERMISSIONS;
RENAME TABLE tmp TO table1;

SHOW PERMISSIONS user1;

permission	table_name	column_name	grant_option	origin
----------	----------	-----------	------------	------
CASCADE PERMISSIONS is not implemented yet, but will be available soon!
The same is true for columns.
When a column is deleted and then re-created, permissions are re-instated.
Owner grants
When a user creates a new table or adds a new column to an existing table, it gets owner permissions on the newly created database object.
If the user creates a table, the user automatically gets all table level
permissions with the GRANT option on it.
If the user adds a new column to an existing table, the user automatically gets
all column level permissions with the GRANT option on it.
In QuestDB ownership does not persist. This means that the user gets full control over the newly created table or column at the time of creating it, but if the permissions are later revoked, then the user cannot get it back without someone re-granting it to them.
Full SQL grammar list
Managing or verifying what users have access to is possible with the following SQL commands:
- ADD USER - add user to one or more groups
- ALTER USER - modifies user settings
- ALTER SERVICE ACCOUNT - modifies service account settings
- ASSUME SERVICE ACCOUNT - switches current user to a service account
- CREATE GROUP - creates user group
- CREATE SERVICE ACCOUNT - creates service account
- CREATE USER - creates user
- DROP GROUP - drops user group
- DROP SERVICE ACCOUNT - drops an existing service account
- DROP USER - drops an existing user
- EXIT SERVICE ACCOUNT - switches current user back from service account
- GRANT - grants permission to user, service account or group
- GRANT ASSUME SERVICE ACCOUNT - grants a service account to a user or a group
- REMOVE USER - removes user from one or more groups
- REVOKE - revokes permission from user, service account or group
- REVOKE ASSUME SERVICE ACCOUNT - revokes a service account from a user or a group
- SHOW USER - shows enabled authentication methods of a user
- SHOW USERS - shows all users
- SHOW GROUPS - displays all groups or those the user is part of
- SHOW SERVICE ACCOUNT - shows enabled authentication methods of a user
- SHOW SERVICE ACCOUNTS - displays all service accounts or those assigned to the user/group
- SHOW PERMISSIONS - displays permissions of a user, service account or group
List of all permissions is available at permissions summary .
SHOW commands
There are a number of access control related SHOW commands in QuestDB.
We can list all users, service accounts and groups, which groups are associated with a user, which service accounts a user or the members of a group can assume; we can list their permissions and also view which authentication mode is enabled for users and service accounts.
However, this functionality is only available to the user if the necessary
permissions are granted to them. When trying to list all users, service accounts
or groups, QuestDB checks for the LIST USERS permission. When trying to view
the groups, service accounts, permissions or authentication modes of an entity,
QuestDB checks for the USER DETAILS permission.
The only exception is when the user is querying information related to themselves or to the groups/service accounts with which they are associated. In this case no permission is required. Anyone is allowed to check their own groups, service accounts, permissions, and the list of authentication methods enabled for them.
Built-in admin
The following considerations are important when leveraging the built-in admin.
Special treatment of built-in admin
The built-in admin is special because it is pre-configured in the system, and has all permissions granted on the database level, meaning it can do anything. It is root.
The access list of the built-in admin is hardcoded in the system, and cannot
be changed. Any attempt to issue a GRANT or REVOKE statement involving the
built-in admin is rejected by the database.
The SHOW PERMISSIONS command also treats the built-in admin differently. When trying to list the permissions of the built-in admin, nothing will be displayed.